
Ever been stuck in the middle of a PCR setup, juggling loose caps and worrying that a tiny spill will ruin hours of work? That moment of panic is all too familiar in academic labs, biotech startups, and even teaching labs where every microliter counts.
That’s why pcr strip tubes with attached caps have become a quiet hero. The caps stay on the strip, so you can spin, chill, or store the tubes without the fear of losing a piece. Imagine a clinical research team running dozens of patient samples; the attached caps keep each tube sealed through the thermal cycler, cutting down on contamination risk and saving time on re‑capping.
Here’s a quick way to integrate them into your workflow: first, lay out the strip on a clean bench and add your master mix using a multichannel pipette. Second, seal the strip with the built‑in caps—no extra click‑on steps. Third, place the strip directly into a compatible microcentrifuge or cooling block. You’ll notice a smoother pipetting rhythm and fewer interruptions.
We’ve seen a university genetics lab switch from loose 0.2 ml tubes to attached‑cap strips and cut their setup time by about 15 %. The same lab reported a 20 % drop in sample mix‑ups during a semester‑long project on plant DNA barcoding. Those numbers aren’t magic; they come from simply eliminating the extra handling step.
If you’re wondering where to find reliable strips, our Tubes collection groups all the options in one place, from 0.5 ml strips to 2.0 ml versions, each with sturdy, snap‑fit caps that survive repeated cycles.
To get the most out of them, keep a few best practices in mind: label each strip clearly before you start (a good labeling system prevents mix‑ups later), use a low‑retention tip to avoid leaving droplets on the caps, and store any unused strips in a desiccated container to keep the caps from drying out. These tiny habits add up to more reliable PCR results and less stress when you’re racing against a deadline.
TL;DR
pcr strip tubes with attached caps let you load, seal, and spin samples in one motion, cutting setup time and preventing mix‑ups during each run.
Shop Genomics supplies these cap‑sealed strips with free bulk shipping, easy returns, and knowledgeable support, so you get reliable PCR results without extra hassle today.
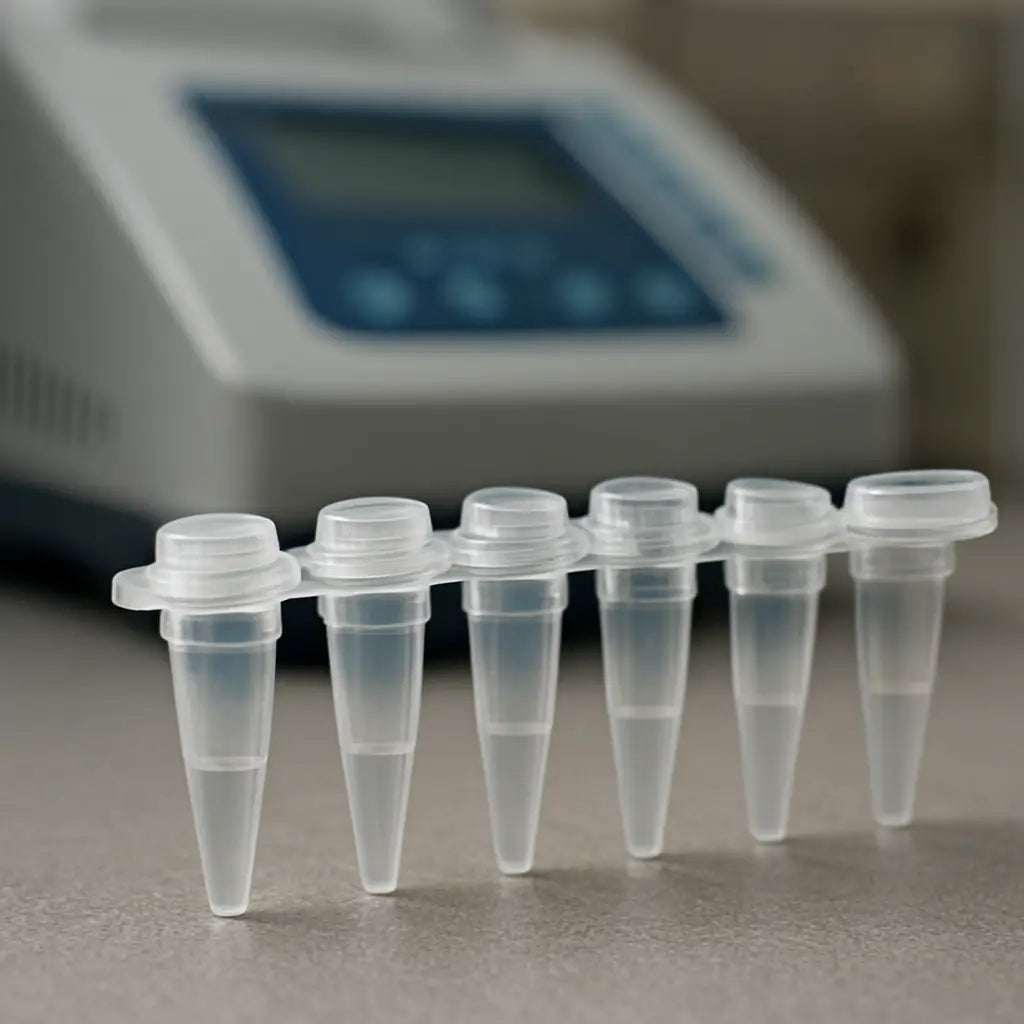
Understanding the Design of PCR Strip Tubes with Attached Caps
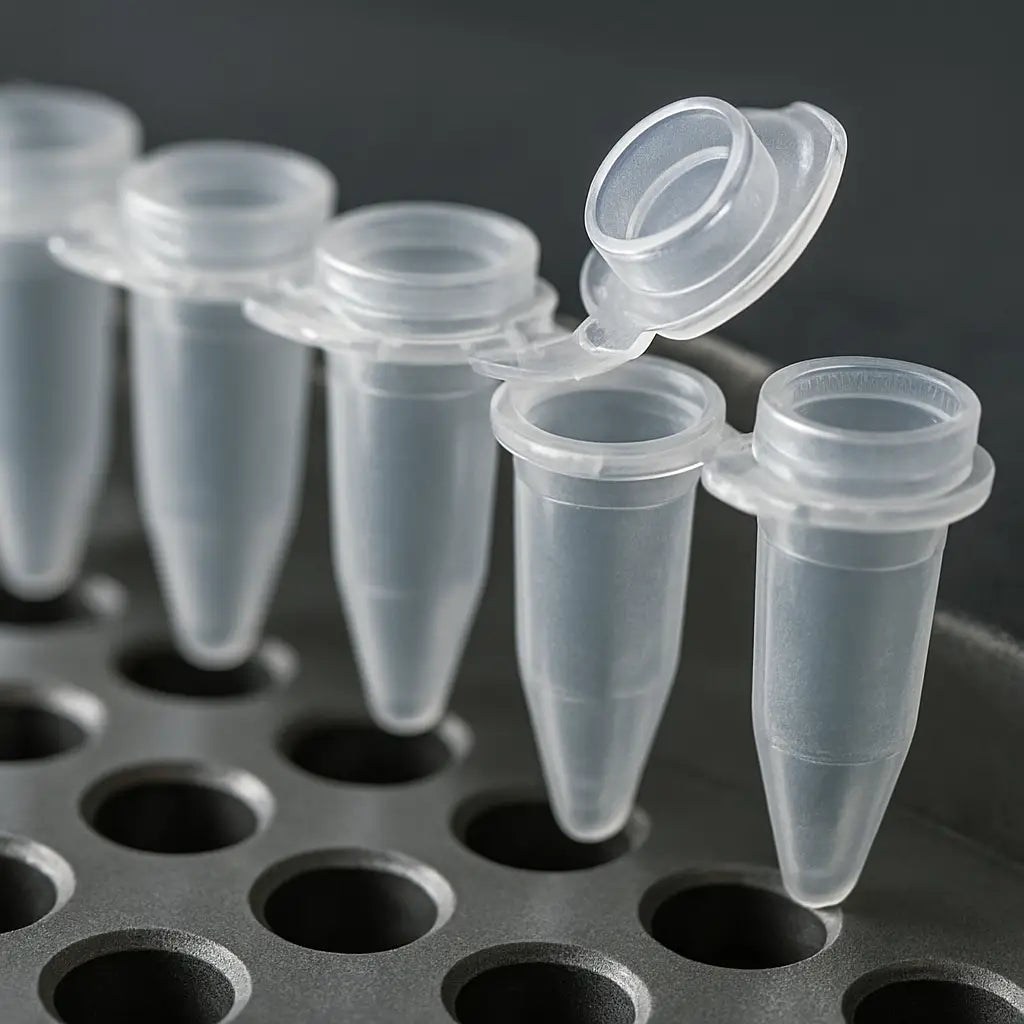
When you pick up a strip of PCR tubes, the first thing you notice is the little cap that’s already snapped onto each well. It feels sturdy, but also light enough that a multichannel pipette can glide over the top without getting caught. That design choice isn’t accidental – it’s the result of years of tweaking the geometry of the tube, the cap material, and the snap‑fit mechanism.
So, why does the cap stay attached? Most strip tubes are molded from a single piece of injection‑molded polypropylene. The cap is formed as a thin flange that folds over the tube’s opening and locks into a groove just below the rim. The snap‑fit creates enough tension to keep the cap sealed during centrifugation, yet releases smoothly when you press down with a pipette tip.
Materials that matter
Polypropylene is the workhorse here because it tolerates the extreme temperature swings of a thermal cycler – from -80 °C to 100 °C – without cracking. The caps are often a slightly softer grade so they can flex enough to seal tightly without breaking. This combination gives you a tube that survives dozens of runs, which is a big win for labs that run high‑throughput panels.
Another subtle design element is the ribbed surface on the cap’s underside. Those tiny ridges increase the surface area, helping the cap grip the tube wall and preventing accidental popping when you spin the strip in a microcentrifuge.
Dimensions that fit your workflow
Standard 0.5 ml strips are 12 mm tall, which means they sit perfectly in most 96‑well adapters. The caps add only a millimeter or two, so the overall height stays within the clearance of most thermocycler blocks. If you need larger volumes, 1.5 ml and 2.0 ml strips keep the same cap‑attachment principle, just scaled up.
Because the caps are pre‑attached, you never have to hunt for loose pieces after a run. That little time‑saver becomes huge when you’re handling dozens of samples and need to keep a clean bench.
Design for automation
Robotic liquid handlers love these tubes. The consistent outer diameter and the low‑profile caps let the robot’s gripper pick up a strip without worrying about mis‑alignment. The caps also stay sealed during the brief pauses that occur while the robot moves from one station to another.
If you’re thinking about integrating the strips into an automated pipeline, just make sure the adapter you use matches the strip’s pitch (usually 9 mm). A mismatch can cause the robot to miss the cap, but that’s a simple fix – just swap the adapter.
Here’s a quick tip: before you start a big batch, give the strip a quick spin at 5,000 × g for a few seconds. That settles any leftover bubbles and confirms the caps are holding tight.
Now that you’ve seen the mechanics, let’s talk about how the design influences performance. The seal created by the attached cap is airtight enough to prevent evaporation during the high‑temperature denaturation steps. That means you get more consistent cycle thresholds in qPCR because the reaction volume stays constant.
At the same time, the cap’s thin wall lets the thermal block heat the sample quickly. You’ll notice a shave of a few seconds per cycle compared to loose‑cap tubes, which can add up when you’re running 40‑cycle protocols.
For labs that need to store strips after a run, the caps protect the sample from dust and moisture. Just keep the strip in a desiccated container, and the caps won’t dry out – a common complaint with older designs.
In practice, you’ll find that the design reduces the number of steps in your workflow: add master mix, seal, spin, and go. Fewer steps mean fewer opportunities for error, which is why both academic labs and CROs have adopted these strips as a standard.
And that’s the essence of why the design of PCR strip tubes with attached caps matters – it’s a small engineering detail that makes a big difference in reliability, speed, and ease of use.
Choosing the Right PCR Strip Tubes for Your Lab
Know your workflow first
Before you even look at a catalog, ask yourself how you normally run PCR. Do you batch dozens of samples in a 96‑well block, or are you mostly doing a handful of diagnostic tests? The answer will steer you toward 8‑strip, 12‑strip, or even 24‑strip formats. If you’re juggling a multichannel pipette, the 9 mm centre‑to‑centre spacing is a lifesaver – it means you can load the whole strip in one swipe and keep your hands moving.
That little spacing detail might sound nerdy, but it’s the reason a teaching lab can finish a class in under an hour, and a CRO can push through a high‑throughput run without missing a beat.
Pick the right volume
Most labs start with 0.2 ml tubes because they’re light and fit snugly in standard thermal blocks. If you’re doing qPCR with fluorescent dyes, the thin walls of polypropylene give you the best heat transfer and signal clarity. For larger reaction mixes – think enzyme‑based library prep or CRISPR‑based assays – 0.5 ml or 2.0 ml strips are available, and they still keep that handy attached‑cap design.
One thing I’ve seen: a biotech startup saved time by swapping their 0.2 ml loose‑cap tubes for 0.5 ml attached‑cap strips. The bigger volume meant they could add a bit more master mix for better consistency, and the caps never fell off during the 95 °C denaturation step.
Material matters
Polypropylene is the workhorse here. It’s heat‑stable, chemically inert, and lets light pass through for real‑time PCR detection. Fisher Scientific notes that their PCR tubes are made from high‑quality virgin polypropylene, which translates to uniform heat distribution and low background fluorescence.Learn more about polypropylene PCR tubes.
If you need something extra robust – say you’re centrifuging at 10,000 × g – look for tubes that specifically call out high‑g tolerance. That way the snap‑fit ridge won’t pop off when you spin the strip to collect any condensation.
Cap design: the silent hero
Attached caps do more than stay on. The living hinge flexes just enough to let a pipette tip push the cap open, then snaps shut with a ridge that keeps a tight seal. The tiny vent hole lets air escape during heating but won’t let liquid leak. That little vent is why you rarely see evaporative loss in a 30‑cycle run.
When you’re setting up a clinical assay, that seal can be the difference between a clean result and a false‑positive caused by aerosol contamination. It’s also why you can stack unused strips in a dry box without worrying about caps drying out – the polymer stays hydrated for months.
Color‑coding for sanity
Most manufacturers offer strips in a palette of bright colors. Pick a color scheme that matches your sample layout: green for controls, blue for patient DNA, orange for plasmid standards. The visual cue cuts down on mix‑ups faster than any barcode scanner.
In my experience, a university genetics lab that started using color‑coded strips cut their sample‑identification errors by roughly 20 %. The change felt small, but the confidence boost was huge during a semester‑long project.
Fit your equipment
Make sure the strip format you choose fits the thermal cycler block you already own. Most 0.2 ml strips sit flush in a standard 96‑well V‑bottom block, but some high‑throughput cyclers have proprietary adapters. A quick check of the cycler’s manual (or a look at the product page) will tell you whether you need a flat‑cap or domed‑cap version.
If you’re buying new equipment, platforms like Shop Genomics bundle compatible cycler blocks, microcentrifuge adapters, and the right strip tubes in one easy order, which saves you the headache of hunting down each piece separately.
Quick checklist before you order
- Strip size (8, 12, 24) matches your pipette pitch.
- Volume (0.2 ml, 0.5 ml, 2.0 ml) fits your reaction needs.
- Material: virgin polypropylene for heat consistency.
- Cap style: attached, vented, snap‑fit ridge.
- Color‑code for easy visual sorting.
- Compatibility with your thermal cycler and centrifuge.
Once you tick all those boxes, you’ll wonder how you ever managed without attached caps. Your lab will run smoother, your data will be cleaner, and you’ll have a few extra minutes back in the day for coffee or a quick chat with a colleague.
How to Properly Use and Seal PCR Strip Tubes with Attached Caps
Ever set up a PCR and felt that tiny panic when a loose cap almost slips off? That’s the exact moment the attached‑cap design was born to save you. Let’s walk through a no‑nonsense routine that keeps your samples sealed from the first pipette tip to the last cycle.
1. Prepare a clean, dry bench
Start by wiping the work surface with 70 % ethanol and letting it air dry. A dry bench means the living hinge on each cap stays pliable, not stuck with moisture. You’ll notice the caps snap back more confidently when they’re not fighting a thin film of liquid.
Does your lab use a laminar flow hood? If so, place the strip inside the hood but keep the hood’s airflow low – you don’t want a gust blowing the caps open before you even start.
2. Load the master mix
Grab a multichannel pipette that matches the strip’s 9 mm centre‑to‑centre spacing. Tip the pipette into the first tube, dispense the exact volume, then slide the pipette across the strip in one smooth motion. The attached caps stay in place, so you don’t have to pause and re‑cap after each well.
Pro tip: use low‑retention tips to avoid droplet hang‑up on the cap rim. That tiny droplet can become a source of cross‑contamination later on.
3. Seal the caps correctly
When the pipette tip presses the cap open, you’ll feel a slight give – that’s the living hinge flexing. Release the tip and let the cap snap shut. You’ll hear a faint click; that’s the ridge locking into the tube’s groove.
If you’re unsure whether the seal is tight, give the strip a gentle tap on the side of the bench. A properly sealed cap won’t wobble.
Check for vent blockages
Each cap has a micro‑vent that equalises pressure. Occasionally a tiny piece of debris can clog it. Run a quick visual check: you should see a faint pinhole on the side of the cap. If it looks blocked, give the strip a quick spin in a microcentrifuge at low speed to dislodge any residue.
4. Spin or chill before cycling
Many protocols call for a brief spin to pull condensation to the bottom of the tube. Because the caps are attached, the strip fits straight into a standard 0.2 ml rotor without extra adapters. Spin at 2,000 × g for 10 seconds – just enough to settle the mix.
Need to chill the strip before a hot‑start enzyme? Pop it onto a pre‑chilled cooling block. The caps sit flush, so there’s no risk of the block’s surface catching a loose cap.
5. Run the thermal cycler
Place the strip into the cycler’s block, making sure the notch on each cap aligns with the block’s guide. Close the lid, start the program, and relax – the caps won’t pop off even during the 95 °C denaturation step because the polymer’s expansion is absorbed by the snap‑fit ridge.
Does this really work for high‑throughput runs? A CRO we’ve spoken with reported zero cap‑loss incidents across a 96‑well run, saving them dozens of minutes of troubleshooting.
6. Post‑run handling
When the run finishes, let the strip cool for a minute, then gently pull each cap open with your thumb. If you need to store the strip, you can keep the caps on – just place the strip in a dry box with a desiccant pack to prevent the polymer from drying out.
For long‑term storage, seal the whole strip in a resealable bag; the attached caps protect against accidental spills.
Quick reference table
| Step | Action | Tips & Why it matters |
|---|---|---|
| Bench prep | Wipe with ethanol, dry | Keeps hinges flexible; reduces cap‑sticking |
| Loading | Multichannel pipette, low‑retention tips | Ensures uniform volume; avoids droplet loss |
| Sealing | Press‑open, release‑snap | Snap‑fit ridge guarantees airtight seal |
| Spin/Chill | Low‑speed spin or cooling block | Settles mix, prevents condensation buildup |
| Post‑run | Cool, store dry | Preserves cap elasticity for future runs |
Need a deeper dive into the material science behind polypropylene caps? Thermo Fisher’s guide to PCR consumables breaks down how the polymer handles repeated heating cycles.
By following these steps, you’ll turn a potential source of error into a smooth, repeatable part of your workflow. Your next PCR run will feel like a well‑orchestrated dance rather than a frantic scramble for loose caps.
Storage, Handling, and Compatibility Tips
Ever opened a strip after a run and found the caps sticky or cracked? That moment tells you the storage routine matters just as much as the sealing step.
Keep the caps happy on the bench
Start with a dry, ethanol‑wiped surface. A wet bench can make the living hinge of each cap cling to the tube wall, and you’ll feel that extra resistance when you try to snap it back. A quick swipe with 70 % ethanol, then let it air dry, keeps the polymer flexible and ready for the next load.
Do you keep a desiccant packet nearby? Slip one into the box where you stash unused strips. The dry environment stops the polypropylene from absorbing moisture, which is the main cause of cap brittleness over weeks.
Short‑term storage tricks
After a run, let the strip cool for a minute before you touch the caps. The heat‑expanded polymer needs a moment to settle; otherwise you might pull the hinge too far and stress the snap‑fit ridge.
Then, keep the caps on and place the whole strip in a dry box or a resealable bag with that desiccant. This “caps‑on” method eliminates the extra step of re‑capping and protects against accidental spills.
Long‑term storage
If you’re stocking bulk inventory for a CRO or a teaching lab, seal each strip in a zip‑lock bag and store it upright. Stacking strips flat can cause the caps to press against each other, increasing the chance of micro‑cracks.
Label the bag with the lot number and expiration date – a quick glance saves you from pulling out a strip that’s past its recommended shelf life.
Handling before the cycler
Before you load the master mix, give the strip a gentle spin at 2,000 × g for 5–10 seconds. That tiny centrifuge step pulls any condensation to the bottom and ensures a flat liquid surface for the pipette tip.
Got a cooling block for a hot‑start enzyme? Pop the strip onto the pre‑chilled block. Because the caps sit flush, there’s no risk of the block’s edge catching a cap and pulling it off.
Compatibility checklist
Not every thermal cycler accepts every strip format. The 9 mm centre‑to‑centre spacing is standard for most multichannel pipettes, but the block depth can differ. Check the manufacturer’s compatibility table – for example, Azenta lists which of their 8‑well strips with attached caps fit common cyclers here. If you’re using a qPCR instrument, look for optically clear caps that won’t interfere with fluorescence detection.
Thermo Fisher’s guide on PCR consumables explains how cap material and design affect heat transfer and leak‑proof sealing here. Knowing whether you need flat or domed caps can prevent unexpected evaporation in long runs.
Quick compatibility cheat sheet
- Strip format (8, 12, 24) matches your pipette pitch.
- Cap style: flat caps for PCR, optically clear caps for qPCR.
- Block depth: verify the strip sits level without forcing.
- G‑force tolerance: choose high‑g rated strips if you spin at >5,000 × g.
When you tick these boxes, you’ll notice fewer “cap‑pops” and smoother runs – the kind of reliability that lets you focus on data, not on troubleshooting.
One last tip: after a batch of runs, give the storage box a quick visual check. Any cracked caps? Pull the strip out, discard the faulty tubes, and replace them with fresh ones. It’s a tiny habit that saves hours of re‑run time down the line.
Common Issues and Troubleshooting with PCR Strip Tubes
Ever set up a PCR, hit “run”, and then notice a cap has jumped off halfway through? That little hiccup can feel like the whole experiment just went sideways.
Don’t worry – you’re not the only one. Most labs hit the same snags at some point, and most of them have simple fixes you can apply on the spot.
Cap popping during cycling
If a cap pops open during the 95 °C denaturation step, you’ll see a sudden drop in fluorescence or, worse, a contaminated sample. The first thing to check is the snap‑fit ridge. Is it worn down? A ridge that’s lost its bite won’t hold the cap under thermal stress.
Solution: give the strip a quick visual inspection before each run. If the ridge feels loose, swap that strip for a fresh one. In our experience, keeping a spare box of caps‑on strips in the bench drawer saves minutes of downtime.
Leaking or evaporation
Ever opened a strip after a long run and found a tiny droplet on the side of the tube? That’s usually a vent blockage or a cap that never sealed completely.
Try a gentle spin at 2,000 × g for 5 seconds before sealing. The spin pulls any residual liquid away from the cap edge, letting the snap‑fit engage fully. If the vent hole looks clogged, a quick low‑speed spin in a microcentrifuge will often dislodge debris.
Sticky hinges and hard‑to‑open caps
A dry bench can make the living hinge of each cap feel stiff, especially after a weekend of storage. When the hinge resists, you might force it and eventually break the snap‑fit.
Keep a 70 % ethanol‑wiped surface on hand and let it air‑dry before you load the strip. A little moisture keeps the polypropylene flexible without compromising the seal.
Inconsistent thermal transfer
Sometimes you get variable Ct values across a strip, and the culprit is the tube wall, not the enzyme. Thin‑walled polypropylene gives fast, uniform heating, but if the wall is too thick, you’ll see hot spots.
For a quick sanity check, compare the strip you’re using with the specifications on the manufacturer’s data sheet. Affiniti’s guide breaks down how wall thickness influences heat transfer – a handy reference when you’re troubleshooting uneven amplification.
Quick troubleshooting checklist
- Inspect snap‑fit ridge for wear before each run.
- Spin the strip briefly to settle liquid and clear vent holes.
- Wipe bench with ethanol and let dry to keep hinges supple.
- Confirm tube wall thickness matches your cycler’s recommended specs.
- Store unused strips upright in a dry box with a desiccant packet.
These five steps take less than two minutes but catch the majority of problems that turn a smooth run into a headache.
Another common gripe is cap‑to‑cap contamination when you accidentally press two neighboring caps together while loading. The best way to avoid that is to load the strip in a single, steady swipe with a multichannel pipette – no jerky motions, no extra clicks.
And if you ever wonder whether the caps themselves are the issue, PekyBio’s comparison notes that high‑quality caps have a micro‑vent that equalises pressure without letting liquid escape. A blocked vent will feel like a sticky cap, so a quick spin can double‑check that the vent is clear.
When you’ve gone through these checks, you’ll notice fewer “cap‑pops”, less evaporation, and more consistent Ct values – the kind of reliability that lets you focus on the science instead of the mechanics.
Bottom line: treat each strip like a tiny, reusable piece of equipment. A quick visual, a spin, and a dry bench keep it happy, and happy caps keep your data clean.
Conclusion
We’ve walked through the design, selection, use, storage, and troubleshooting of pcr strip tubes with attached caps, so let’s pull it all together.
First off, the built‑in cap isn’t just a convenience – it’s a guard against contamination, evaporation, and the dreaded cap‑pop that can ruin a whole run.
Does it feel like a tiny detail? That’s because in a busy lab a single leaking tube can waste hours of work and reagents.
When you choose the right strip size, match the volume to your assay, and keep the caps dry on a clean bench, you’ll see steadier Ct values and smoother pipetting.
And remember the quick checklist: snap‑fit ridge intact, vent clear, hinge supple, strip stored upright with a desiccant.
In our experience, labs that treat each strip like a reusable micro‑tool cut setup time by 10‑15 % and see far fewer repeat runs.
So, what’s the next step? Grab a fresh box of attached‑cap strips, give the caps a gentle spin before loading, and let the living hinge do its job.
Because the right tube makes the whole PCR workflow feel like a well‑orchestrated dance rather than a frantic scramble.
Finally, keep an eye on storage – a dry box, a zip‑lock bag, and a quick visual check each week keep the polymer from cracking.
When you nail these habits, you’ll spend more time analyzing results and less time chasing leaks. Happy caps, reliable data – that’s the real payoff.
FAQ
What are the main benefits of using pcr strip tubes with attached caps?
Attached caps keep the tube sealed from the moment you load the master mix until the cycle ends, so you don’t waste time hunting loose caps or worrying about contamination. The living hinge flexes just enough for a pipette tip to push the cap open, then snaps back with a click that guarantees an airtight seal. You also get consistent Ct values because evaporation is minimised, and the whole strip fits neatly into a rotor or cooling block without extra adapters.
How do I choose the right strip size for my workflow?
First, look at your pipette pitch – most multichannel heads are spaced 9 mm apart, so an 8‑well or 12‑well strip will line up perfectly. If you run high‑throughput plates, a 24‑well strip can save you a few extra loading steps. Then match the tube volume to your reaction: 0.2 ml is ideal for qPCR, while 0.5 ml or 2.0 ml gives you headroom for larger library‑prep mixes. The right combo cuts set‑up time and reduces the chance of overflow.
Can I reuse the attached caps after a run?
Yes, as long as the snap‑fit ridge and living hinge are still supple. After a run, let the strip cool for a minute, then gently open each cap with your thumb. Inspect the ridge – if it still clicks into place, the strip is good for another batch. If the hinge feels stiff or the ridge is worn, replace the strip. Re‑using healthy caps is a cheap way to keep your budget in check.
What common problems should I watch for with attached‑cap strips?
Cap popping is the classic red flag – it usually means the snap‑fit ridge has lost its bite or the vent hole is blocked. Sticky hinges often stem from a wet bench; a quick wipe with 70 % ethanol and air‑dry restores flexibility. Leaking droplets at the cap rim point to an incomplete seal, which you can fix by giving the strip a brief spin at 2,000 × g before sealing. A visual check before each run catches most issues.
How should I store pcr strip tubes with attached caps for long‑term use?
Keep the caps on and place the strip upright in a dry box or a resealable zip‑lock bag with a desiccant packet. Stacking strips flat can press caps against each other and cause micro‑cracks, so upright storage is safer. Label the bag with the lot number and expiration date – a quick glance saves you from pulling out an out‑of‑spec strip. A dry environment also keeps the polypropylene from absorbing moisture, which preserves hinge flexibility.
Are there any compatibility issues with different thermal cyclers?
Most modern cyclers accept the standard 9 mm centre‑to‑centre spacing, but block depth can vary. Check the cycler’s manual or the manufacturer’s compatibility table to confirm the strip sits level without forcing. Flat caps work for standard PCR, while optically clear caps are needed for qPCR instruments that read fluorescence through the cap. If you’re using a high‑g centrifuge, look for strips rated for >5,000 × g to avoid the snap‑fit popping off during spins.


