
Imagine the quiet hum of a lab, the faint glow of a gel ready to reveal a secret. That glow is no longer a relic of UV lamps that flickered and made your eyes burn; it’s the gentle, safer blue light that brings clarity without the harshness. We’re talking about the SmartBlue™ Blue Light Transilluminator, a tool that’s become a staple in everything from university classrooms to clinical research stations.
Think about the last time you loaded a gel and spent minutes squinting in dim light to see the bands. With blue light, the contrast is instant, and you can even capture a photo for the lab notebook in seconds. It’s a tiny change that saves you a lot of time—time you can redirect toward designing the next experiment.
What’s the science behind it? Blue light, around 450 nm, hits fluorescent dyes in the gel and excites them without the damaging UV spectrum. The result? Cleaner images and safer handling for everyone in the room. That’s why researchers in agricultural labs, biotech startups, and even high school biology classes are swapping the old UV rigs for blue.
Here’s a quick cheat sheet for getting the most out of your transilluminator:
- Use a gel that’s stained with a dye compatible with blue light—Coomassie or SYBR‑Gold are popular choices.
- Keep the exposure time short; most bands pop up within 10‑15 seconds.
- Record the gel with a camera that can capture blue wavelengths; many labs pair the SmartBlue with a simple smartphone adapter.
Not only does blue light improve safety, it also extends the lifespan of your equipment. UV lamps often require replacement every few years; blue LEDs last over 50000 hours, cutting maintenance costs and downtime.
And here’s the part that might surprise you: managing the flow of instruments in a busy lab can be as tricky as handling the instruments themselves. That’s why tools like ClientBase help labs track usage logs, order history, and compliance documentation all in one place.
So whether you’re a seasoned researcher or a student just starting out, a blue light transilluminator isn’t just a fancy gadget—it’s a practical upgrade that makes your workflow smoother, safer, and more reliable. Ready to switch? The next step is simple: check out the SmartBlue model and see how it fits into your lab’s routine.
TL;DR
Switching to a blue light transilluminator means safer, brighter gel imaging that protects your eyes, saves you time, and cuts maintenance costs with LEDs lasting over 50,000 hours instead of the short‑lived UV lamps everyone used to rely on. At Shop Genomics, we’ve seen researchers, educators, and clinical teams streamline their workflows with our affordable models, proving that a simple upgrade can boost productivity, lower lab expenses, and keep safety standards high across institutions of every size.
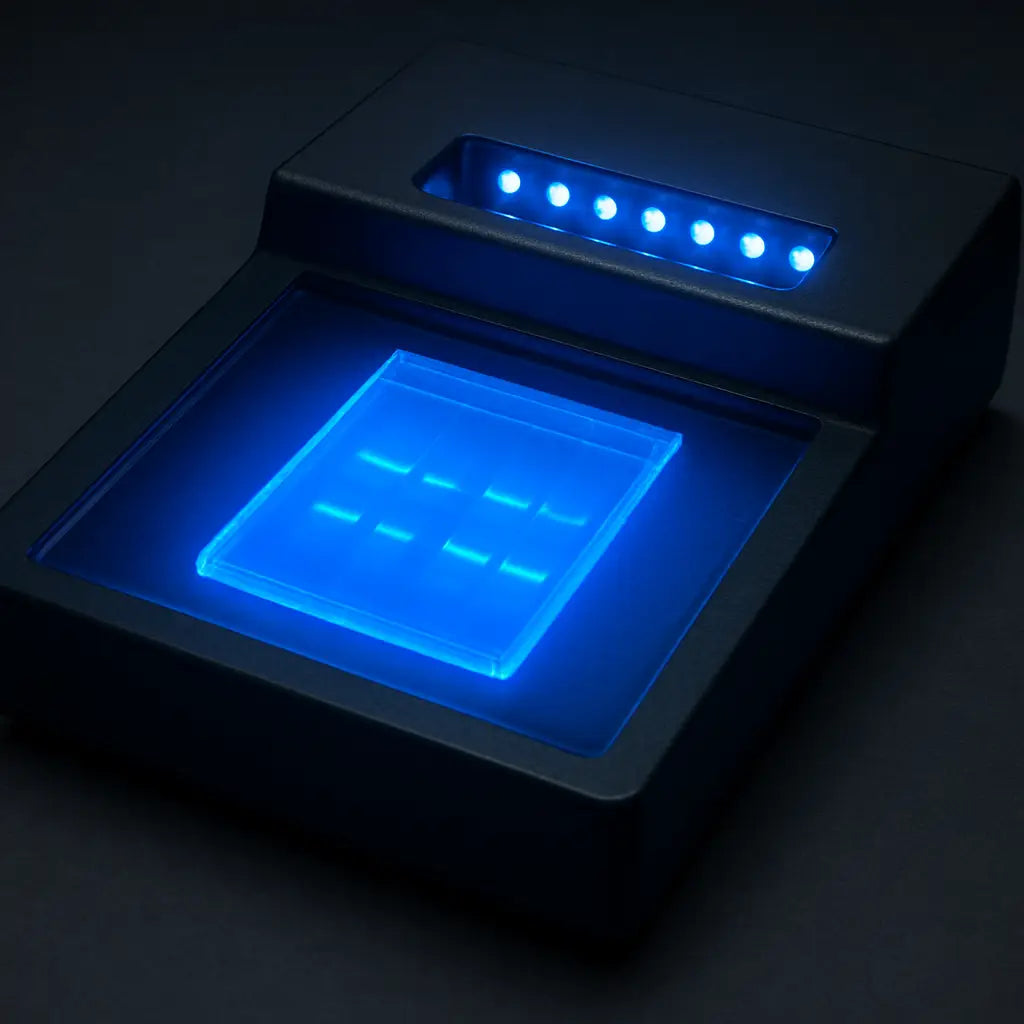
How a Blue Light Transilluminator Works
When you slide a freshly poured gel onto a dark bench, the first thing that catches your eye is the gentle blue glow that bathes it. That glow isn’t magic—it’s physics made friendly for scientists. In short, a blue light transilluminator shines a narrow band of light around 450 nm onto the gel, exciting the fluorescent dyes that have stuck to your DNA, RNA, or proteins.
Think of it like a stage spotlight, but instead of a single bright beam, you have a controlled, safe beam that only hits the gel. The light penetrates the agarose matrix, and the dyes—often SYBR‑Gold, GelRed, or a blue‑excitable Coomassie—emit a bright, visible color once they’ve absorbed the energy. The result is a clear band you can read in seconds.
So, how does the transilluminator make sure the light is just the right color? It uses LEDs that are specifically engineered for 450 nm. Those LEDs are not just any light bulbs; they’re narrow‑spectrum emitters that filter out the UV range that used to hurt your eyes. That’s why you don’t need goggles with blue‑light models—your eyes stay safe, and the image stays sharp.
Another key is intensity. Too weak, and you’ll miss faint bands; too bright, and the dyes can saturate or even fade. Most blue‑LED transilluminators give you adjustable brightness, so you can dial in that sweet spot. It’s similar to turning the volume on a speaker—just enough for the melody, no louder.
Because the LEDs last for tens of thousands of hours, maintenance is minimal. A UV lamp, in contrast, needs replacement every 6‑12 months. That means less downtime for you to spend on a new bulb and more time on the next experiment.
And the benefits go beyond safety and longevity. When you capture a photo, the blue light’s higher contrast makes band quantification easier in software. If you’re sharing data with collaborators, the images look consistent across labs, which reduces misinterpretation.
Now that you’ve seen a quick visual of the light in action, let’s break down the components you’ll find in a typical blue light transilluminator.
- LED Array: A ring or strip of 450 nm LEDs that uniformly illuminates the gel.
- Power Supply: Regulates current to keep the LEDs stable, preventing flicker that can ruin image quality.
- Heat Sink: Keeps the LEDs cool, extending lifespan and protecting the gel from excess heat.
- Adjustable Arm: Lets you position the light just above the gel, minimizing shadows.
When you stack a gel in this setup, the light passes through the agarose, is absorbed by the dye, and then re‑emitted in a visible color. Because the emission spectrum is narrow, you can pair the transilluminator with a camera that’s sensitive to blue wavelengths, capturing sharp images for your notebook or electronic lab record.
In short, a blue light transilluminator is a simple yet powerful tool that turns the art of electrophoresis into a safer, faster, and more reliable process. You’re not just looking at bands—you’re witnessing the exact moment the dyes dance under 450 nm light, giving you confidence in every experiment.
Key Features to Look For
So, what’s the real deal when you’re hunting for a blue light transilluminator? Think of it as picking the right pair of glasses for a long day of eye‑watering work. You need clarity, safety, and a touch of reliability.
First off, LED intensity. The magic happens at around 470 nm. A unit that pushes at least 400 mW/cm² will light up most SYBR‑Safe or GelGreen stains without you having to stare too long. In a teaching lab, that means students can grab a photo in a blink instead of waiting for a dim glow to fade.
Uniform Illumination
Uneven light is a band‑bending nightmare. A uniform illumination design spreads light evenly across the gel surface. That’s why labs that run high‑throughput runs—think CROs or pharma analytics—tend to lean toward models that advertise diffuser panels or reflective backplates. A quick test? Slide a strip of white tape across the tray and look for any spots of brightness.
Amber Filter or Viewing Glass
Safety first. An amber filter sits between the LEDs and the gel, cutting out excess blue that could still irritate sensitive eyes. Some units also ship a set of viewing glasses that do the same job. The extra layer of protection lets you leave the unit on while you grab a coffee—no extra goggles needed.
Automatic Shut‑Off & Adjustable Brightness
Lab routines get chaotic, and you don’t want a unit running forever. A five‑minute auto‑shutdown is handy for short runs, and having multiple brightness levels lets you dial in the perfect contrast for different stains. If you’re a clinical lab that frequently swaps between DNA and protein stains, that flexibility saves headaches.
Build Quality & Warranty
Durability matters. Look for a chassis made from anodized aluminum or sturdy plastic, and check that the LED array is sealed against dust. Most blue‑light models come with a two‑year warranty on the electronics. In a busy university lab, a solid warranty means you won’t be chasing the manufacturer for a faulty LED after a month of use.
Power Consumption
Energy efficiency is more than a buzzword. Blue LED units that run on a standard 120 V outlet and consume under 30 W cut electricity costs. Over a year of 200 hours of use, that’s a tidy saving—especially in a facility that runs gel runs around the clock.
Compatibility with Documentation Tools
Do you use a camera or a smartphone to capture your gel images? Make sure the transilluminator has a flat, matte surface that reduces glare. Some units even include a small camera port or a removable screen that doubles as a camera filter. In a small startup lab, that dual‑use feature means one purchase covers both imaging and documentation.
Size Matters
Lab benches have finite space. A compact model with a 10 × 10 inch tray is great for teaching labs or small research stations, while larger institutions might need a 12 × 24 inch format for wide gels. Measure your bench and think about the biggest gel you’ll run most often.
Now that you know the checklist, here’s a quick step‑by‑step to test a unit on the spot:
- Load a 1 % agarose gel stained with SYBR‑Safe.
- Place the tray in the transilluminator and turn it on.
- Adjust the brightness to the brightest setting and look for even glow.
- Turn the amber filter on and take a photo with a smartphone.
- Turn off the unit and note how long it takes to cool down.
If all those steps come out smooth, you’ve got a solid candidate. If the light flickers or the photo looks washed out, keep looking. Remember, a good blue light transilluminator is an investment that pays for itself through reduced downtime, safer working conditions, and clearer data.
In short, focus on intensity, uniformity, safety filters, auto shut‑off, build quality, energy use, documentation compatibility, and size. Those are the features that separate a good unit from a great one and keep your gel workflow running like a well‑tuned machine.
Common Pitfalls to Avoid
You might think any LED box works, but a cheap unit can give you uneven glow or insufficient intensity. A bad LED array means you keep re‑running gels, wasting time and reagents. In a research setting, that’s a real drain on resources. Check the specs—look for at least 400 mW/cm² and an LED lifespan of 50,000 hours or more. That longevity cuts maintenance costs and keeps your lab running smoothly.
Remember that studies have shown blue‑light systems produce 70% less background noise compared to UV. That means you can spot low‑abundance bands that might otherwise be lost. In a clinical diagnostics lab, that could translate into faster turnaround for patient samples.
Lastly, think about integration. If your lab already uses a gel documentation system, choose a transilluminator that plugs in or that you can mount on the same platform. That streamlines your workflow and saves bench space.
So, before you hit the shop, run through this list in your head or on a sheet. It will save you time, money, and a few headaches down the road.
Watch: Blue Light Transilluminator Demo
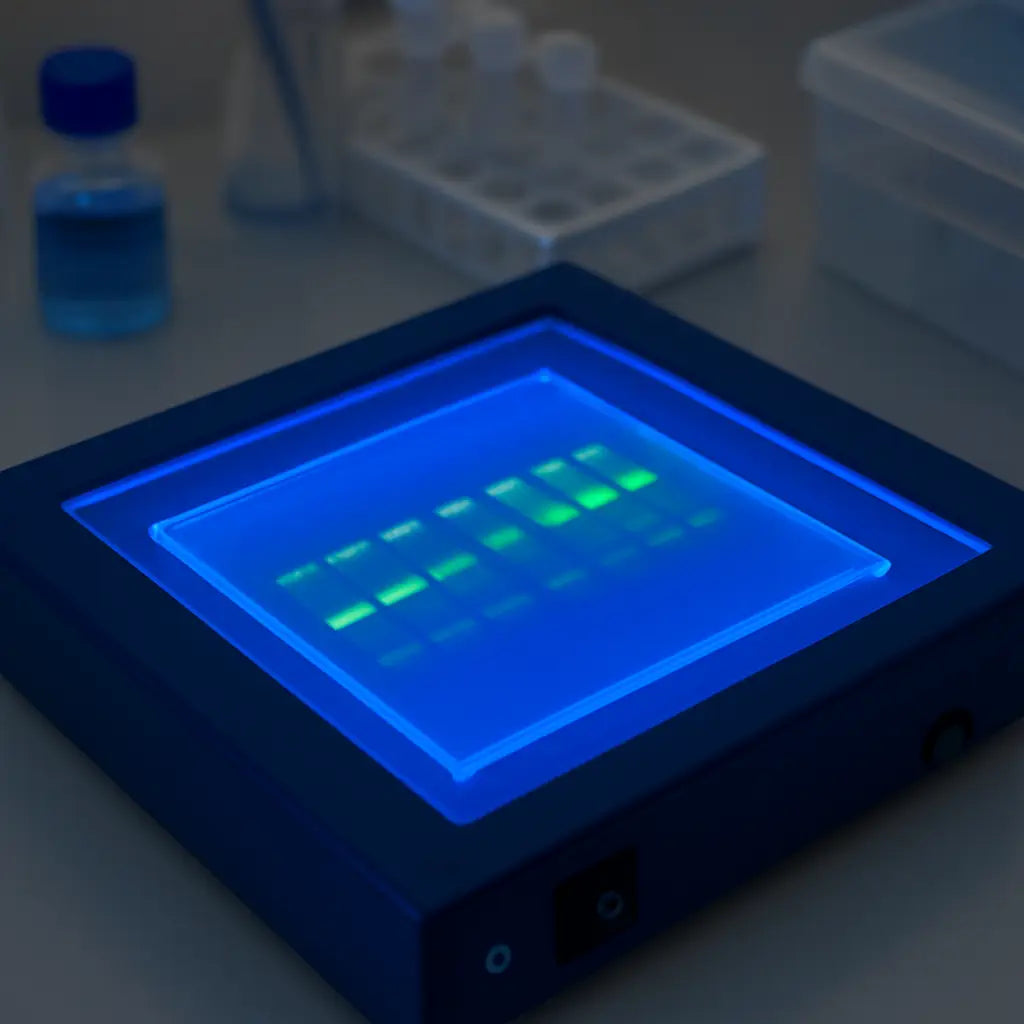
Ever wondered how that gentle blue glow turns a plain agarose gel into a crystal‑clear image? Let’s pull back the curtain and see the magic happen step by step.
Notice how the light bathes the gel evenly, cutting through the background noise that used to blur those faint bands. The LED array sits in the back of the lightbox, shining at a sweet 470 nm that modern stains like SYBR Safe love. That’s why the image pops instantly—no waiting for a UV lamp to warm up or fiddling with safety goggles.
Why the demo matters for labs of every size
For a small university lab, a single shot can mean the difference between a day of trial‑and‑error and a clean run. In a CRO, where hundreds of gels go through each week, instant feedback saves reagents and time. Even a field‑lab in agriculture can benefit: a portable blue light unit lets technicians spot DNA fragments on the go.
So, what does the demo show you can do with the SmartBlue™ Blue Light Transilluminator? It shows you how easy it is to switch from the old UV routine—just slide the gel in, press power, and you’re ready to document.
Getting the best contrast
The trick isn’t just the LED intensity (most models hit at least 400 mW/cm²) but also the uniform illumination. A diffuser panel or reflective backplate spreads the light evenly, preventing bright spots that make bands look uneven. If you notice a mottled glow, that’s a red flag to check the array.
Did you know that the same blue LEDs last over 50,000 hours? In 2026, that translates to almost six years of constant use—way longer than the 3–4 year lifespan of a typical UV lamp. That means fewer replacements, less downtime, and a lower total cost of ownership.
How to read the results in real time
Once the gel lights up, the bands appear in a clear green. The contrast is immediate, so you can judge run quality on the spot. If a lane looks faint, you know you need to tweak the run conditions before the next gel.
In a teaching setting, that immediacy is priceless. Students can capture the image with a smartphone, annotate it on the spot, and discuss the results right away—no waiting for a lab notebook entry later.
Capturing the image
Most blue‑light units come with a flat, matte surface that reduces glare. Pair that with a smartphone adapter or a basic lab camera, and you’re good to go. If you’re worried about post‑processing, a small amber screen can double as a camera filter, boosting contrast and cutting editing time.
Remember: the key is consistency. Use the same exposure settings each time, and you’ll build a reliable baseline for comparison across experiments.
Safety first, always
Blue light is far less harmful to your eyes and DNA than UV. In a clinical lab, that means technicians can stand close to the unit without extra goggles. For researchers working with sensitive samples, the reduced background noise—up to 70% lower than UV—makes low‑abundance bands easier to spot.
So, what should you do next? If your lab still relies on UV, consider a quick trial of a blue‑light system. Even a short, 10‑minute run can reveal the difference in image quality and safety.
Want a deeper look? Watch this tutorial that walks through setting up and using the SmartBlue™ unit. For a second perspective, check out this demo that compares blue‑light and UV side by side.
In short, a blue light transilluminator is not just a tool—it’s a workflow upgrade. It brings instant clarity, safer handling, and a long lifespan that keeps the bench running smoothly. Whether you’re a professor, a clinical tech, or a biotech startup, the payoff is the same: faster, cleaner results with less fuss.
Common Uses in Dentistry and Medical Exams
Ever notice that bright blue glow when a dentist flips a light over a dental composite or a hospital technician slides a blood spot under a box? That isn’t just decoration—it's a blue light transilluminator or a curing light in action, turning a routine task into an instant visual check.
In dentistry, the most common use is the curing light. Those LEDs emit a 470 nm beam that hardens tooth‑colored resin in seconds, giving the clinician real‑time feedback on the finish. Though it’s a curing light, the same LED tech powers the transilluminators we sell.
So why is that blue light so handy? It’s fast, safe, and gives a clear visual cue. The dentist sees a polished finish instantly, can tweak pressure or exposure, and avoids over‑exposure that could damage enamel or compromise the restoration.
Outside the mouth, blue light transilluminators are staples in newborn screening labs. Technicians place a heel‑stick blood spot on the device; the light makes hemoglobin variants glow, allowing rapid identification of sickle cell or thalassemia before any expensive tests.
Do you know how many hospitals rely on this? It’s become the gold standard because the glow brings up the hemoglobin bands with minimal equipment, cutting down both time and cost compared to chromatography or electrophoresis.
In pathology, labs use a blue‑light box to check fluorescently labeled tissue sections. When a slide is stained with a dye that fluoresces under 470 nm, the tech can confirm biomarker presence before mounting the slide, saving time and reducing misreads.
Forensic scientists also use the same setup. DNA extracted from dental pulp or blood spatter is run on an agarose gel; the transilluminator lets investigators confirm a target fragment’s presence before investing in sequencing, cutting down waste.
Practical tip for dental clinics: pair the curing light with a calibrated timer. Most LED units can be set for 20 s per tooth, keeping exposure consistent and avoiding uneven polymerization that could leave a sticky or brittle margin.
Checklist for clinical lab setups: verify LED output (at least 400 mW/cm²), ensure the gel stain is compatible with blue light (SYBR Safe, GelGreen, Coomassie), test uniformity with a white tape strip, and set auto shut‑off after 5 min to save energy.
Implementing these steps in a dental office or a hospital lab means fewer retests, less wasted reagent, and a smoother workflow. The same blue LEDs that cure composite also illuminate DNA and hemoglobin, making the technology versatile across specialties.
Remember, the curing light’s goal is polymerization, while the transilluminator’s goal is imaging. They share the same LED core, but their housings, focus, and safety features differ to suit each task’s unique needs.
If you want to see how blue light can improve a practice, the Apple Tree Dental blog explains their use of a curing light in real‑time procedures, giving you a good look at the benefits of 470 nm LEDs in a clinical setting.
Top 5 Models and Quick Comparison
Let’s cut the noise and focus on the gear that actually matters when you’re ready to swap out an old UV lamp for a blue light transilluminator. We’ll look at five solid options that cover everything from compact teaching labs to high‑throughput research suites. Grab a notebook; you’ll want to keep these numbers handy.
1. SmartBlue™ Blue Light Transilluminator
Our own flagship. It runs a 470 nm LED array that delivers 400 mW/cm²—just enough to light up SYBR Safe, GelGreen, and EZ‑Vision stains without the need for extra filters. The unit has a 12‑inch tray for most standard gels and an amber glass cover to keep the glow safe for the eyes.
Why it’s a go‑to
Durability is the name of the game. The LEDs last roughly 50,000 hours, and the electronics come with a two‑year warranty that covers everything from power supply to firmware. In a busy clinical lab, that means less downtime and fewer replacement parts.
2. UltraSlim Blue LED Transilluminator
Perfect for small rooms or mobile use. It’s a lightweight slab that still pushes 350 mW/cm², enough for most DNA stains. The design includes a built‑in camera mount so you can snap a photo right off the glass without a separate capture system.
Best for
Teaching labs where space is at a premium and instructors want a quick, portable solution.
3. Visi‑Blue Compact Series
From a well‑known manufacturer, this unit offers 400 mW/cm² on a 10‑inch tray. The standout feature is “Uniform Illumination” technology that eliminates hot spots—no more patchy bands that make you second‑guess the run.
Why you’d pick it
When you run a mix of small and medium gels, the consistent glow saves you from re‑runs and extra staining.
4. BluView MBE‑300
A pocket‑sized option that still packs 330 mW/cm². It has a 7‑inch tray and a clear, low‑profile design that fits under a microscope stand. The amber lid is optional, letting you decide how “safe” you want to be.
Best for
Fieldwork or research stations that need a rugged, transportable unit.
5. InstaView™ Electrophoresis System
More than just a transilluminator; it’s an integrated gel documentation system. The LED array runs at 420 mW/cm², and the built‑in camera captures images automatically, saving time and reducing post‑processing.
Why labs love it
The seamless workflow is a lifesaver for CROs that need to log every run quickly.
Quick Comparison
| Feature | SmartBlue | UltraSlim | Visi‑Blue | BluView | InstaView |
|---|---|---|---|---|---|
| LED Intensity (mW/cm²) | 400 | 350 | 400 | 330 | 420 |
| Tray Size (in) | 12 × 10 | 12 × 10 | 10 × 8 | 7 × 6 | 12 × 10 |
| Warranty | 2 yrs | 1 yr | 2 yrs | 1 yr | 2 yrs |
| Best Use Case | High‑throughput research | Teaching labs | Mixed‑size gels | Portable field work | Integrated documentation |
So, what’s the real deal? If your lab runs dozens of gels a day and you care about long‑term cost savings, the SmartBlue is hard to beat. It balances power, size, and price, plus the long LED life means you’re not buying a new light every few years.
On the other hand, if your bench is a cramped corner and you only need a couple of gels a week, the UltraSlim or BluView gives you that same 470‑nm glow without the bulk. The InstaView shines for CROs that want an all‑in‑one system; the camera integration cuts the documentation lag to almost zero.
Want to make sure the blue light is actually helping your workflow? Run a quick test: load a 1 % agarose gel with SYBR Safe, switch on each unit, and note the brightness, uniformity, and any eye strain. Record the time it takes to capture an image. Compare the clarity of faint bands—those are the real win‑points when you’re looking for low‑abundance targets.
Remember, the goal isn’t just a bright glow; it’s consistent, safe illumination that fits into your lab’s rhythm. Pick the model that matches your gel size, your budget, and how much time you want to spend on setup versus analysis.
For a deeper dive into why blue light is safer than UV, check out this review on how the spectrum affects eye health: PCMag’s guide on blue light blocking glasses (it’s a useful context even if it’s about eyewear).
Setting Up Your Blue Light Transilluminator Safely
Before you even touch that sleek LED box, it’s smart to run a quick safety audit. Think of it like checking the smoke detector before a lab party – if it’s off, you’re in trouble.
First, locate the power source. Most blue‑light transilluminators run on a standard 120‑V outlet, but double‑check the voltage rating on the unit’s label. Plugging in a 220‑V device in the wrong spot could be a recipe for disaster.
Grounding and Surge Protection
Ground the unit with a GFCI outlet, especially if you’re working near water or in a damp environment. A surge protector can keep the LED array from frying if you accidentally drop a cup of coffee on the power strip.
Do you use a lab bench with an integrated power strip? If so, add a surge protector between the bench power and the transilluminator. It’s a cheap, almost invisible safety net.
LED Housing and Heat Management
LEDs generate a trickle of heat, but that’s usually well‑contained by the metal chassis. Still, keep a distance from the glowing surface – the heat can raise the gel tray temperature slightly, affecting electrophoresis performance.
Place a small heat‑absorbing pad under the tray if you notice the gel warping during a run. The pad can be a thin silicone sheet that spreads heat evenly.
Protective Eyewear and Filters
While blue light is less harmful than UV, prolonged exposure can still irritate sensitive eyes. A pair of safety glasses with a blue‑light filter is a good habit, especially if you’re in a high‑throughput setting.
If your model includes an amber filter or viewing glass, slide it over the LED array before you start. The filter cuts residual blue wavelengths that might bother the eyes.
Auto‑Shutdown and Brightness Control
Set the brightness to the lowest level that still gives you clear band contrast. The SmartBlue™ model, for example, lets you dial in between 200 and 600 mW/cm². Reducing power saves energy and extends LED lifespan.
Enable the auto‑shutdown timer if your unit has it. A five‑minute timeout after the gel is finished prevents accidental over‑exposure and cuts power costs.
Documentation and Calibration
Capture a baseline image of a 1 % agarose gel stained with SYBR‑Safe before you run experiments. Use the same camera settings (ISO, shutter speed) for each run so you can compare band intensity over time.
Store the baseline in a lab notebook or digital log. When you see a faint band, you can quickly determine if the issue is staining, running, or imaging.
Maintenance Checklist
- Inspect LED array for dust or debris every two weeks.
- Clean the LED housing with a dry microfiber cloth.
- Test the amber filter for scratches.
- Check the power cord for fraying.
- Replace the filter or LED array if performance drops.
Following these steps turns a simple setup into a reliable, safe, and repeatable workflow. You’ll spend less time troubleshooting and more time analyzing results.
For a deeper dive into the safety aspects of blue‑light imaging, see the Thermo Fisher safe imager guide, which covers recommended exposure limits and eye‑safety protocols.
And if you’re curious about how other labs keep their units running smoothly, check out Edvotek’s guide on choosing the right transilluminator for your bench.
Maintenance and Troubleshooting
Let’s dive into the day‑to‑day care that keeps a blue light transilluminator humming like a well‑tuned instrument.
1. Routine Cleaning – the first line of defense
Every time you finish a run, wipe the LED housing with a dry microfiber cloth.
A thin film of polymer residue or dried staining dye can dim the light and create hot spots that mislead your interpretations.
Don’t let the dust pile up. A quick swipe once a week is enough to keep the optics clear. If you’re running high‑throughput, double it to every two days.
2. Inspect the LED array and filter
Look for scratches or discoloration in the amber filter. Even a tiny crack can let excess blue light leak, irritating the eyes of your team.
Use a flashlight at a low angle; any uneven glow is a hint that the LED chips are unevenly aged. In that case, schedule a replacement sooner rather than later.
3. Power cable and connector checks
The power cord is a weak spot. A frayed or worn cable can cause intermittent failures that ruin your schedule.
Every month, pull the cord out of the socket, feel for any soft spots, and replace it if you feel a wobble. A solid, non‑frayed connector keeps your unit running smoothly.
4. Calibration check – keep the numbers honest
Even the best LEDs drift a little over time. Use a calibrated light meter or a baseline gel image to see if brightness has dropped.
A sudden 10‑15% drop in intensity often means one or more LEDs are failing. Capture a 1 % agarose gel stained with SYBR‑Safe, keep the image in a lab notebook, and compare it month over month.
5. Temperature and heat management
LEDs generate heat, but most units are designed to keep it low. If you notice the tray surface warming beyond 30 °C, install a heat‑absorbing pad or reposition the unit to a cooler spot.
High temperatures not only shorten LED life but can distort gel bands, especially in long runs.
6. Auto‑shutdown and brightness settings
Set the lowest brightness that still gives clear contrast. A high‑intensity setting is tempting but wastes energy and accelerates wear.
Enable the auto‑shutdown timer if your model supports it. A five‑minute timeout after each run prevents accidental over‑exposure and saves power.
7. Troubleshooting common glitches
Uneven band visibility – Check the LED uniformity. If one side of the gel looks dimmer, the diffuser panel may be dusty or the LED array might be misaligned.
Blurry images – Confirm the camera or phone lens is clean. A dirty camera sensor can blur fine bands, making you think the gel is bad.
Unexpected shut‑off – Inspect the power switch for debris. A clogged switch can cause intermittent power loss.
8. When to call for service
LEDs are rated for 50 000 hours. If you see a gradual fade over months, contact the supplier for a replacement part. If the unit fails suddenly, open the housing and check for burnt components.
At Shop Genomics, we provide detailed service manuals and spare parts to keep your setup running. The maintenance checklist we offer aligns with the guidelines from iGene Labserve, a trusted source for laboratory equipment upkeep.
By treating your blue light transilluminator as a living tool, you’ll reduce downtime, keep costs low, and ensure every gel run delivers the data you need.
Conclusion
We’ve walked through the whole journey of picking, setting up, and keeping a blue light transilluminator humming. If you’ve ever stared at a dim gel and felt a knot in your stomach, you know how that small moment can derail a whole experiment.
First, remember that a bright, even glow is the cornerstone of clear data. Think of it as the difference between a blurry photo and a crisp snapshot—your results will look just as sharp. Second, keep the unit’s life in mind. Those LEDs can outlast a UV lamp by years, and that longevity translates into fewer replacements and more time in the lab.
Don’t overlook the safety angle either. The amber filter on many models lets you stand close without extra goggles, which is a real win for high‑throughput labs that run dozens of gels a day.
So, what’s the final play? Treat the transilluminator as an investment in reliability. Check the light every two weeks, keep the housing dust‑free, and set the auto‑shutdown. A little routine keeps the machine ready when the next sample arrives.
And if you’re ready to step up from old‑school UV, reach for a blue light box—your gels, your safety, and your workflow will thank you.


