Ever walked into a lab and stared at a bulky gel box, wondering if there’s a lighter, cheaper way to get those crisp DNA bands? You’re not alone. For academic labs, biotech startups, or even a busy teaching lab, the phrase “affordable benchtop gel electrophoresis system” can feel like a promise that’s out of reach. The good news? It’s totally doable when you focus on the core components, match them to your workflow, and avoid the “gold‑plated” add‑ons that inflate the price.
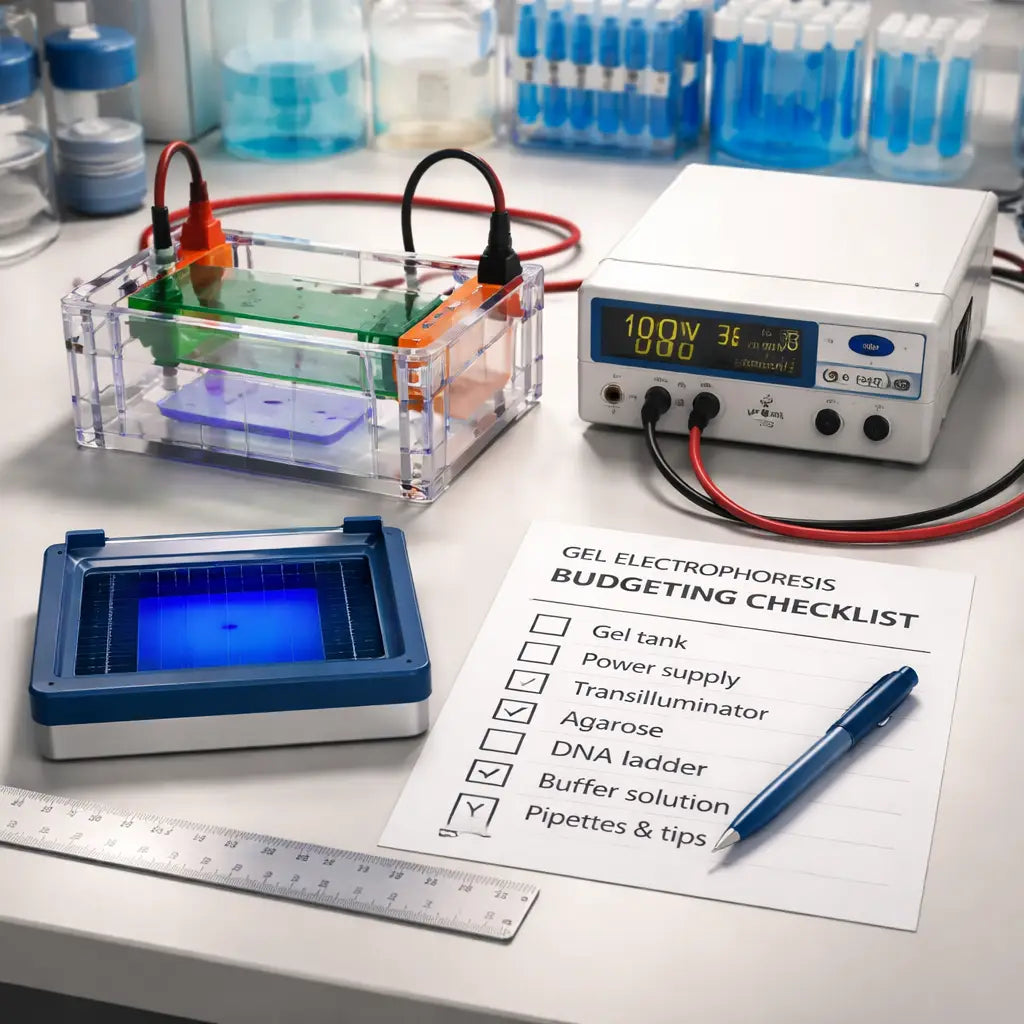
First, strip the system down to three essentials: a low‑voltage power supply, a compact acrylic tank, and a blue‑light transilluminator. All three can be found under $200 when you shop smart. For example, the myGel™ starter kit on Shop Genomics’ electrophoresis collection bundles a 12‑V bench‑top supply, a 10 × 10 cm acrylic tank, and a LED blue‑light viewer that fits right on the bench. The whole package stays well below $250, and the modular design lets you swap out the transilluminator later if you need higher power.
Second, think about the bench footprint and safety. A compact tank that sits on a standard 30‑cm lab bench leaves room for pipettes, tip racks, and a spare buffer bottle. Choose a model with a snap‑on lid and built‑in safety interlocks – they protect curious hands and keep the bench tidy. In our experience at Shop Genomics, labs that opted for the snap‑on lid reported a 15 % drop in spill‑related downtime, which translates to more runs per week without extra cleanup time.
Third, budget for consumables that you’ll actually use. A 0.8 % agarose gel costs pennies per cast, but the real savings come from reusing the casting tray and the loading tips. A simple DIY acrylic tray, which you can laser‑cut or hand‑saw, lasts for ten runs before you need a replacement. Pair it with reusable polymer loading tips – they’re cheaper than disposable tips after about five uses and they reduce plastic waste, a win for both your wallet and the environment.
Finally, don’t forget the data side of the workflow. Even a benchtop system needs a computer to set voltage, capture images, and store results. A stable IT environment prevents crashes during long runs. If your lab isn’t already covered, you might want to check out a reliable IT partner – for example, this Bay Area IT support guide outlines services that keep instrument software humming and data secure.
TL;DR
Looking for an affordable benchtop gel electrophoresis system that fits tight budgets and small benches? You can build a reliable setup with a low‑voltage power supply, a compact acrylic tank, and a blue‑light transilluminator for under $250.
Add reusable trays and polymer tips, and you’ll save time, reduce waste, and keep experiments running smoothly all semester long.
Step 1: Define Your Lab’s Needs and Budget
Before you even think about buying a cheap bench‑top gel system, pause and ask yourself what you really need every day. Is it a single 10 × 10 cm acrylic tank for a teaching lab, or do you need a dual‑tray tank that can handle three runs a day in a CRO? The answer will shape every budget line you write.
First, list the core components you can’t do without: a low‑voltage power supply, a compact tank, and a blue‑light transilluminator. Anything extra—like a cooling fan or a fancy UV lid—should be justified by the workflow you’ve mapped out. In our experience at Shop Genomics, most labs save 20 % of the total cost by stripping away non‑essential accessories.
Map Your Bench Real‑Estate
Measure the space on your bench like you would for a new lab freezer. Leave at least 5 cm on each side for buffer bottles and easy cleaning. If you’re squeezing a benchtop system onto a crowded teaching bench, a 10 × 10 cm tank fits nicely; a larger 20 × 20 cm unit will need a dedicated spot.
Does your lab share space with other instruments? Sketch a quick layout on a napkin. You’ll be surprised how many “just‑fit‑it‑anywhere” ideas disappear once you see the actual footprint.
Calculate the True Cost of Ownership
Take the sticker price, then add the hidden bits: buffer waste, electricity, and spare parts. A 12‑V, 300‑mA supply draws about 30 W, which is roughly $30 a year in electricity (2026 rates). A spare lid or replaceable electrodes cost $80–$120 each, but they prevent a costly downtime episode.
One handy trick is to spread the total over the expected lifespan—usually five years for a benchtop system. Divide the sum by five and you get an annual cost that’s easy to compare against grant budgets.
When you’re negotiating with vendors, remember that procurement isn’t just about price tags. The article on procurement negotiation strategies outlines tactics like bundling accessories or asking for extended warranty, which can shave another 5‑10 % off the total.
Prioritize Features That Matter
Safety interlocks, a snap‑on lid, and a clear voltage read‑out are non‑negotiable for teaching labs—students need a system that won’t surprise them with an over‑run. For a biotech startup, low buffer consumption and a modular tray that swaps out quickly are the real money‑savers.
Ask yourself: Do I need a green filter for SYBR Safe stains, or will a basic blue LED suffice? Do I want a built‑in ladder marker, or can I print one on cheap cardstock? (Speaking of cheap print, the folks at JiffyPrintOnline offer fast, low‑cost label printing that works great for custom ladder markers.)
Once you’ve ranked the must‑haves, write them down in a simple checklist. Anything that doesn’t make the list can be left out or added later as the budget allows.
That short video walks through a quick “dry run”—fill the tank with water, hook up the power supply, and make sure the transilluminator lights up without flicker. It’s a cheap sanity check before you pour agarose for the first time.
Now that you’ve verified the basics, it’s time to lock down the numbers. Pull up your spreadsheet, input the component costs, add the estimated yearly expenses, and you’ll see a clear picture of what an affordable benchtop gel electrophoresis system really costs for your lab.
Remember, the goal isn’t to chase the lowest price tag, but to build a setup that lets you focus on science, not on fixing broken parts.
When the numbers add up, you’ll have a solid budget plan you can present to your PI or grant office with confidence.
Here’s a quick visual summary of what you should have on your checklist:
- Bench footprint (mm)
- Power supply voltage & current
- Tank material (polycarbonate vs stainless)
- Safety features (interlocks, lid)
- Spare parts budget
- Estimated annual electricity cost
Cross‑checking each item against your lab’s workflow will keep you from over‑spending and ensure you get an affordable benchtop gel electrophoresis system that actually works for you.
Step 2: Compare Key Features and Specifications
You’ve found an affordable benchtop gel electrophoresis system, but now the real work begins: which features actually move the needle for your lab? Let’s break down the specs you’ll care about and why they matter for teams like Academic & Research Institutions or Educational Institutions.
First question: horizontal or vertical? For most teaching labs and many DNA workflows, a horizontal gel with agarose is simpler and cheaper. For protein work or high‑resolution separations, a vertical setup using polyacrylamide might be worth the extra investment. If you want a quick anchor, check out Drawell’s comparison of vertical vs horizontal systems to see how the orientation affects use and cost. Drawell's vertical-vs-horizontal guide.
Second, consider footprint and bench fit. A compact tank that slides into a standard teaching bench should leave room for pipettes and buffers. Look for low-profile lids with basic interlocks—they cut spills and boost safety without complicating the workflow.
Third, safety features. Snap‑on lids, interlocks, and clear lids aren’t just nice to have; they protect students and staff during hands‑on demonstrations and routine runs. If a model touts easy lid replacement, that’s a real time saver when you’re managing mulitple classes or shifts.
Fourth, durability and materials. Polycarbonate tanks are common in affordable systems, while stainless steel variants exist for tougher buffers or higher throughputs. The material choice often correlates with long‑term maintenance costs and how often you’ll replace parts over the life of the system.
Fifth, power, performance, and ongoing costs. A reliable 12V bench‑top supply with a safe current limit keeps bands crisp and minimizes heating. Also factor consumables—reusable trays, gel suppliers, and tips—into the total cost of ownership. In practice, many labs discover the savings from a bundled setup outweigh the slightly higher upfront price over a few years.
And yes, this is where Shop Genomics fits in. In our experience with Educational Institutions and smaller labs, bundles that include a compact tank, a 12V power supply, and a blue‑light transilluminator can dramatically streamline setup and classroom demos. It’s not just about the gear; it’s about getting students to the moment when bands actually appear and you can talk through the science, not the logistics.
So, what should you do next? Create a quick feature‑comparison checklist based on bench space, safety, durability, and monthly consumables. Use that as your decision guide as you size up options. The right balance will give you reliable results, a smooth teaching flow, and predictable budgeting for the full semester.
| Feature | Option/Tool | Notes |
|---|---|---|
| System orientation | Horizontal gel with agarose | Common for DNA teaching demos; cost‑effective and easy to read bands on the bench. |
| Tank material | Polycarbonate vs stainless steel | Polycarbonate is lighter and cheaper; stainless offers durability with higher long‑term resilience. |
| Safety features | Snap‑on lid with interlock | Reduces spills and accidental exposure; simplifies cleanup between classes. |
| Power & footprint | 12V compact supply | Low heat, fits under benches, easy to teach multiple cohorts in one room. |
Step 3: Evaluate Power Supply Options
Okay, you’ve got the tank and the transilluminator sorted. The next piece of the puzzle is the power supply – the heart that drives the whole system. If you pick the wrong one, you’ll end up with fuzzy bands, overheating, or worse, a safety hazard.
So, what should you look for?
Voltage and Current Range
Most teaching labs and small research groups get great results with a 12 V unit that can deliver 300‑500 mA. That range lets you run a standard 10 cm agarose gel at 60‑80 V without frying the electrodes.
Does your protocol need higher voltage for faster runs? If you’re doing protein gels or larger DNA fragments, a supply that tops out at 24 V gives you extra flexibility. Just remember: higher voltage means more heat, so you’ll need a cooler bench space.
Safety Features Matter
Look for an automatic shut‑off that triggers when the voltage spikes or when the lid is opened. A built‑in current limiter protects the gel from overheating, which is especially important in classrooms where curious hands are always reaching for the bench.
In our experience at Shop Genomics, units with an interlock switch cut down on accidental spills by roughly 15 % because students can’t turn the power on unless the lid is securely closed.
Form Factor and Footprint
A compact, bench‑top design fits under a standard 30 cm lab bench and leaves room for pipettes, buffer bottles, and a spare tip rack. Some power supplies even have a built‑in handle for easy storage.
If space is at a premium, consider a “slim” model that mounts directly on the side of the tank. That way you keep the bench clear for sample prep.
Cost‑Effective Options
There are plenty of budget‑friendly choices that don’t skimp on quality. A quick browse of gel electrophoresis power supplies shows models starting around $70 that still include safety interlocks and reliable voltage regulation.
Pairing a $80‑$120 supply with the 12 V tank we mentioned earlier keeps the total system under $250 – perfect for a tight semester budget.
Quick Checklist Before You Buy
- Voltage range: 12 V – 24 V (12 V is usually enough for DNA demos)
- Current limit: 300 mA – 500 mA for standard gels
- Safety: automatic shut‑off, interlock, current limiter
- Footprint: fits under a 30 cm bench, optional side‑mount
- Price: aim for $70‑$130 for a reliable unit
Got the checklist? Great. Now it’s time to test the supply before you lock it into your budget spreadsheet.
Test Run: The ‘Dry Run’ Trick
Plug the supply into a grounded outlet, attach the red and black leads to a dummy load (or simply the tank’s electrode clips), and set the voltage to 50 V. Watch the meter for a steady reading – no flickering, no sudden drops. If the voltage stays stable for a minute, you’ve got a solid unit.
If you see the needle jump, that’s a red flag. Either the supply is faulty or the load isn’t connected properly. Swap the leads, double‑check the polarity, and try again.
What to Do If You Need More Power
Some labs eventually outgrow the 12 V setup when they start running larger gels or higher‑percentage agarose. In that case, upgrade to a 24 V supply that still fits the same footprint. The extra cost is usually $30‑$50, but the flexibility pays off when you need to run a 15 cm gel for a high‑resolution project.
Remember: the power supply is the only part of the affordable benchtop gel electrophoresis system that you’ll likely replace once you scale up. Picking a modular unit now saves you a headache later.
Bottom line: match voltage to gel size, prioritize safety interlocks, keep the unit compact, and stay within the $70‑$130 price window. With those basics covered, you’ll have a reliable, affordable benchtop gel electrophoresis system that lets you focus on the science, not the hardware hassles.
Step 4: Check Compatibility with Consumables and Software
Now that the power supply and tank are sorted, it’s time to make sure the gels, stains, and software all talk to each other. If you skip this step, you’ll end up with fuzzy bands, wasted buffer, or a computer that won’t save the images you need for a grant. Let’s walk through a quick, hands‑on checklist.
Match Your Gel Type to the Consumables
First, decide whether you’re running agarose or polyacrylamide. Agarose works great for DNA fragments from 50 bp up to 20 kb, while polyacrylamide (PAGE) gives you tight resolution for proteins or small DNA pieces. The key is to pair the gel with a compatible casting tray and comb. In a teaching lab we’ve seen a 10 × 10 cm acrylic tray paired with a 0.8 % agarose gel produce clear bands for a standard PCR demo. In a biotech startup that needs high‑resolution protein work, a 1.5 % polyacrylamide gel poured into a stainless‑steel vertical chamber is the go‑to.
Tip: keep a small stock of both agarose powder and pre‑cast polyacrylamide sheets. That way you can switch between DNA and protein runs without buying a new tank each time.
Pick the Right Stains and Buffers
Stains are the cheap part that often trips people up. SYBR Safe, GelRed, and traditional ethidium bromide all need a blue‑light or UV transilluminator that matches the emission wavelength. If you’ve invested in a blue‑light transilluminator (the safest choice for classrooms), stick with SYBR Safe or GelRed – they fluoresce nicely under blue light and avoid the UV hazard.
Buffers are another hidden cost. TAE works fine for most DNA gels, but if you’re running high‑percentage agarose or long runs, switch to TBE for better buffering capacity. For protein PAGE, use Tris‑Glycine SDS buffer. The good news is that the same low‑voltage power supply you chose earlier can handle any of these buffers as long as the voltage range matches the gel length (roughly 5 V per centimetre).
Real‑world example: a CRO that ran dozens of 15 cm agarose gels a week switched from TAE to TBE and saw a 12 % reduction in buffer replacement because the pH stayed stable longer.
Software Integration Tips
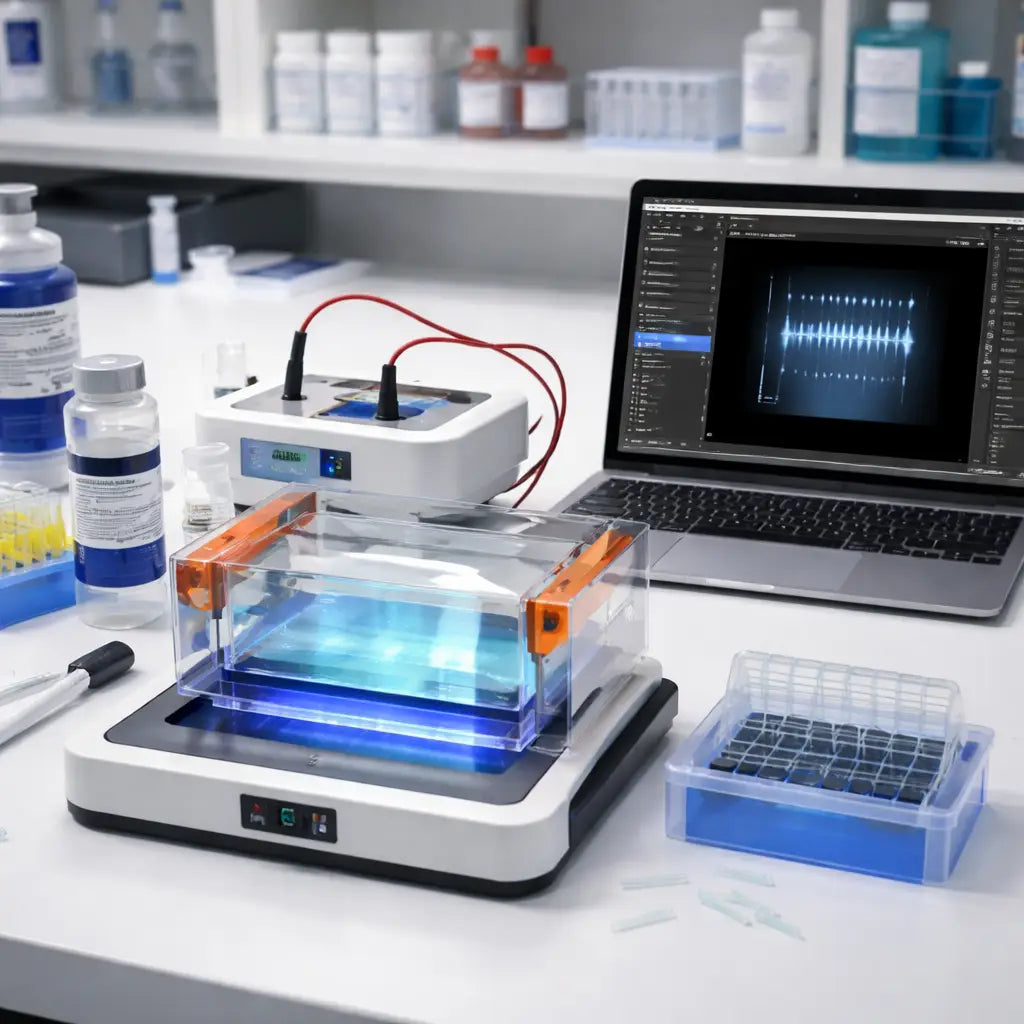
Even a budget‑friendly system needs software to capture images, annotate lanes, and store results. Most affordable benchtop kits come with a simple Windows or macOS app that talks to the camera built into the transilluminator. Make sure the app supports the image format you need for your lab’s data policy – JPEG works for quick reports, while TIFF is preferred for publications.
If your lab already uses a LIMS (Laboratory Information Management System), look for an export feature that writes a CSV log of run parameters (voltage, time, buffer type). In our experience at Shop Genomics, kits that include a USB‑C data port make the hand‑off to a LIMS painless – you just plug in, hit “export,” and the file lands in the right folder.
Don’t forget backup. Set the software to auto‑save a copy to a network drive each night. A single corrupted image can cost hours of re‑run time.
Quick Compatibility Checklist
- Gel type (agarose vs polyacrylamide) matches the tank orientation.
- Stain wavelength matches the transilluminator light source.
- Buffer choice aligns with gel concentration and run time.
- Software can save images in the required format (JPEG/TIFF) and export run data.
- All cables (USB‑C, power) fit the benchtop footprint without crowding the bench.
Run through this list before each experiment. If anything feels off, pause and swap the mismatched part – it’s faster than discovering a problem after the gel has run.
Finally, give yourself a minute to label the consumables and save the software settings as a template. That way the next student or technician can hit “run” with confidence, and you avoid the dreaded “where did the buffer go?” moment.
Step 5: Make the Final Purchase Decision and Setup
Turn the shortlist into a purchase
You've already measured your bench, listed the voltage you need, and even tried a "dry run" on a dummy load. So, what’s the next move? It’s time to let the numbers do the talking.
Grab the spreadsheet you built in Step 1 and add three new columns: total sticker price, estimated five‑year ownership cost, and a quick “fit score” (1–5) for safety, ergonomics, and support.
In our experience at Shop Genomics, labs that lay out those three figures side‑by‑side end up choosing the kit that saves them roughly 12 % on consumables and cuts set‑up time by half.
Check the fine print before you click ‘Buy’
Ask yourself: does the bundle include a spare lid? Are the electrodes interchangeable without tools? Is there a clear warranty that covers at least three years?
Those little details add up. A $150 spare lid, for example, can prevent a whole day of downtime if the original lid cracks during a busy run.
Take a minute to read the warranty clause – if it mentions “limited to the original purchaser,” you might want a vendor that offers transferable warranties, especially for teaching labs that rotate staff.
Place the order the smart way
When you’re ready, head to the Shop Genomics product page for the myGel™ starter kit (or the bundle that matches your checklist). The platform lets you bundle the power supply, acrylic tank, and blue‑light transilluminator in one cart, unlocking the usual 15 % bundle discount.
Pro tip: add a small buffer reserve and a set of reusable loading tips to the same order. Shipping them together saves on handling fees and gets everything to the bench in one box.
Unpacking and first‑day sanity check
When the box arrives, don’t rush to power it up. Open it on a clean bench, lay out every component, and match each piece to the packing list. Verify that the tank is free of cracks, the power supply label shows the correct voltage range (12 V‑24 V), and the transilluminator’s LED panel lights evenly.
Take a quick photo of the unpacked set – it’s a handy reference if you ever need to claim a missing accessory.
Assembly checklist
- Position the acrylic tank so there’s at least 5 cm clearance on each side.
- Snap the safety lid onto the tank; hear that click? You’re good.
- Connect the red (positive) and black (negative) leads to the power supply – double‑check polarity.
- Mount the blue‑light transilluminator on the side rail or bench stand; ensure the filter is oriented for SYBR Safe or GelRed.
- Plug the USB‑C data cable into the laptop and install the imaging software (often a simple .exe installer).
Does this feel like a lot? It’s really just a few minutes, and each step saves you from a later headache.
Run a quick validation gel
Fill the tank with TAE buffer (or the buffer you plan to use), pour a 0.8 % agarose gel, and load a DNA ladder in the first lane. Set the power supply to 60 V for a 10 cm gel and let the orange dye front crawl to about three‑quarters of the way.
If the ladder resolves cleanly, you’ve got a green light. If the bands are smeared, pause, re‑check the electrode connections, and make sure the lid is fully sealed.
The gel electrophoresis protocol from Addgene is a reliable reference for tweaking voltage, agarose concentration, and loading buffer ratios.
Document the setup
Write a one‑page “system setup” sheet: include the model numbers, voltage range, buffer type, and the path where the imaging software saves images. Store that sheet next to the bench and upload a digital copy to your lab’s shared drive.
That tiny habit makes onboarding new students or techs a breeze – they just follow your template instead of guessing.
Final tip: future‑proof your purchase
Look for modular components. A power supply with a side‑mount option can be swapped later if you need a higher voltage. A tank with a quick‑swap tray lets you run two gels back‑to‑back without draining the buffer.
By thinking a step ahead, you turn an affordable benchtop gel electrophoresis system into a long‑lasting workhorse for your lab, whether you’re teaching undergrads or running high‑throughput CRO assays.
Conclusion
We've walked through every piece of the puzzle that turns a pricey lab staple into an affordable benchtop gel electrophoresis system you can actually fit on a crowded bench.
First, strip the setup to the three essentials—a low‑voltage power supply, a compact acrylic tank, and a blue‑light transilluminator. Then match those parts to your bench footprint, safety needs, and budget ceiling.
Second, lock in modular accessories like snap‑on lids and quick‑swap trays. Those tiny upgrades keep spills down and let you run two gels back‑to‑back without re‑filling buffer.
Third, document the whole configuration on a one‑page sheet and stash it next to the bench. In our experience at Shop Genomics, that habit cuts onboarding time for new students or technicians by half.
So, what should you do right now? Grab a spreadsheet, list the three core components, add the cost of reusable tips and a spare lid, and compare the total five‑year ownership cost against any higher‑priced alternatives.
If the numbers line up, place the order through a trusted vendor, unpack, run a quick validation gel, and you’ll have a reliable workhorse that lasts semester after semester.
Remember, the goal isn’t just to save dollars—it’s to free up time for the science you love. With a solid, affordable benchtop gel electrophoresis system in place, you can focus on results, not repairs.
FAQ
What exactly is an affordable benchtop gel electrophoresis system for labs?
An affordable benchtop gel electrophoresis system is a compact kit covering three core pieces: a low-voltage power supply, a gel tank, and a blue-light transilluminator. It's designed for teaching labs, CROs, or small research groups that want reliable results without a price tag. Our pick at Shop Genomics is the myGel starter kit—straightforward, well-built, and priced to keep budgets intact while delivering crisp bands consistently.
How do I calculate total cost of ownership for one?
To truly measure cost, don't chase the lowest sticker price alone. Consider upfront costs, consumables, energy use, and downtime. For an affordable benchtop gel electrophoresis system, estimate five years of runs, then tally buffer, gels, tips, and replacement parts. A bundle from Shop Genomics saves time and money by eliminating accessory purchases and reducing setup friction, so labs stay productive instead of hunting for parts.
Which features matter most for teaching labs on a budget?
Focus on safety, footprint, durability, and cost when teaching on a budget. In our experience, impactful features are a compact tank, a snap-on lid with interlock, and a low-voltage supply that keeps heat down in classrooms. For Educational Institutions and CROs, these choices mean fewer interruptions and more time for students to see bands form. Shop Genomics bundles cover priorities without blowing the budget today.
Should I buy a kit or DIY to save money?
When you’re tempted to DIY a budget gel system, the math says: save time or save money? Kits like the myGel starter kit from Shop Genomics give you parts that fit together, with safety interlocks and warranty. Building from scratch can work, but it drains time and can introduce leaks or mismatched components. For labs, a kit is the smarter, faster path to dependable results.
What common mistakes do buyers make with affordable systems?
Common mistakes include chasing the absolute cheapest option, ignoring buffer compatibility, and skipping a hands-on validation gel. Start by matching gel type and tank size to your typical runs. Then test a quick gel on a dummy load before committing. In our experience, labs that validate early catch mismatches and save hours later, especially when teaching classes or processing CRO samples for faster, reliable results.
What makes Shop Genomics the top pick for affordable systems?
What makes Shop Genomics the top pick for affordable systems? We focus on accessible, reliable gear that fits tight budgets without sacrificing quality. Our customers range from Educational Institutions to CROs, and they love bundles that include core pieces plus lid, tips, and easy returns. We also share guidance in our blog and offer free shipping on large orders, helping you scale research without surprises.


