A reliable power supply doesn't have to cost a fortune.
When you run a gel, the supply is the heart of the setup. It delivers steady voltage, protects students, and keeps your results clear.
What most labs overlook is that low-voltage, bench-top models under $100 can do the job just as well as pricey units.
In our experience at Shop Genomics, the 12 V, 300 mA compact supply has become a go-to for high-school teachers and small research groups. It plugs into any standard outlet, has an automatic shut-off, and shows voltage on a tiny read-out.
Because the unit runs on 120 V mains, you avoid extra adapters and the hidden cost of power converters. That saves both time and money.
Here’s a quick checklist to pick the right affordable lab bench power supply for electrophoresis:
- Voltage range 0-15 V with fine adjustment
- Current limit at least 300 mA
- Built-in safety shut-off
- Clear digital display
- Compact size fits on a bench
Match those specs to your gel length and you'll stay in the sweet spot of 5-10 V per centimetre.
With the right supply you get clean bands, happy students, and a budget that leaves room for agarose and tips. The rest of the guide will walk you through wiring, voltage setting, and troubleshooting so you can get the most out of every run.
Step 1: Define Your Electrophoresis Power Needs
First, figure out what voltage your gel will need. Most classroom gels run fine between 5 and 10 V per centimetre. If you use a 10 cm gel, set the supply to 50‑60 V.
Next, check the current rating. A supply that can deliver at least 300 mA will handle most agarose runs without overheating.
Safety matters. Look for a unit with an automatic shut‑off. That feature cuts power if the current spikes, keeping students safe.
Match the power specs to the gel size. Too high a voltage will make the gel melt fast. Too low and the run drags on, wasting class time.
Here’s a quick checklist you can print and tape to the bench:
- Voltage range 0‑15 V with fine knob
- Current limit ≥ 300 mA
- Automatic shut‑off
- Clear digital read‑out
- Compact footprint
Watch this short video for a visual walk‑through of setting the voltage and current on a typical bench‑top supply.
When you run multiple classes a day, break the work into focused bursts. The Pomodoro technique for teachers helps keep labs on schedule and students engaged (read more).
Labs often need quick IT fixes. If your power supply talks to a PC for data logging, a reliable IT support service in Salinas, CA can keep the network humming (IT support details).
Don’t forget the little things like printed labels for lanes and buffers. A fast online print shop such as JiffyPrint can ship custom labels in a day, so you never run out mid‑experiment (JiffyPrint services).
Step 2: Compare Key Features and Prices
Now that you know what you need, it’s time to line up the specs and the price tag. A good comparison helps you spot the sweet spot where performance meets budget.
What to look at
Focus on the basics: voltage range, current limit, output ports, and safety bits like automatic shut‑off. A unit that covers 0‑15 V and 300‑500 mA will run most agarose and SDS‑PAGE gels without a hitch.
Check the mode options. Constant voltage is fine for DNA gels, but constant current gives steadier heat control for proteins. If you need both, pick a supply that lets you switch easily.
Real‑world examples
One lab at a midsize university chose a Spellman 105 low‑voltage model because it offers a simple knob, a clear display, and fits on a crowded bench. The price was about $120, and the unit handled 10‑cm gels with no trouble.
Another CRO preferred Thermo’s PS300B. It gives 10‑300 V, up to 500 mA, and has a timer that shuts the unit off after a set run. The extra cost – roughly $250 – paid off in saved hands‑on time and fewer run errors.
For shops that want a ready‑made budget option, Shop Genomics offers a compact 12 V, 300 mA bench supply under $80. It plugs straight into a standard outlet, has an automatic shut‑off, and comes with a tiny digital read‑out. Many teaching labs find it hits the right balance of price and safety.
Quick comparison table
| Model | Voltage range | Current limit | Key safety feature |
|---|---|---|---|
| Spellman 105 | 0‑15 V | 300 mA | Auto shut‑off |
| Thermo PS300B | 10‑300 V | 500 mA | Timer‑controlled shut‑off |
| Shop Genomics budget supply | 0‑12 V | 300 mA | Automatic shut‑off |
Take a moment to write down the numbers that matter for your work. Then compare them against the budget you have. If a model costs a bit more but saves you time or reduces waste, that extra spend often makes sense.
Tip: look for a price list that shows the total cost of ownership – include spare parts, extra cords, and power use. A simple spreadsheet can reveal hidden savings.
For a deeper dive into the range of power supplies on the market, see the electrophoresis power supplies overview on SelectScience.

Step 3: Set Up and Calibrate Your Power Supply
Now that you have chosen an affordable lab bench power supply for electrophoresis, it’s time to put it on the bench and make sure it works right.
Unbox and check
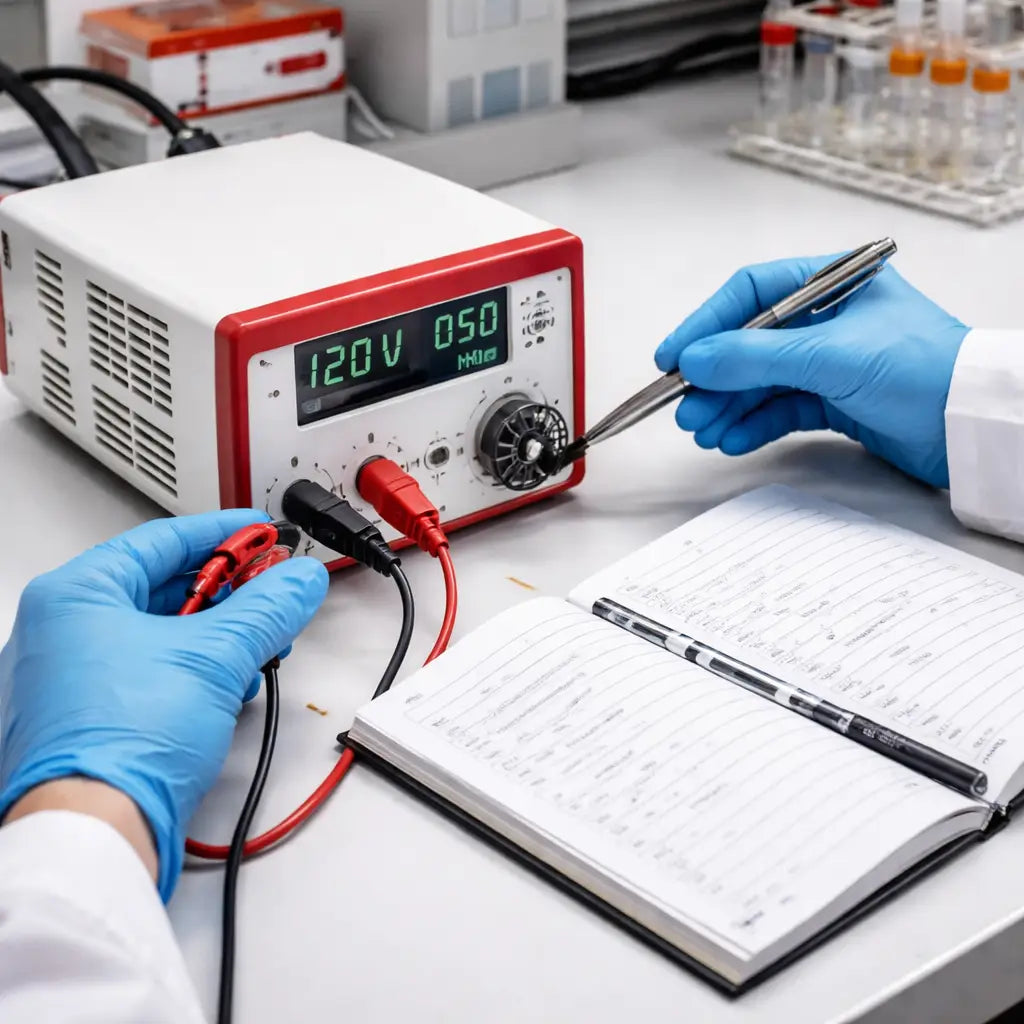
Place the box on a clean, dry surface. Look for a solid metal case, a clear digital read‑out, and the two banana plugs. Inspect the plug for frayed wires and the case for cracks. If anything looks off, ask the seller for a replacement before you start.
Wire the leads
Snap the red plug into the “+” terminal and the black plug into the “–” terminal. Then connect the other ends to the tank’s electrode clips. You should hear a soft click. If the plugs feel loose, double‑check the polarity – swapping them can damage the gel.
Set voltage and run a test
Turn the knob to 0 V, then raise it to the target voltage. A rule of thumb is 5‑10 V per centimetre, so a 10 cm gel runs well at about 60 V. Watch the read‑out as it climbs.
Run a quick test with just the loading dye. The orange line should travel three‑quarters of the way down in 30‑45 minutes. If it reaches the bottom in under 20 minutes, lower the voltage a notch.
Calibrate and record
Use a multimeter on the same banana plugs to verify the output. The reading should match the display within 0.5 V. Write the voltage, current limit, and run time in a notebook so you can repeat the settings later.
- Supply plugged into a grounded outlet.
- Red lead in anode, black lead in cathode.
- Voltage set for gel length.
- Test run with loading dye only.
- Confirm voltage with a multimeter.
Tip: a short “dry run” with water instead of buffer catches loose connections before the real gel, saving time and agarose.
For a visual walk‑through, see this quick video walkthrough.
When the supply passes these checks, you’re ready to load real samples and run a full experiment.
Step 4: Maintain and Troubleshoot
Keeping your affordable lab bench power supply humming is easier than you think. A few quick habits stop most problems before they start.
Daily sanity check
After you finish a run, turn the knob to 0 V and unplug the unit. Give the banana plugs a gentle wiggle – they should feel snug. If anything rattles, reseat it before the next session.
Look at the display. A stray flicker or a dim read‑out often means a loose connection or a weak battery in the internal clock. Fix it now, not when the gel stalls.
Weekly maintenance routine
1. Wipe the case with a dry cloth. Dust on the vents can cause the fan to run louder and overheat the supply.
2. Inspect the leads for frayed insulation. Replace any cable that shows cracks – cheap fixes save costly replacements.
3. Run a 5‑minute dry test with distilled water in the tank. Watch the voltage rise smoothly. If it jumps or drops, the internal regulator may need a service.
For a deeper dive into troubleshooting basics, see this forum post from experienced hobbyists that walks through common faults and how to fix them testing and troubleshooting bench power supply.
Quick fixes you can try on the spot
If the dye front runs too fast, lower the voltage by 5 V and note the change. If the power supply trips the auto‑shutoff, check the buffer level – low buffer can cause a sudden current spike.
When the unit hums loudly, open the vent slots and blow out any dust with compressed air. A clean vent lets the fan cool the electronics properly.
And if the voltage read‑out drifts by more than 0.5 V after a run, grab a multimeter and compare. A mismatch means the internal sensor may need recalibration.
Pro tip: keep a small logbook on the bench. Jot down the voltage, run time, and any odd behaviour. Over weeks you’ll spot patterns and prevent repeat issues.
By treating your power supply like a lab partner – checking it, cleaning it, and noting its quirks – you keep runs consistent and avoid surprise downtime.
FAQ
How do I choose the right voltage range for an affordable lab bench power supply for electrophoresis?
First, look at the max voltage the unit can show. Most agarose gels need 0‑15 V, so a supply that tops out at 12‑15 V works fine. If you run protein gels, you may need up to 30 V, but many cheap models still hit that range. Match the voltage range to the gel length, about 5‑10 V per centimetre gives a steady run without overheating.
What safety features should I look for in a low‑cost power supply?
Look for an automatic shut‑off that cuts power if the current spikes or if the lid opens. A built‑in over‑current protection stops the unit from frying when the buffer dries out. A clear digital read‑out helps you spot drift quickly. A sturdy metal case keeps dust out and protects the electronics if the bench gets knocked over. These features add little cost but save a lot of hassle.
How often should I calibrate the voltage reading on my bench power supply?
Check the voltage with a multimeter at least once a month, or after any big change in buffer volume. Turn the knob to 0 V, then set it to a known value like 5 V and compare the display to the meter. If the reading differs by more than 0.5 V, note it and adjust the zero knob if your unit has one. Regular checks keep your runs repeatable.
Can I use a cheap power supply for both DNA and protein gels?
You can run both DNA and protein gels with the same low‑cost supply, as long as it meets the voltage and current limits you need. DNA gels usually stay below 150 V, while protein gels may need a steadier current setting. Choose a model that lets you switch between constant voltage and constant current modes. That flexibility lets a single affordable unit cover most teaching and small research work.
What are common signs that my power supply needs maintenance?
Listen for a louder fan or a humming buzz that doesn’t go away when the voltage is at zero. If the digital read‑out flickers or jumps, the internal regulator may be wearing out. Check the banana plugs; any looseness or corrosion will cause spikes. A dusty vent will make the unit overheat fast. When you see any of these signs, clean the vents, tighten the plugs, or plan a quick service.
Where can I find budget‑friendly power supplies that still meet lab standards?
Shop Genomics lists a few low‑price models that still meet lab safety rules. Look for units priced under $100 that show a clear voltage read‑out and an automatic shut‑off. Many university labs also buy from bulk science catalogs that offer student discounts. Compare the spec sheet, read the short user reviews, and pick the one that fits your bench space and run needs. A small upfront cost often saves you time later.
Conclusion
You've seen how a cheap bench power supply can run clear gels without draining the lab budget.
Pick a unit that gives 0‑15 V, 300‑500 mA and an auto shut‑off. Check the banana plugs, wipe the case, and set the voltage by the rule of 5‑10 V per centimetre of gel.
Real‑world tip: a teaching lab at a community college saved $80 a term by swapping a noisy supply for a quiet 12 V model and labeling each unit with clear safety stickers.
Keep a short checklist on the bench – voltage set, buffer topped, tip rack ready – and run a quick dye test before every experiment.
Need printable labels for your new supply? JiffyPrintOnline offers affordable lab labels that stick well to plastic and metal.
For a deeper walk‑through of low‑cost gel setups, check our budget‑friendly gel electrophoresis guide. With the right parts and a simple routine, you’ll get reliable results week after week.


