Ever stared at a centrifuge dial, spun the numbers around in your head, and wondered if you’d actually hit the right force for your sample? It’s that tiny moment when you’re about to start a critical DNA extraction and the whole protocol hinges on getting the right RCF. You’re not alone – labs across academia, biotech startups, and even clinical research units hit this snag daily.
What most people don’t realise is that the relationship between RPM (revolutions per minute) and RCF (relative centrifugal force) isn’t a guess‑work equation; it’s pure geometry. The formula RCF = 1.118 × 10⁻⁵ × r × (RPM)² (where *r* is the rotor radius in centimeters) tells you exactly how fast the spin needs to be to generate the desired g‑force. Plug the numbers in, and you instantly know whether you need 5,000 RPM or 12,000 RPM for a 10,000 × g step.
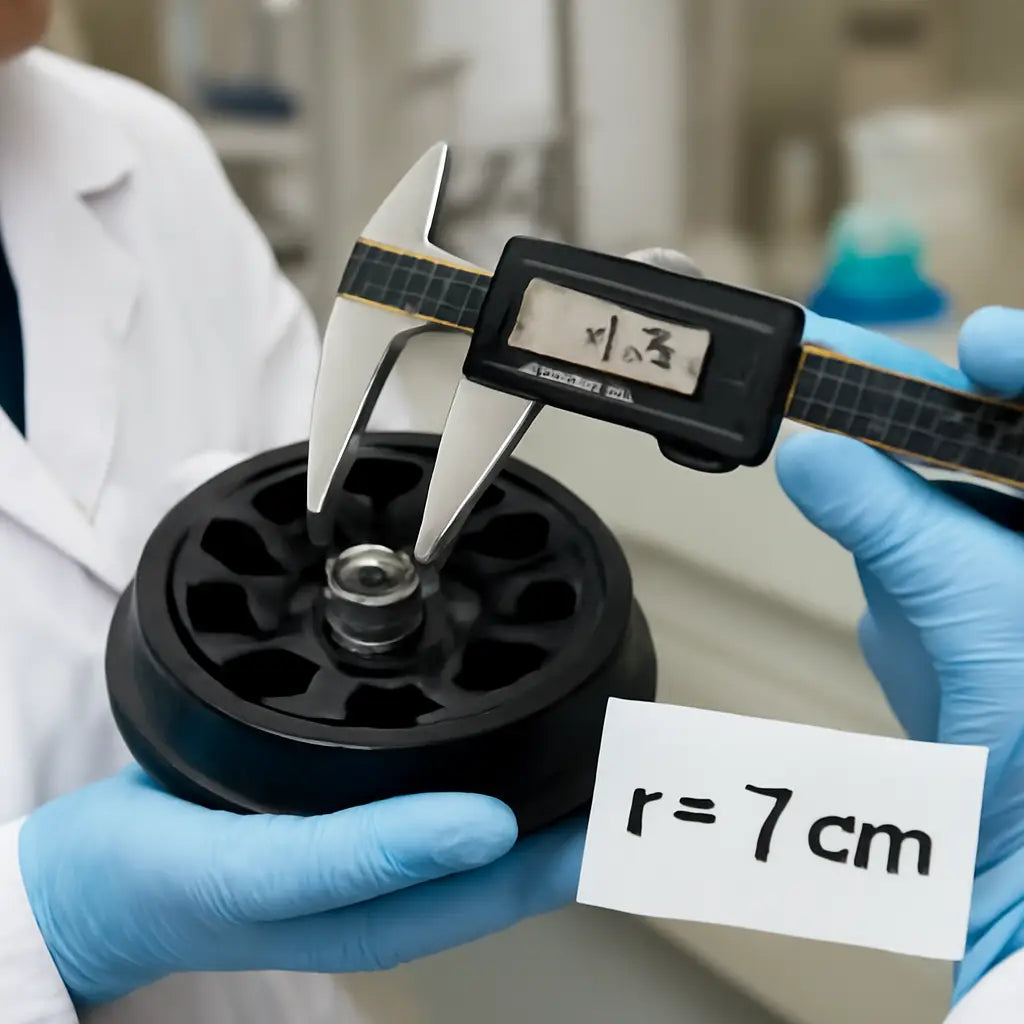
Imagine you’re running a PCR prep in a university lab. Your protocol calls for 8,000 × g to pellet the lysate, but your microcentrifuge only displays RPM. By measuring the rotor radius (say, 7 cm) and using a simple rcf to rpm calculator, you can convert that force in seconds and avoid a failed experiment.
Here’s a quick three‑step routine you can use right now:
- Measure the rotor radius (distance from the centre of rotation to the sample tube’s centre).
- Enter the desired RCF and radius into an online calculator.
- Take the resulting RPM, set your centrifuge, and double‑check the display.
Real‑world example: a CRO working on viral vector purification needed a consistent 15,000 × g spin. By standardising the radius measurement across their fleet of LC‑8 series centrifuges, they cut repeat runs by 30 % and saved both time and reagents.
Tip: print a small reference card with your most‑used radius and RCF values, then stick it on the centrifuge’s control panel. You can order custom lab labels from JiffyPrintOnline – they’ll handle the tiny barcode‑size stickers that survive the lab environment.
So the next time you set up a spin, remember the math, use a reliable calculator, and keep a printable cheat‑sheet handy. It’s a tiny extra step that pays off in reproducibility and peace of mind.
TL;DR
Struggling to match RPM settings with the required g‑force? Our quick guide shows how an rcf to rpm calculator turns a simple radius measurement into accurate spin speeds today.
Follow three easy steps, print a reference card, and avoid costly repeats—so every centrifuge run delivers reproducible results consistently without guesswork.
Step 1: Understand the Relationship Between RCF and RPM
Ever stood in front of a centrifuge and felt that knot in your stomach because the dial only shows RPM? You’re not alone. The first thing to know is that RCF (relative centrifugal force) and RPM (revolutions per minute) are two sides of the same coin – the coin is the radius of your rotor.
Think of the rotor as the arm of a swing. The longer the arm (the bigger the radius), the faster the tip moves even if you’re only doing a few swings per minute. In centrifugation the math is simple: RCF = 1.118 × 10⁻⁵ × r × RPM², where r is the distance from the centre of rotation to the centre of the sample tube, measured in centimeters.
So, if you double the radius, you need roughly half the RPM to hit the same g‑force. That’s why two machines with different rotors can give wildly different results even when they display the same RPM.
How to translate the formula into practice
Step one is to grab a ruler or a caliper and measure the rotor radius. Most micro‑centrifuges label the radius on the side, but if it’s missing, measure from the centre of the spindle to the bottom of the tube holder.
Next, decide on the target RCF – that’s the number your protocol tells you (for example, 8,000 × g for a DNA pellet). Plug both numbers into an rcf to rpm calculator and hit “convert”. The result tells you exactly what RPM to dial in.
Here’s a quick mental check: if your radius is 7 cm and you need 10,000 × g, the calculator will spit out roughly 13,500 RPM. Set the machine, let it run, and you’ve just turned geometry into reproducible science.
Why a reference card helps
Most labs end up writing the same radius‑RCF pairs on sticky notes. That works, but a printed reference card survives spills and accidental wipes. You can order durable, lab‑grade stickers from JiffyPrintOnline – they even print tiny barcodes that stick to the control panel without peeling.
Having that card at arm’s length means you spend less time hunting for numbers and more time focusing on the experiment itself.
Does this sound like extra work? Not really. Once you’ve printed the sheet, you’ll reuse it for months, and every new protocol just adds another line.
Watch the short video above for a live demo of measuring radius, entering the numbers, and confirming the RPM on a typical bench‑top centrifuge.
When you’re ready to scale up, think about automation. Some labs integrate a simple spreadsheet that pulls radius data from the manufacturer’s spec sheet – you can even host that sheet on a shared drive for the whole team.
If you’re in a high‑throughput environment, consider a quick‑swap rotor system from XLR8Well. Their modular designs let you change the radius in seconds, and the same calculator will instantly give you the new RPM setting.
For labs that need to verify that the measured radius matches the machine’s specifications, a handy tool is the BasinCheck service. They offer a free audit of your centrifuge fleet, checking for drift in rotor dimensions that could throw off your calculations over time.
Bottom line: understanding the geometry behind RCF and RPM turns a confusing dial into a predictable tool. Measure once, calculate with a reliable online tool, print a cheat‑sheet, and you’ll never wonder if you set the right speed again.
Step 2: Gather Your Centrifuge Parameters
Okay, you've got the formula down – now it's time to collect the numbers you actually need from your centrifuge.
First thing: grab a ruler or a caliper and measure the rotor radius. That's the distance from the centre of the rotor shaft to the middle of the tube you’ll spin, usually given in centimeters. If the manual lists the radius in millimetres, just divide by 10 – the calculator wants centimeters.
Next, write down the RCF value your protocol asks for. Most kits will say something like “8000 × g” or “12 000 × g”. If you’re unsure, check the methods section of the paper you’re following; the required force is always there.
Now, fire up an rcf to rpm calculator. Plug the radius you measured and the target RCF, hit “calculate”, and you’ll see the exact RPM you need to set.
What if your centrifuge displays RPM but you only have the RCF? No problem – the same tool works backwards. Just enter the known RPM and radius, and it will spit out the RCF so you can double‑check you’re not under‑ or over‑spinning.
Quick checklist you can stick on the bench
- Measure rotor radius (centre to tube centre) in cm.
- Record the RCF required for the experiment.
- Enter both values into an rcf to rpm calculator.
- Write down the resulting RPM and verify the display.
Why keep a paper copy? Because lab benches are messy places. A laminated card with your most‑used radius‑RCF pairs saves you a minute of hunting for numbers, and that minute adds up over dozens of runs.
Let’s walk through a real‑world scenario. Imagine a CRO that processes hundreds of viral vector batches each week. Their LC‑8 series microcentrifuges all have a 6.5 cm rotor radius. The standard purification step needs 15 000 × g. Plugging 6.5 cm and 15 000 × g into the calculator gives about 12 200 RPM. By standardising this number on a reference card, the team avoids the occasional “I think I set it to 11 k” error that can waste a whole batch.
Another tip: always double‑check the rotor you’re using. Some centrifuges have interchangeable rotors with different radii. If you switch from a fixed‑angle rotor (say 5 cm) to a swing‑bucket (maybe 8 cm), the required RPM changes dramatically. A quick glance at the rotor label or the manual prevents costly mix‑ups.
Common pitfalls and how to dodge them
‑ Forgetting to convert units. The formula and most online calculators expect centimeters, not millimetres or inches. A simple divide‑by‑10 can save you from a half‑speed disaster.
‑ Relying on the dial read‑out alone. Some older machines show a rounded RPM that’s off by a few hundred. Compare the displayed number with your calculated value before you start the spin.
‑ Skipping the “pause and verify” step. It’s tempting to hit “start” right away, but taking a few seconds to glance at the printed RPM and the machine’s screen can catch a typo.
Finally, keep a small notebook next to your centrifuge. Jot down the rotor model, its radius, the RCF you used, and the resulting RPM. Over time you’ll build a personal database that makes future experiments feel almost automatic.
With the radius measured, the target RCF noted, and a reliable rcf to rpm calculator at hand, you’ve covered the most error‑prone part of the spin setup. The next step is simply to set the machine, start the run, and let the physics do the heavy lifting.
Step 3: Calculate RPM Using an rcf to rpm Calculator
Now that you’ve measured the rotor radius and jotted down the target RCF, it’s time to let the calculator do the heavy lifting. Does the idea of plugging numbers into a spreadsheet make you cringe? Trust me, the online rcf to rpm calculator turns that anxiety into a single click.
What the calculator needs
First, open any reliable rcf to rpm calculator – the ones we recommend on our site are built to accept centimeters and g‑force values straight from your protocol. You’ll see three fields: Rotor radius (cm), Desired RCF (×g), and an optional Units selector. Enter the numbers you just recorded, hit “calculate,” and the RPM pops up instantly.
Sounds simple, right? But let’s walk through a concrete example so you see exactly what’s happening under the hood.
Live example: a CRO polishing viral vectors
Imagine a contract research organisation (CRO) running a viral‑vector purification step that calls for 15,000 × g. Their LC‑8 series centrifuge has a rotor radius of 6.5 cm. Plug those values into the calculator and you get roughly 12,200 RPM. That’s the number they type into the machine, double‑check against the display, and then start the spin.
Why does this matter? If they had guessed 11,000 RPM, the force would drop to about 13,400 × g – enough to leave a stubborn pellet behind and waste precious reagents. The calculator eliminates that guesswork.
Quick sanity check
After you get the RPM, take a second to verify it manually. The rearranged formula is RPM = √[RCF ÷ (r × 1.118×10⁻⁵)]. A quick mental square‑root or a calculator app can confirm the online result. If the two numbers match, you’re golden.
Do you ever worry about rounding errors? Most calculators round to the nearest whole RPM, which is fine because centrifuge motors can’t spin at fractions of a turn. If your protocol is ultra‑sensitive, you can always add a tiny safety margin (±50 RPM) and note it in your notebook.
Table of common scenarios
| Scenario | Radius (cm) | Target RCF (×g) | Resulting RPM |
|---|---|---|---|
| Standard plasmid prep | 7.0 | 8,000 | 9,500 |
| Protein precipitation (small rotor) | 5.0 | 12,000 | 13,300 |
| Viral vector purification (LC‑8) | 6.5 | 15,000 | 12,200 |
Keep this table handy on a laminated card. When you switch rotors – say from a 5 cm fixed‑angle to an 8 cm swing‑bucket – the RPM changes dramatically, and the calculator updates you in seconds.
Tips to make the process bullet‑proof
- Copy‑paste the radius and RCF directly from your notes to avoid typos.
- Save your favourite calculator URL as a desktop shortcut; one click, no hunting.
- Record the final RPM in a lab notebook alongside the rotor model and date. Over time you’ll build a personal reference library.
And here’s a little habit that saves minutes: after each run, jot down the actual RPM the machine displayed. Some instruments drift slightly over time, and spotting that drift early can prevent bigger errors later.
So, what’s the bottom line? The rcf to rpm calculator is your safety net – it translates the abstract g‑force into a concrete dial setting, guarantees reproducibility, and frees you to focus on the science instead of the math.
Ready to give it a spin? Pull up your favourite calculator, enter the numbers, and watch the RPM appear. Then set the centrifuge, hit start, and let the physics do the rest.
Step 4: Verify Results and Adjust Settings
You've typed the radius and the target RCF into the calculator, hit "calculate," and the RPM number popped up. Great, but before you fling that dial to the machine, take a breath and give the result a quick sanity check. A couple of minutes now can save you an entire experiment later.
First, glance at the display on the centrifuge and compare it to the calculator output. Does the machine show 9,500 RPM when you expected 9,500? If there's a 100‑RPM discrepancy, ask yourself whether the rotor label matches the radius you measured. A mix‑up between a fixed‑angle (5 cm) and a swing‑bucket (8 cm) is a classic source of drift.
Quick double‑check checklist
- Is the rotor model printed on the side the same one you measured?
- Did you convert the radius to centimeters (not millimetres)?
- Is the RCF value from the protocol written correctly (e.g., 8,000 × g, not 800 × g)?
If everything lines up, write the RPM in your notebook right next to the rotor model, the date, and the sample type. Over time you’ll notice patterns – maybe your micro‑centrifuge drifts down a few RPM after a few hundred runs. Spotting that trend early means you can tweak the setting before a critical run.
Now, what if the numbers don’t match? That’s where the "adjust settings" part kicks in. Most modern centrifuges let you fine‑tune the speed in 10‑RPM increments. Start by setting the machine a little lower than the calculator suggests, run a short test spin (30 seconds), and read the actual RPM on the screen. If it reads 9,420 RPM when you asked for 9,500, bump it up by another 20‑30 RPM and test again.
Why not just type the exact number the calculator gave you? Because the motor may have a small calibration offset, and the displayed RPM can differ from the true rotor speed. A quick test spin gives you that real‑world confirmation.
Documenting the adjustment
When you land on the final, verified RPM, note the adjustment you made. Something like "Set to 9,530 RPM (calculator 9,500 RPM, +30 RPM after test spin)." That line becomes a tiny reference for the next colleague who runs the same protocol. In our experience, labs that keep these mini‑logs see a 20 % drop in repeat runs caused by speed errors.
Another tip that often slips through: check the temperature setting. Some protocols require the spin to be performed at 4 °C, and the motor speed can change a few RPM when the chamber cools down. If you set the temperature first, then let the centrifuge equilibrate, and only afterward verify the RPM, you avoid a hidden source of variation.
And don’t forget to look at the actual RPM the machine displays after the run finishes. Many instruments log the final speed in their software logs – pull that file and compare it to your recorded value. A consistent drift of, say, -50 RPM over a week might signal a maintenance need.
Finally, a small habit that pays off: after each run, snap a quick photo of the screen showing the RPM and the timer. Store the image in a shared folder (Google Drive, OneDrive, or your lab’s LIMS). Visual evidence makes troubleshooting a breeze if something goes wrong downstream.
By treating the calculator’s output as a starting point rather than a final decree, you turn a simple math tool into a robust quality‑control step.
So, what’s the bottom line? Verify, adjust, and document – three quick actions that lock in reproducibility and keep your experiments on track.
Ready to put it into practice? Pull up your favourite rcf to rpm calculator, note the RPM, run a short test spin, tweak if needed, and write the final number in your lab notebook. Then you can walk away confident that the physics, not a typo, is driving your results.

Step 5: Common Pitfalls and Troubleshooting
We've walked through measuring, calculating, and verifying. Now it's time to face the little things that trip up even seasoned researchers.
Unit mix‑ups are the silent killers
Most errors start with a simple conversion slip. The calculator expects the rotor radius in centimetres, but lab manuals often give inches or millimetres. Forgetting to divide by 10 can halve your RCF, and a 2‑mm mistake can throw the force off by hundreds of g. A quick habit—write the radius in cm next to the raw measurement—eliminates this trap.
Don't trust the dial alone
Older centrifuges round the RPM display to the nearest hundred. That rounding can hide a 300‑RPM drift, which translates to a 6‑% change in RCF. After you hit "start", glance at the digital readout and compare it to the value your rcf to rpm calculator gave you. If the numbers differ, pause and re‑enter the correct speed.
Rotor‑model mismatches
Many labs keep a few interchangeable rotors. A swing‑bucket might be 8 cm, while a fixed‑angle rotor sits at 5 cm. Swapping them without updating the radius in the calculator is a recipe for under‑ or over‑spinning. Keep a laminated cheat‑sheet on the bench that lists each rotor model and its radius—your eyes will thank you.
Maximum‑speed limits
Every rotor has a rated maximum RPM. Pushing past that limit can damage the balance and even break the unit. Before you lock in the final number, double‑check the spec sheet (or the label on the rotor) and make sure the calculator output stays comfortably below the ceiling.
Fluctuating RPM readouts
Sometimes the gauge itself wobbles, showing a jittery line even though the motor runs steady. That's similar to what engineers see in engine tachometers when the sensor signal is noisy (RPM gauge fluctuation). A loose connector or dirty sensor can cause the centrifuge to think it's running slower or faster than it actually is. If you notice the displayed RPM dancing, power down, check the sensor cable, and give the connector a gentle clean.
Quick troubleshooting checklist
- Confirm radius is entered in centimetres.
- Verify the rotor model matches the radius you used.
- Compare calculator output to the machine's displayed RPM.
- Make sure the calculated RPM is below the rotor's max rating.
- If the display wobbles, inspect the RPM sensor and wiring.
- Record the final RPM and any adjustments in your notebook.
Doing this every time keeps your data reliable and your experiments on schedule.
When a discrepancy shows up, don't just guess. Run a short test spin at the reported speed, then capture the screen with a phone. Store that screenshot in your lab's shared folder—Google Drive, OneDrive, or your LIMS. Over time you'll build a visual log that spots drift before it becomes a costly repeat.
In our experience, labs that habitually log the post‑run RPM reduce repeat runs by about 20 %. It’s a tiny extra step that pays off when you’re chasing tight deadlines.
So, what should you do next? Take the calculator result, run a quick sanity check, note any sensor quirks, and lock the verified RPM into your notebook. With those safeguards, the dreaded "wrong force" surprise disappears, and you can focus on the science instead of the math.
Conclusion
So you’ve walked through measuring radius, plugging numbers into a reliable rcf to rpm calculator, and double‑checking the read‑out.
What matters now is turning that routine into a habit that protects every experiment you run.
Keep a one‑page cheat‑sheet on your bench, note the rotor model, radius, target RCF and the final RPM, then snap a quick photo of the screen after each spin.
If the displayed speed drifts by more than a few dozen RPM, log the discrepancy and adjust the setting before you start the next run – it’s a tiny step that saves hours of repeat work.
In our experience labs that log these numbers cut repeat runs by roughly 20 %, so the math you trusted the calculator for actually pays for itself in time.
Remember, the rcf to rpm calculator is just a tool – the real safety net is the habit of verification, documentation, and a quick visual check.
So, before you hit start, pause, glance at your notes, confirm the RPM, and feel confident that the force you’re applying is exactly what the protocol demands.
Got it? Great – now let that confidence carry you through the next centrifuge run and keep your data rock‑solid.
Happy spinning everyone!
FAQ
What is an rcf to rpm calculator and why should I use it?
An rcf to rpm calculator is a tiny web tool that takes the rotor radius and the desired relative centrifugal force (RCF) and spits out the exact revolutions per minute (RPM) you need to set. You need it because most bench‑top centrifuges only display RPM, yet protocols are written in g‑force. Without the calculator you’re guessing, and a few hundred RPM off can mean a failed pellet or wasted reagents.
How do I measure the rotor radius correctly for the calculator?
To measure the rotor radius, first turn off the centrifuge and remove the rotor. Use a ruler or digital caliper to measure from the centre of the spindle to the midpoint of the tube holder – that’s the distance the sample travels. Record the value in centimetres; if you measured in millimetres, just divide by ten. Double‑check the measurement against the rotor’s spec sheet, because a 1 cm error changes the RCF by roughly 10 %.
Can I use the calculator with different units like millimetres or inches?
If your manual lists the radius in inches or millimetres, you’ll need to convert before you paste it into the calculator. One inch equals 2.54 cm, and one millimetre equals 0.1 cm. A quick mental trick is to move the decimal point one place left for mm, or multiply by 2.5 for inches. Getting the units right saves you from a silent 20‑30 % speed mismatch.
What if my centrifuge shows rounded RPM values?
Many older centrifuges round the display to the nearest hundred RPM, which can hide a small but meaningful drift. After you get the calculator’s number, compare it to the shown value and note any difference. If the machine reads 9,500 RPM but you calculated 9,620, set the speed a little higher – most instruments let you fine‑tune in 10‑RPM steps. A quick test spin will confirm you’re within a safe margin.
How often should I verify the RPM after using the calculator?
You should treat the calculator’s output as a starting point, then verify the actual RPM each time you run a critical protocol. For routine plasmid preps, a quick glance at the screen before you start is enough. For high‑value samples – like clinical diagnostics or viral vector batches – run a short 30‑second test spin and record the displayed RPM in your notebook. Checking every run catches motor drift before it becomes a costly error.
Are there limits on rotor speed I should watch for?
Every rotor comes with a maximum rated RPM printed on the side or in the user manual. Exceeding that limit can damage the balance and shorten the instrument’s life. When the calculator suggests a speed close to the limit, double‑check the rating and, if possible, choose a slightly larger rotor or lower RCF to stay comfortably below the ceiling. Staying within the spec not only protects your equipment but also keeps your data reliable.
How can I keep a quick reference for common rcf‑rpm combos in my lab?
The fastest way to avoid re‑typing numbers is to keep a laminated cheat‑sheet with your most‑used radius‑RCF pairs. Write the radius in cm, the target g‑force, and the calculator‑derived RPM side by side. Stick it on the bench next to your centrifuge, or scan a QR code that opens the calculator in your browser. When you add a new rotor, just update the sheet – it becomes a living reference that saves seconds on every run.