
Ever walked into the lab and heard that low‑hum of an ultra low temperature freezer sputtering, then felt a knot in your stomach because you know a sample could be at risk?
We’ve been there—researchers in academic institutes, biotech firms, and CROs all worry about a freezer hiccup when the next critical experiment is on the line. A routine can keep those -86 °C units humming for years.
Ultra low temperature freezer maintenance isn’t rocket science, but it needs a plan that fits a busy lab. Think of it like brushing your teeth—you don’t wait for a cavity to start caring.
First, picture the condenser coils as the freezer’s lungs. If dust clogs them, the unit works harder, temps drift, and you waste power. A quick visual check each month—just a glance and a soft brush—prevents a nightmare.
Second, frost is a silent thief. Even a thin ice layer insulates the evaporator and spikes temps. A simple manual defrost each quarter, followed by a lint‑free wipe, does the trick easily.
What about alarms? Most modern units flash a warning before things go south. In our experience, training the lab techs to respond to the first beep—checking the temperature log and confirming door seals—saves a day’s worth of lost samples.
And don’t forget the power supply. A UPS or backup generator can be a lifesaver during a blackout. It’s a small investment compared to the cost of losing priceless genomic material.
So, what’s the next step? Grab a checklist, set a monthly reminder, and involve the whole team. When everyone knows the simple steps—cleaning coils, removing frost, responding to alarms—ultra low temperature freezer maintenance becomes second nature.
Ready to make your freezers reliable partners in discovery? Let’s dive deeper into each maintenance task and see how you can keep your samples safe.
TL;DR
Ultra low temperature freezer maintenance means monthly coil checks, quarterly defrosts, and quick alarm responses to keep -86 °C samples safe, ensure energy efficiency, and experiments on track. Follow a clear checklist, involve every lab member, schedule reminders, and you’ll dodge costly failures while preserving priceless genomic material for future breakthroughs.
Step 1: Inspect the Door Seal
Imagine you just closed the freezer door after a long run of sample transfers and you hear a faint hiss. That tiny sound could be the seal whispering that it's not quite tight. If the door seal lets a little warm air sneak in, your ultra low temperature freezer will have to work harder, and you risk a temperature drift that could jeopardize priceless samples.
So, how do we make sure the seal is doing its job? First, give the gasket a visual once‑over. Look for any visible cracks, tears, or areas where the rubber looks dry and brittle. Even a small nick can become a big problem over time.
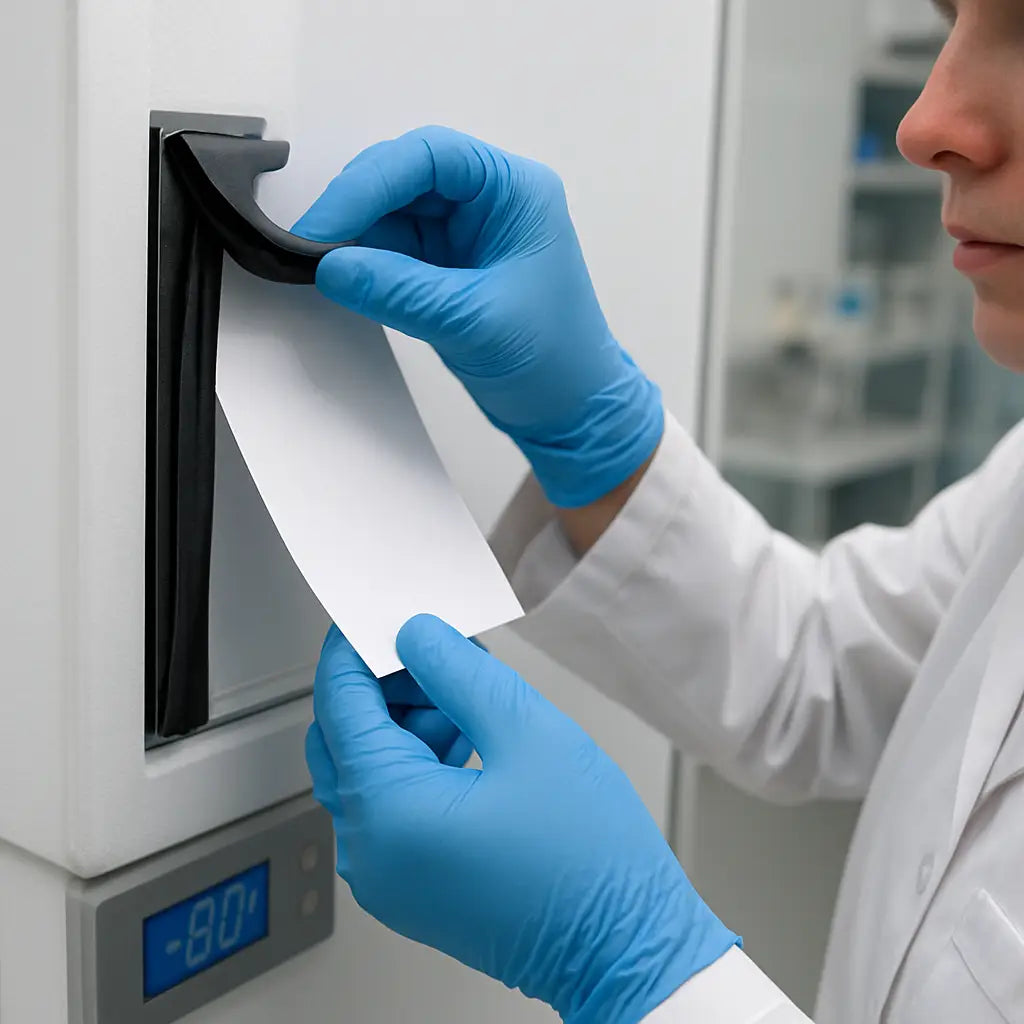
Next, run the "paper test". Take a thin piece of printer paper—something you might grab from the lab’s print station—and close the freezer door on it. If you can pull the paper out easily without resistance, the seal isn’t sealing properly. A snug pull means the gasket is still airtight.
Feel around the perimeter with your fingertips. A good seal feels uniformly firm; any soft spots or uneven pressure are red flags. If you spot a gap, gently clean the area with a lint‑free cloth and a mild soap solution, then dry it thoroughly.
But cleaning isn’t always enough. Over time the gasket can lose elasticity. In those cases, replace the seal according to the manufacturer’s part number. Our own Ai RapidChill units, for example, ship with a replaceable gasket that snaps back into place without tools.
Here’s a quick checklist you can print and stick on the freezer door:
- Visual inspection for cracks or wear.
- Paper pull‑test.
- Touch‑test for uniform firmness.
- Clean with lint‑free cloth if dirty.
- Replace if any test fails.
Keeping that checklist handy also ties into your lab’s broader documentation workflow. Many teams use a simple client management system to log maintenance activities—think of platforms like ClientBase that let you record who performed the inspection and when.
And when you need to print out the checklist or a maintenance log, a reliable online print service such as JiffyPrintOnline can deliver crisp, double‑sided sheets right to your lab door, saving you a trip to the office printer.
One more thing: if your institution relies on integrated IT for alarm monitoring, make sure the freezer’s network interface is covered by a robust IT plan. Resources like managed IT services for healthcare can help you keep the alarm data flowing even during a power hiccup.
After you’ve run through the steps, give the door a gentle tug. It should close with a soft “click” and stay sealed. If it feels loose, double‑check the gasket or schedule a replacement before the next quarterly defrost.
Step 2: Clean the Condenser Coils
Okay, you’ve checked the door seal, now it’s time to give the condenser coils some TLC. Those fins are the freezer’s lungs – they push heat out so your -86 °C samples stay frosty.
Ever wonder why a unit suddenly starts humming louder or your energy bill spikes? Dirty coils are the usual suspects. A thin layer of dust acts like a blanket, forcing the compressor to work harder, which can shave minutes off the recovery time after a power glitch.
Why coil cleanliness matters
In a recent field note from a biotech lab, a 15 % increase in power draw was traced back to just a month of neglected coil cleaning. The extra load not only costs money; it also shortens the lifespan of the compressor – a part you’d rather not replace before your grant runs out.
Gather the right tools
Here’s what you’ll need: a soft brush or a handheld coil‑cleaning brush, a vacuum with a low‑speed setting, a lint‑free cloth, mild detergent (a drop of dish soap in warm water works), and a screwdriver if your model has removable panels. Most of our Ai RapidChill units ship with a brush tucked in the accessories tray, so you’re already set.
Step‑by‑step cleaning routine
1. Power down and unplug. Safety first – you don’t want a live compressor shocking you while you’re elbow‑deep in dust.
2. Remove the outer panel. Use the screwdriver to loosen the screws; keep them in a small cup so they don’t roll away.
3. Brush off loose debris. Sweep the fins gently from top to bottom. A soft brush prevents bending the thin copper tubes.
4. Vacuum the remaining particles. Set the vacuum to the lowest suction and glide it over the coil surface. This pulls out the fine powder that the brush missed.
5. Wipe with a damp cloth. Dip the lint‑free cloth in the diluted detergent, wring out excess water, and run it across each fin. Avoid spraying water directly – you don’t want moisture seeping into the electronics.
6. Dry and reassemble. Use a dry cloth to remove any lingering moisture, then bolt the panel back on and plug the unit in.
7. Run a quick test. Power the freezer up, watch the temperature log for the next 30 minutes, and make sure the compressor settles into its normal rhythm.
If you need a visual reference, Mether Biomedical walks through a similar process in their maintenance guide, showing exactly how to avoid touching the hot condenser surface while cleaningcleaning the coils safely.
Pro tips you’ll wish you’d known earlier
• Schedule a coil check on the same day you do the door‑seal inspection – it becomes a habit and you won’t forget.
• Keep a small notebook on the freezer’s side. Jot down the date, any observations, and the person who performed the cleaning. Over time you’ll see patterns – maybe a particular lab bench draws more dust.
• If you work in a high‑traffic area, consider placing a simple air‑filter curtain in front of the unit. It cuts down on particulate buildup by up to 40 % according to a small study from a university cryogenics department.
Remember, a clean condenser means lower energy use, quieter operation, and—most importantly—more reliable temperature stability for those priceless genomic samples.
Step 3: Verify Temperature Settings
Now that the coils are spotless and the door seal is tight, the next thing that can make—or break—your ultra low temperature freezer maintenance routine is actually confirming that the unit is staying at the set point. Ever watched the temperature log bounce around like a jittery heart monitor and thought, “Is this normal?”
Why a quick temperature check is a lifesaver
Even a perfectly cleaned freezer can drift if the thermostat or sensor is off. A few degrees above -86 °C can accelerate sample degradation, and you’ll see a spike in energy use as the compressor works overtime. In our experience, catching a drift early saves both samples and the lab’s budget.
Step‑by‑step verification
1. Pull the latest log. Most modern units keep a 24‑hour rolling record. Open the control panel, export the CSV, and glance at the average temperature over the past hour.
2. Compare to the set point. Your target is usually –86 °C (or whatever your protocol demands). If the average is within ±0.5 °C, you’re good.
3. Check alarm history. Look for any “high temperature” warnings in the last 48 hours. Even a brief alarm can hint at a sensor glitch.
4. Validate the sensor. Most freezers let you run a self‑test. Initiate it from the menu; the unit will compare the internal probe to a built‑in reference. If the test fails, note the sensor serial number for replacement.
5. Document the result. Write the date, observed temperature, and any notes in your maintenance notebook. Over time you’ll see trends—maybe a particular lab bench generates more heat.
Does this feel like a lot? Not really. The whole check takes under five minutes once you’ve trained a tech.
What to do when temps are off
If the average sits more than 0.5 °C high, first double‑check that the door wasn’t left ajar during the logging period. Next, look at airflow: make sure there’s at least 8 in of clearance on top and 5 in on the sides, just as the best practices for maintaining an ultra low temperature freezer recommend.
Still high? Consider calibrating the sensor. Many manufacturers ship a calibration kit; follow the SOP and run the calibration at room temperature, then at –80 °C if possible. If calibration doesn’t help, it’s time to replace the probe—most Shop Genomics models use a standard sensor that’s easy to order.
Another quick fix is to verify the power supply. Fluctuating voltage can confuse the controller. A UPS or dedicated circuit breaker can smooth out spikes, a tip we often share with CROs and academic labs that run multiple freezers side by side.
Quick checklist you can paste on the freezer
- Export temperature log (last 1 h)
- Is avg ≤ –86 °C ± 0.5 °C?
- Any alarms in 48 h?
- Run built‑in sensor self‑test
- Record date, reading, notes
For labs that need 24/7 oversight, many units now support remote temperature dashboards. You can set up email or SMS alerts so you never have to stare at a frozen screen. The Stirling Ultracold guide walks through setting up cloud‑based monitoring, which works with most major brands.
Keeping this tiny routine on your lab’s wall turns a potentially catastrophic surprise into a routine part of ultra low temperature freezer maintenance. And when everything stays cold, you can get back to the science you love.
Step 4: Defrost Properly
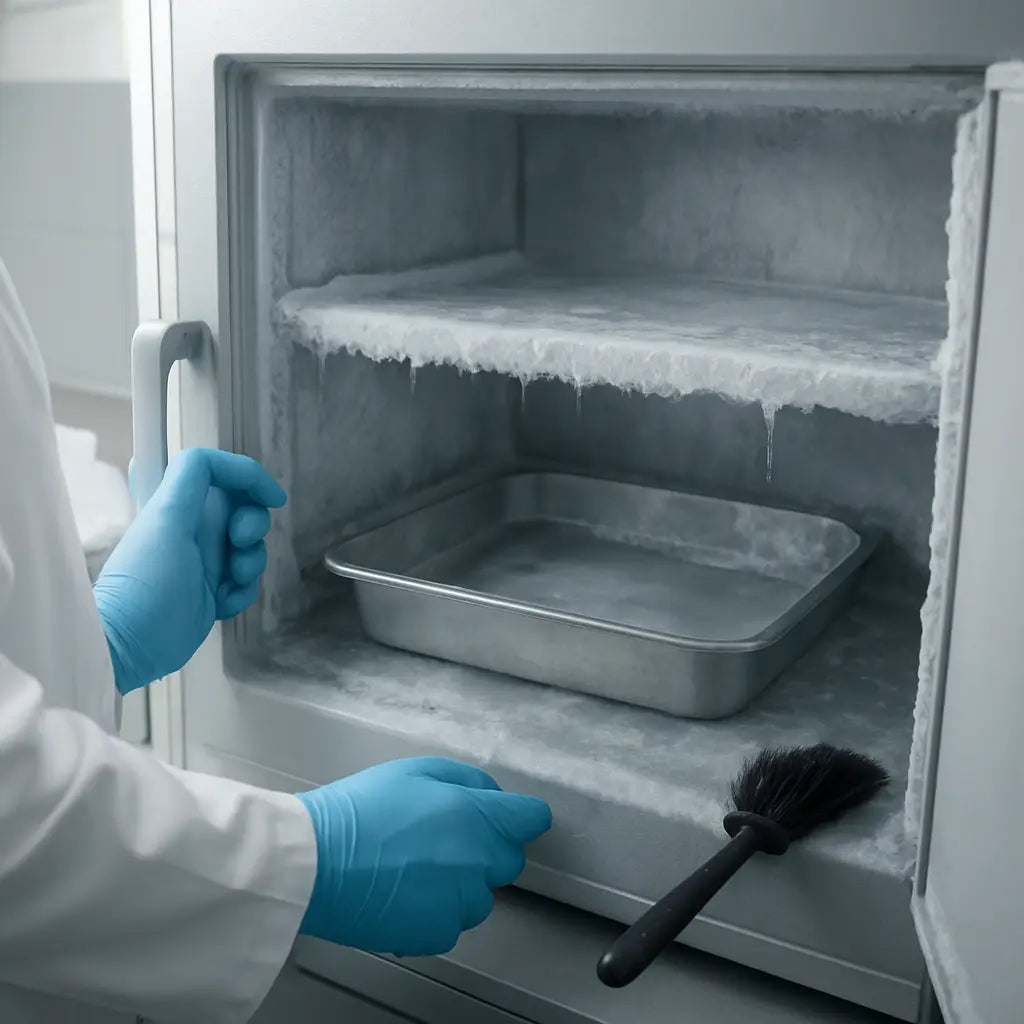
Ever opened a ULT freezer and felt that icy crust inside like a forgotten freezer burn on a frozen pizza? That frost is the silent thief that can drag your -86 °C down to a wobble. The good news? Defrosting it the right way takes only a few minutes and saves you a lot of heart‑ache later.
Why a regular defrost matters
When ice builds up on the evaporator, the freezer has to work harder to pull heat out. You’ll notice a spike in energy use, the compressor humming louder, and—worst of all—temperature drift that puts priceless samples at risk. A quarterly defrost keeps the unit humming efficiently and protects gaskets from damage.
Quick defrost checklist
- Schedule a 30‑minute window when no one needs the freezer.
- Back up the latest temperature log.
- Gather a soft brush, lint‑free cloth, and a container for melt water.
- Notify your team that the unit will be offline.
Got the list? Great. Let’s walk through the actual steps.
Step‑by‑step defrost process
1. Power down and unplug. Safety first—no live components while you’re handling ice.
2. Remove any samples you can. If you have a backup freezer, transfer them quickly; otherwise, place them in a -20 °C fridge for the short outage.
3. Leave the door ajar. This lets warm air melt the frost naturally. You’ll hear a slow drip as the ice turns to water.
4. Speed up the melt (optional). A low‑heat hair dryer on a cool setting can help, but keep it at least six inches away to avoid overheating the coils.
5. Catch the water. Place a shallow pan or tray beneath the freezer to prevent puddles on the lab bench. Wipe up any spills immediately to avoid slip hazards.
6. Inspect the interior. Once the ice is gone, use a lint‑free cloth dampened with mild detergent to clean any residual grime. Avoid harsh chemicals that could corrode the seal.
7. Dry thoroughly. Let the unit air‑dry for 10‑15 minutes. A quick fan can help circulate air without blowing dust onto the coils.
8. Power back up. Plug the freezer in, close the door, and let it reach –86 °C before returning samples. Check the temperature log for a stable reading within ±0.5 °C.
If you’re looking for a step‑by‑step video, the defrosting guide from NuAire walks you through each move with clear visuals.
Remember, a clean, frost‑free interior not only saves energy but also extends the life of the door gasket—a common failure point in labs that run the freezer round‑the‑clock.
In our experience at Shop Genomics, labs that embed a quarterly defrost into their routine see fewer temperature alarms and lower electricity bills. It’s a tiny habit that pays off big time when you’re protecting irreplaceable genomic material.
Step 5: Test Alarms and Sensors
Ever been jolted by a sudden alarm when you’re halfway through an experiment, and you’re not sure if it’s a real problem or a false trigger? That panic moment is exactly why we set aside a few minutes each month to give those alarms and temperature sensors a quick sanity check.
Why testing matters
In ultra low temperature freezer maintenance, the alarms are the freezer’s early‑warning system. A faulty sensor can either hide a temperature drift or scream at the slightest breeze, both of which waste time and can jeopardize priceless samples.
Think of the alarm as a smoke detector for your freezer – you want it to work, but you don’t want it crying wolf every time the door swings.
Step‑by‑step checklist
1. Pull the alarm log. Open the control panel, navigate to the alarm/history screen, and export the last 48 hours. Look for any “high temperature” or “door open” entries. If you see a warning you don’t remember, note the timestamp.
2. Simulate a temperature breach. Most units let you run a built‑in self‑test. Select “sensor test” and let the system inject a fake –80 °C reading. The alarm should flash and an audible tone should sound. If nothing happens, the buzzer or speaker may need a quick replace.
3. Verify the sensor output. Grab a calibrated handheld probe (we like the ones that ship with our Ai RapidChill models) and compare its reading to the freezer’s displayed temperature. The difference should be ≤ 0.2 °C. Larger gaps mean the internal sensor is drifting and should be recalibrated or swapped.
4. Check the door‑open sensor. Gently open the door just a crack and listen. A subtle click followed by a brief beep signals the sensor is alive. No sound? Clean the sensor pad and try again.
5. Document everything. Write the date, who performed the test, and any anomalies in your maintenance log. Over time you’ll spot patterns – maybe a specific freezer in a high‑traffic corner alarms more often.
So, what should you do if an alarm fails?
First, power down the unit safely, replace the buzzer or sensor, and run the self‑test again. If the problem persists, it’s time to call the service tech – most warranties cover alarm module failures.
Quick reference table
| Component | Test Frequency | What to Do if It Fails |
|---|---|---|
| High‑temp alarm | Monthly | Replace buzzer or sensor; run self‑test |
| Door‑open sensor | Quarterly | Clean contacts; replace sensor pad if needed |
| Internal temperature probe | Every 3 months | Calibrate with handheld probe; swap if drift > 0.2 °C |
Need a deeper dive? The manufacturer’s service manual walks you through the exact self‑test sequence for most ultra low temperature units here. And if you want to pair alarm checks with a formal temperature mapping, the Ellab guide offers a step‑by‑step protocol that you can follow here.
Bottom line: a quick alarm and sensor sanity check each month keeps your freezer humming, your data safe, and your lab running without those heart‑stopping surprise beeps.
Step 6: Schedule Regular Maintenance
Okay, you’ve checked the seal, cleaned the coils, verified temps, defrosted, and tested alarms – now it’s time to put a calendar on the wall. Regular maintenance isn’t a suggestion, it’s the safety net that keeps your ultra low temperature freezer maintenance plan from falling apart.
First, grab a simple paper planner or a digital calendar that sends you a reminder. In our experience, a recurring monthly event titled “ULT freezer check” works better than a vague “lab upkeep” note because the title itself triggers the right mindset.
Pick a rhythm that matches your workflow
Most labs find a monthly deep‑check plus a quarterly quick glance hits the sweet spot. The monthly slot is where you run the alarm self‑test, inspect the door gasket, and give the condenser a visual once‑over. Then, every three months, add a 15‑minute frost‑check and a brief coil brush if dust has built up.
Does that feel too much? If you’re running a single unit in a small research group, you can collapse the quarterly frost check into the monthly routine – just add a two‑minute extra step.
Write it down, then lock it in
Write the date, who performed the task, and any notes in a logbook that lives on the freezer’s side. Over time you’ll see patterns: maybe the freezer near the centrifuge alarms more often, or the unit on the far‑right corner collects dust faster.
Tip: use a colour‑coded sticker system. Green means “all clear”, yellow signals “watch this”, and red means “service needed”. It’s a visual cue you can glance at while grabbing samples.
Automate reminders
Set up an email or SMS alert that pings you a week before each scheduled task. The DAI Scientific maintenance guide (ultra low temperature freezer maintenance tips) recommends a 7‑day lead‑time so you have room to clear the bench.
What if a reminder lands on a busy day? Just move the task to the next open slot – the point is to keep the cadence, not to punish yourself.
Make it a team habit
Assign ownership. One person can be the “maintenance champion” for each unit, but rotate the role every six months so everyone stays familiar with the process. When a new tech joins, a quick walkthrough of the schedule gets them up to speed without a lecture.
And don’t forget to involve the whole lab. A brief 2‑minute stand‑up at the start of each week can include a “who’s on freezer duty?” shout‑out. It builds accountability and makes the routine feel less like a chore.
What to do when you miss a slot
If a month slips by, don’t panic. Run a rapid sanity check: look at the alarm log, verify the temperature reading, and give the door seal a quick visual. Then reschedule the missed month’s deeper tasks for the next open window.
Bottom line: a solid schedule turns ultra low temperature freezer maintenance from “something we hope to do” into “something we do every month without thinking”. It protects priceless samples, saves energy, and lets you focus on the science that really matters.
FAQ
How often should I perform ultra low temperature freezer maintenance?
In most research labs, a solid routine means a quick check every month and a deeper clean every quarter. That monthly pass covers the door seal, a visual coil glance, and a temperature log glance. Then, every three months you’ll do a full coil brush, a frost‑check, and a sensor sanity test. Sticking to this cadence keeps the unit humming and your samples safe without turning maintenance into a chore.
What’s the quickest way to check the door seal?
The fastest trick is the “dollar‑bill test.” Slip a bill or a thin piece of paper between the door and the frame, close the door, and try to pull it out. If it slides out easily, the seal isn’t tight enough. Follow up with a visual scan for cracks or dried‑out spots, and give the gasket a quick wipe with a lint‑free cloth. It takes under a minute and catches most leaks.
Why does coil cleaning matter and how often should I do it?
Dust on the condenser coils acts like a blanket, forcing the compressor to work harder and pulling extra power from your lab’s budget. A month‑to‑month visual inspection lets you spot heavy buildup early; a full brush‑down every three months clears the fine powder that a quick glance misses. Clean coils mean lower energy bills, quieter operation, and more stable –86 °C temperatures for those precious genomic samples.
What steps do I take if the temperature drifts?
First, pause and verify the door was fully closed during the drift window. Next, pull the last hour’s log and compare the average to the –86 °C set point; a 0.5 °C swing is usually okay, but anything beyond that needs attention. Check airflow clearance around the unit, run the built‑in sensor self‑test, and if the reading still looks off, calibrate or swap the probe. A quick sanity check often saves a sample loss.
How can I set up reminders without forgetting?
Use a digital calendar that sends you a notification a week ahead and another on the day. Name the event “ULT freezer check” so the purpose is crystal‑clear. If your lab uses a shared lab‑management platform, add the task there and assign a rotating “maintenance champion.” A colour‑coded sticker on the freezer door (green = all good, yellow = watch, red = service) provides a visual cue for anyone walking by.
What’s the best practice for defrosting without losing samples?
Schedule a 30‑minute window when no one needs the freezer, back up the latest temperature log, and move any active samples to a –20 °C backup or a second ULT unit. Then power down, leave the door ajar, and let the frost melt naturally. Place a shallow tray under the unit to catch water, wipe up spills immediately, and give the interior a quick lint‑free wipe before powering back up. Let the freezer stabilize before returning samples.
How do I document maintenance so my lab stays compliant?
Keep a simple logbook or spreadsheet on the freezer’s side. Record the date, who performed the task, and any observations—like “door seal showed minor wear” or “coil cleaning completed.” Add a checkbox for each checklist item (seal, coil, temp log, alarm test). Over time you’ll see patterns, such as a particular unit needing more frequent coil cleaning, and you’ll have audit‑ready records if an inspection ever comes around.
Conclusion
We've walked through seal checks, coil cleaning, temperature verification, and scheduling. By now you know that ultra low temperature freezer maintenance is less about fancy tech and more about a few disciplined habits.
Remember the three‑minute door‑seal test, the monthly brush of the condenser, and the quick five‑minute temperature log glance. If you stick to those, you’ll catch most problems before they become a costly alarm.
Real‑world labs see big wins: a biotech team at a mid‑size CRO cut their energy bill by 12 % after cleaning coils every month, and a university core facility reduced sample loss incidents from 4 % to under 1 % by adding a colour‑coded sticker system.
Here are three next‑step actions you can take this week:
- Print a simple checklist and tape it to the freezer door.
- Assign a rotating “maintenance champion” for your unit.
- Schedule a calendar reminder for the monthly seal and coil review.
And if you’re looking for a model that already incorporates easy‑access panels and clear service guides, check out the Shop Genomics Ai RapidChill 34 CF -86°C Ultra‑Low Freezer. Its design makes the routine we described a breeze.
Take these steps, keep the logs up to date, and your samples will stay safe while you focus on the science that matters today.


