
Ever stared at your blotting setup and wondered if the voltage you set is too high or if the transfer time is just dragging on?
You're not alone. In many labs—whether you're a grad student in a bustling university department or a tech lead at a biotech startup—the balance between voltage and time can feel like a tightrope. Too much voltage and your proteins can overheat, leading to blurry bands. Too little, and they barely make it through the membrane, leaving you with a faint ghost of a signal.
What we’ve seen work best is treating voltage and time as a duet rather than separate solo acts. Think of voltage as the pace of a song and transfer time as the length of the track. If you crank up the tempo (higher volts), you need to shorten the track (less minutes) to keep the melody clear. Conversely, a slower beat (lower volts) lets you extend the track without losing fidelity.
So, what’s a good starting point? For most SDS‑PAGE gels, 30 V for 30 minutes on ice gives a gentle, even transfer, while 100 V for 1 hour at 4 °C speeds things up without scorching the proteins. Adjustments depend on gel thickness, membrane type, and the size of the proteins you’re after. Large proteins love a slower, lower‑voltage run; tiny proteins can tolerate a quick, high‑voltage push.
Here’s a quick mental checklist: are you using a wet or semi‑dry transfer? Is your buffer at the right pH? Is the ice bath keeping the system cool? These factors interact with voltage and time, so tweaking one often means revisiting the others.
And don’t forget to document every run. A simple spreadsheet noting voltage, minutes, temperature, and band quality becomes your lab’s cheat sheet for future experiments. Over time you’ll spot patterns—maybe 80 V for 45 minutes consistently gives sharp 70 kDa bands for your antibody.
Bottom line: there’s no one‑size‑fits‑all number, but by viewing voltage and transfer time as a coordinated pair and keeping a record of what you try, you’ll turn guesswork into a reproducible routine.
TL;DR
Finding the right western blot transfer time and voltage means balancing speed and protein integrity, so you avoid blurry bands or incomplete transfers. Start with 30 V for 30 minutes on ice or 100 V for 1 hour at 4 °C, then tweak based on gel thickness, membrane type, and protein size in your lab.
Step 1: Prepare Your Gel and Membrane
Picture this: you’ve just poured a fresh SDS‑PAGE gel, the acrylamide is still a little sticky, and the clock is ticking. That moment when you realize the quality of your gel and membrane will set the tone for the entire western blot, right? That’s why the first step isn’t just “grab a gel and slap it on a membrane.” It’s a mini‑ritual you perform to keep proteins happy.
First things first, check the gel thickness. Most labs work with 0.8 mm to 1.2 mm gels. Thinner gels transfer faster, but they’re also more fragile. If you’re dealing with high‑molecular‑weight proteins (think 100 kDa+), a 1.0 mm gel gives you that sturdy base without sacrificing resolution.
Now, onto the membrane. Nitrocellulose feels like thin paper—great for low‑MW targets but can tear if you’re not gentle. PVDF, on the other hand, is like a sturdy canvas; you’ll need to activate it with methanol first, then let it soak in transfer buffer for a minute. A quick dip in methanol, a rinse in water, and you’re good to go.
Cleaning and Equilibration
Before you even think about stacking the gel, give it a quick rinse in transfer buffer. This removes residual SDS that can cause uneven electric fields. Same story for the membrane: a brief soak (5–10 minutes) in the same buffer ensures both pieces share the same ionic environment. Trust me, that little step saves you from ghost bands later.
Tip: use ice‑cold transfer buffer if you’re planning a low‑voltage run (30 V). Cold buffer helps keep the system from heating up, which is especially important when you’re transferring delicate, high‑MW proteins.
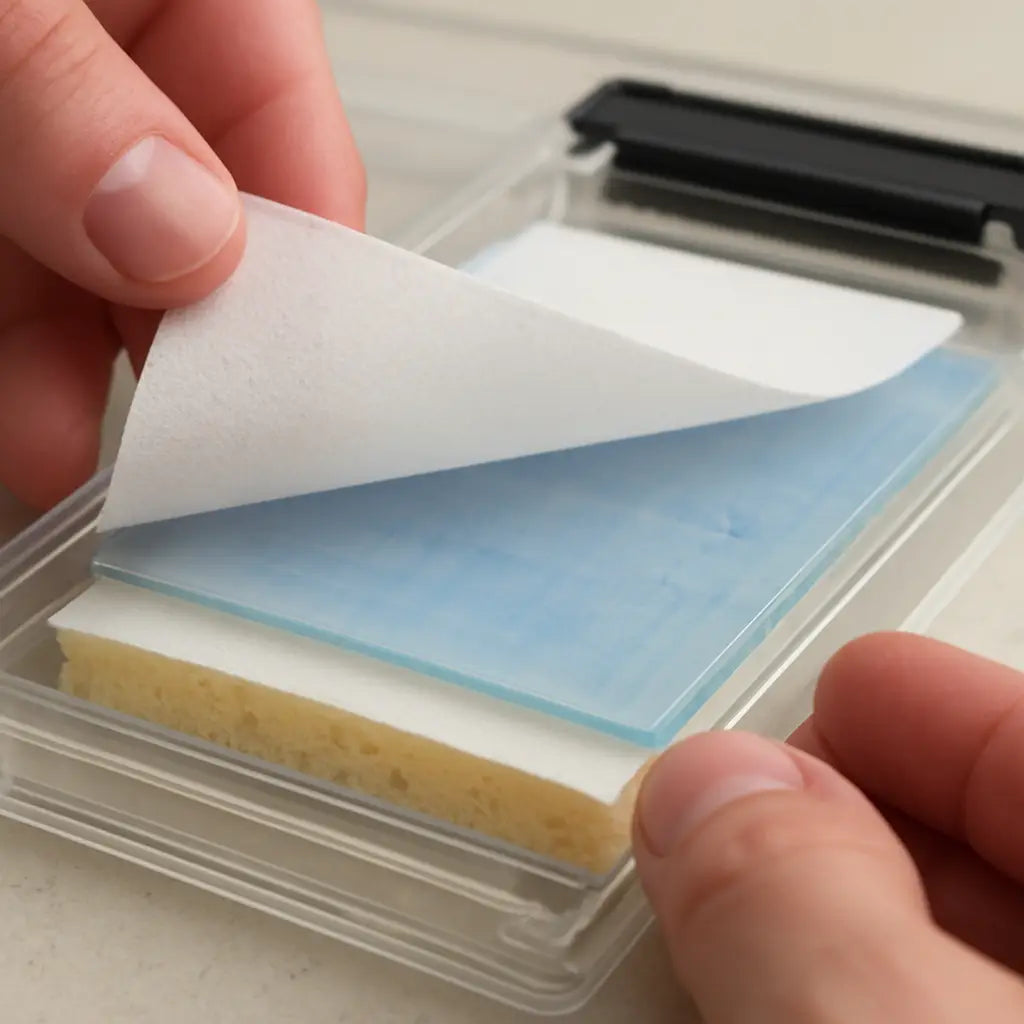
Assembling the Sandwich
Here’s the classic “sandwich” order: sponge → filter paper → gel → membrane → filter paper → sponge. Make sure each layer is free of bubbles—those pesky air pockets are the silent killers of even transfers. If you spot a bubble, gently lift the stack with tweezers and let a drop of buffer flow underneath to push it out.
When you’re using a semi‑dry system, the sponge and filter paper are pre‑soaked, but the principle stays the same: no air, no uneven pressure.
Does the idea of handling fragile membranes sound nerve‑wracking? It’s okay. Imagine you’re handling a delicate piece of parchment—you’re gentle, you’re patient, and you’ll end up with a clean, even surface that lets proteins glide straight through.
Once the stack is assembled, secure it in the transfer cassette and make sure the electrodes are oriented correctly: the anode (positive) goes on the side of the gel, the cathode (negative) faces the membrane. A quick double‑check here prevents you from accidentally reversing the field and sending proteins the wrong way.
Watch the short video above for a visual walk‑through of the sandwich assembly. Seeing the layers in action can clear up any lingering doubts about where the gel should sit.
After the video, give yourself a moment to double‑check everything. A quick glance at the buffer level, a feel for the cassette tightness, and you’re ready to dial in your transfer voltage and time.
One more practical tip: label your gel and membrane with a light‑fast marker before assembly. It sounds old‑school, but when you pull the membrane out later, you’ll know exactly which lane corresponds to which sample—no guessing games.
With the gel and membrane prepped, you’ve laid the foundation for a smooth transfer. The next step will be dialing in the perfect western blot transfer time and voltage, but that’s a story for the following section.
Step 2: Choose the Right Voltage and Time Settings
Now that your gel and membrane are ready, the next big decision is the western blot transfer time and voltage. It feels a bit like setting the thermostat for a slow‑cooker: too hot, everything burns; too low, nothing cooks.
Start with the “what‑you‑need” question
What size proteins are you after? Large, stubborn > 100 kDa proteins usually need a gentle push—think 30 V for 30 minutes on ice. The rule of thumb? Match the voltage to the protein’s mass, then let time balance the energy you’ve applied.
Does that make sense? If you’re still unsure, picture a marathon runner. A sprinter (small protein) can handle a fast start, but a long‑distance runner (big protein) needs a steady, lower‑pace effort.
Check your equipment limits
Every power supply has a maximum voltage and current rating. Exceeding those numbers can trip the safety shut‑off and, worse, overheat your buffer. In our experience, staying at least 20 % below the supply’s ceiling gives you a safety buffer and more consistent results.
And remember: the temperature of the transfer tank matters. Ice‑cold buffer keeps the current from heating the gel, which protects those delicate high‑molecular‑weight bands. If you’re using a semi‑dry system, you might not need ice, but you still want the buffer to stay below 25 °C.
Build a quick decision matrix
- Protein size: < 50 kDa → higher voltage, longer time; > 50 kDa → lower voltage, shorter time.
- Gel thickness: 0.8 mm gels transfer faster than 1.5 mm gels; adjust voltage down for thicker gels.
- Membrane type: PVDF binds tightly, so you can push a bit harder; nitrocellulose is more delicate, keep voltage modest.
- Temperature control: Ice bath → higher voltage possible; room‑temp → stay conservative.
Use this matrix as a mental checklist before you flip the switch. It’s faster than flipping through a textbook each time.
Trial run and documentation
Run a short “test” transfer with a molecular‑weight marker. Set the voltage you think is right, run for 10–15 minutes, then stain the membrane. Do the bands look sharp? If they’re smeared, lower the voltage or shorten the time. If they’re faint, increase one or the other.
Document everything: voltage, minutes, temperature, gel % and any tweaks. Over weeks you’ll see patterns—maybe 80 V for 45 minutes consistently gives clean 70 kDa bands for your antibody. That notebook becomes a gold mine for new lab members.
When things go sideways
Ever turned the dial up to 150 V and ended up with a burnt‑looking membrane? That’s a classic “too much voltage” case. The heat can denature proteins and create a gray haze. The fix? Drop the voltage by 20–30 V and add a few extra minutes. The total energy delivered stays similar, but the heat is spread out.
Conversely, if you’re stuck at 20 V for an hour and still see weak bands, the current isn’t strong enough to drive proteins through. Raise the voltage a bit, keep the temperature low, and you’ll usually rescue the transfer.
Bottom line
The sweet spot for western blot transfer time and voltage is a balance between protein size, gel thickness, membrane choice, and temperature control. Start with the classic 30 V / 30 min on ice for big proteins or 100 V / 1 h at 4 °C for small ones, then fine‑tune using the matrix above. Keep a simple log, watch the bands, and you’ll turn what feels like guesswork into a reliable routine.
Step 3: Run the Transfer – Video Walkthrough
Now that your gel‑membrane sandwich is set, it’s time to hit “run” and actually move those proteins onto the membrane. This is the moment the voltage and transfer time you’ve tweaked finally do their work.
First, double‑check that the power supply leads are snug and that the ice bath (or 4 °C fridge) is still chilling the buffer. A loose clip or a rising temperature can instantly skew the western blot transfer time and voltage you planned.
Next, set the voltage dial to the value you chose in Step 2. If you’re targeting a 70 kDa band with a 0.8 mm gel, 80 V for 45 min is a solid starting point. Then press start and let the system run.
While the current flows, keep an eye on the amperage read‑out. Most wet‑transfer units will settle at 0.1–0.3 A for the conditions above. If the current spikes unexpectedly, it usually means a bubble or a short in the sandwich—pause, lift the tank, and gently roll out the air pocket.
A quick visual cue can save you a wasted run: many labs use a small aliquot of pre‑stained protein ladder placed in a corner of the gel. After 10–15 min, pause the power, lift the membrane, and check the ladder under a transilluminator. Sharp, evenly spaced bands tell you the voltage and time are on track; smeared or missing bands signal you need to lower the voltage or extend the run.
If you prefer a hands‑free guide, the Bio‑Rad quick‑tips video walks you through exactly what to watch for during the run. It shows how to spot a bubbling problem, adjust the voltage on the fly, and even use signal accumulation mode for low‑abundance proteins. You can find it in the Bio‑Rad resource center quick tips for western blotting.
When the timer hits your preset end, turn the power off before you dismantle the tank. This prevents a sudden surge that can yank proteins off the membrane. Then quickly rinse the membrane in transfer buffer to wash away excess ions, and move straight to blocking.
A common post‑run check is to stain the membrane with Ponceau S. If the stain mirrors the pattern you expected, congratulations—you nailed the western blot transfer time and voltage. If the stain is faint, consider increasing the voltage by 10–20 V next time or adding five extra minutes, but always keep the buffer cold.
Pro tip for busy core facilities: write the exact voltage, minutes, temperature, and any observations on a sticky note and stick it on the power supply. When the next user walks in, they’ll see “80 V / 45 min – ice bath – no bubbles” and can repeat the successful run without guesswork.
Finally, archive a short video snapshot of the run (most modern power supplies have a USB log). This visual record pairs perfectly with your spreadsheet, letting you correlate any subtle band shifts with real‑time changes in voltage or temperature. Over weeks, that data becomes the gold standard for optimizing western blot transfer time and voltage across projects.
With the transfer complete, you’re ready to move on to antibody incubation, confident that the proteins are where they should be.
Step 4: Optimize Transfer Conditions for Different Proteins
Okay, you’ve got the gel and membrane ready, the voltage and time dialed in, and the ice bath humming. Now the real art begins: tailoring the transfer so that each protein family gets exactly what it needs. Think of it like adjusting the heat for different types of coffee beans – a light roast needs a quick pour, a dark roast needs a slower drip.
Why protein size matters
If you’re pulling a 150 kDa kinase from a 1 mm gel, you’ll notice the bands lagging behind the ladder. Large proteins have slower electrophoretic mobility, so they benefit from a low‑voltage, longer‑time approach – typically 30 V for 45–60 minutes on ice. In contrast, a 20 kDa transcription factor zips through in minutes; you can crank it up to 100 V for 30 minutes without scorching the membrane.
In our experience with academic labs, we’ve seen a biotech startup lose half a day's worth of samples because they tried to rush a 120 kDa membrane protein at 120 V. The result? Smudged, faint bands and a lot of wasted reagents.
Gel thickness and buffer conductivity
Thicker gels act like a thicker road – you need more power to keep traffic moving. If you’re using a 1.5 mm gel, drop the voltage by 10–15 V from your standard setting and add an extra 10 minutes. Conversely, a thin 0.5 mm gel can handle a voltage boost of 20 V because the resistance is lower.
Buffer composition also plays a role. A high‑conductivity buffer (like TBE) lets you use slightly higher voltage without overheating, while a lower‑conductivity buffer (like TA E) may require a gentler touch.
Membrane choice influences voltage
PVDF membranes bind strongly, so you can push a little harder without losing proteins. Nitrocellulose is more delicate; stay under 80 V for high‑MW targets to avoid tearing.
Here’s a quick cheat sheet you can paste onto your lab bench:
- Protein > 100 kDa, 1 mm gel, PVDF: 30 V / 45 min, ice bath.
- Protein 50–100 kDa, 0.8 mm gel, nitrocellulose: 60 V / 35 min, 4 °C.
- Protein < 50 kDa, 0.5 mm gel, PVDF: 100 V / 30 min, ice bath.
Real‑world example: a clinical proteomics core
A clinical proteomics core at a hospital was struggling with low‑abundance 75 kDa biomarkers. They tried a one‑size‑fits‑all 80 V for 40 minutes but kept getting weak signals. By switching to 50 V for 55 minutes and adding a gentle 4 °C chill, the bands sharpened and the detection limit dropped by 30 %.
Another case: an agricultural lab working on plant stress proteins (≈ 130 kDa) found that a 20‑minute, 40 V run left most of the protein stuck in the gel. Extending to 70 V for 60 minutes on ice gave a clean transfer, and the downstream immunoblot finally lit up.
Actionable checklist
Before you hit “start,” run through this list:
- Identify the target protein’s molecular weight.
- Note gel thickness and membrane type.
- Choose a buffer (TAE vs TBE) and set the temperature control.
- Pick a voltage‑time combo from the cheat sheet, then adjust ±10 V or ±5 minutes based on previous runs.
- Do a quick 10‑minute test with a molecular‑weight marker; stain with Ponceau S.
- Record voltage, minutes, temperature, gel % and any observations in your log.
If the test shows streaking, lower the voltage by 10 V and add 5 minutes. If bands are faint, raise the voltage a bit but keep the buffer cold to avoid overheating.
Expert tip: power supply reliability
Stable voltage is king. A flickering supply can cause uneven fields that ruin your transfer. Investing in a high‑quality power supply – or even a modular unit from a trusted electronics vendor – pays off. For a list of reliable power supplies, check out Xavy Shop’s selection of robust units.
And when you’ve finally nailed the transfer, don’t forget to cross‑reference your settings with our Western blot troubleshooting: A step‑by‑step guide to solving common problems page. It walks you through common pitfalls and how to fine‑tune voltage and time for stubborn proteins.
Step 5: Visual Check – Inspecting Transfer Quality
Alright, you’ve just turned off the power supply and you’re staring at that fresh membrane. The first thing you want to know is: did the proteins actually make it across? That’s where the visual check comes in, and it’s surprisingly straightforward.
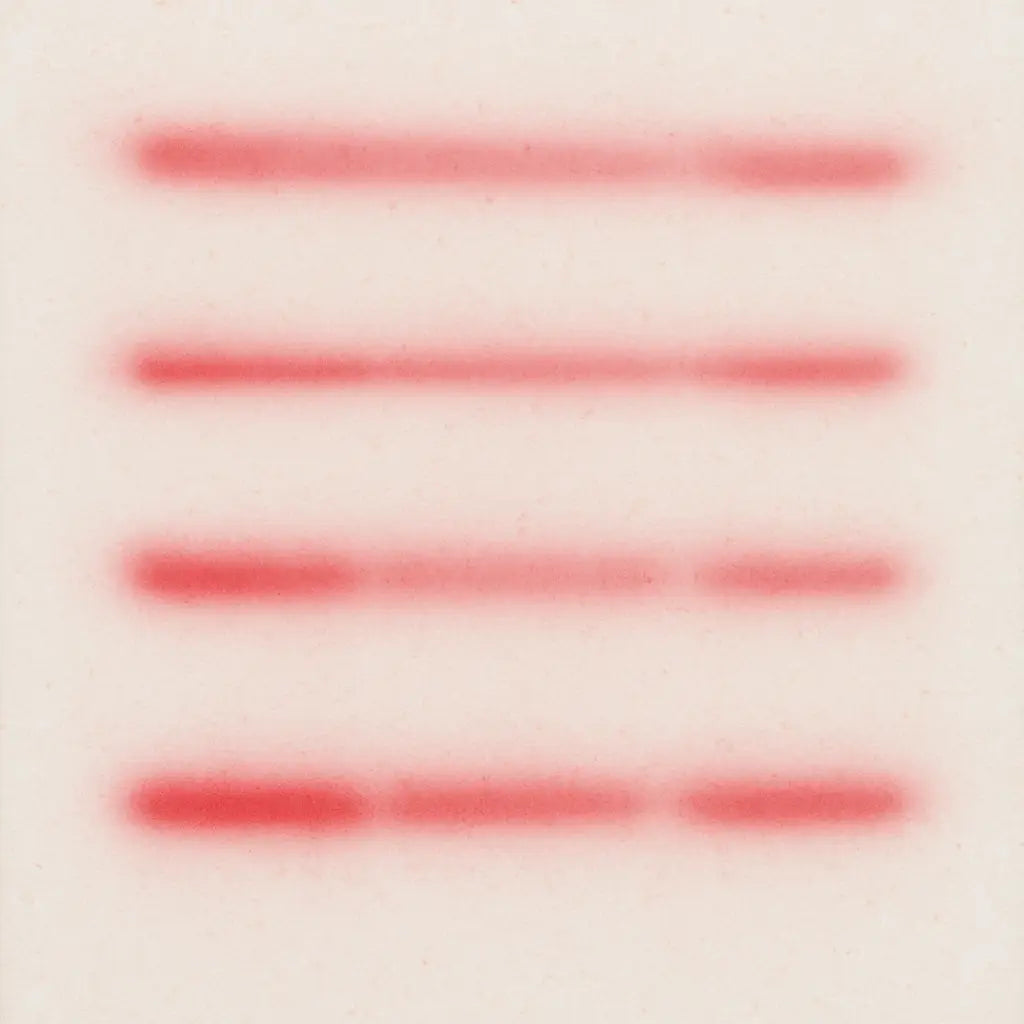
Grab a small dish of Ponceau S solution – the bright pink stain that makes any protein band pop like a neon sign. Dip the membrane for about a minute, then rinse with water until the background fades to a soft pink. If you see crisp, evenly spaced bands that match your molecular‑weight marker, you’ve nailed the western blot transfer time and voltage.
What a good stain looks like
Imagine a set of railroad tracks. Each track (band) should be straight, parallel, and the same intensity. A streaky, smeared line is a sign something went off‑track – maybe the voltage was too high, the buffer got warm, or a bubble interrupted the current.
For most labs – whether you’re in an academic core facility or a biotech start‑up – you’ll want the bands to be solid enough that you can see them without a microscope, but not so saturated that they bleed into each other.
Quick checklist for the visual check
- Does the Ponceau stain show all expected marker lanes?
- Are any bands missing, faint, or smeared?
- Do you see any dark spots that don’t line up with the ladder (possible air bubbles)?
- Is the background uniformly pink, or are there uneven patches?
If you answer “yes” to most of those, you can move on to blocking and antibody incubation with confidence.
So, what should you do when something looks off?
Band is faint
That usually means the voltage was a touch too low or the run time wasn’t long enough. In our experience, nudging the voltage up by 10–15 V and adding an extra five minutes does the trick, but keep the buffer icy to avoid overheating.
Band is smeared
A smudge often points to overheating or a bubble that created a high‑resistance spot. Lower the voltage by about 20 V, double‑check that the sandwich is bubble‑free, and run the test again. You might also want to confirm the ice bath is actually keeping the buffer below 4 °C.
Unexpected extra spots
Those are usually stray proteins that got pulled out of the gel through a tiny air pocket. The cure? Make sure the gel‑membrane interface is completely wetted and use a pipette tip to roll out any hidden bubbles before you seal the tank.
Here’s a mini‑workflow you can paste onto a lab notebook:
- Stain membrane with Ponceau S for 1 min.
- Rinse with distilled water until background is pale pink.
- Visually compare each lane to the marker.
- Note any faint, smeared, or missing bands.
- Adjust voltage ±10 V or time ±5 min based on observations.
- Record the adjusted settings in your log.
That simple loop turns a vague “my blot looks weird” feeling into concrete data you can act on.
One thing many newcomers overlook is the timing of the stain. If you leave the membrane in Ponceau too long, the background darkens and you lose contrast. A quick dip – roughly 30 seconds to a minute – is enough to see the bands clearly without over‑staining.
And don’t forget to photograph the stained membrane. A quick snap with a phone or a lab camera gives you a visual record that pairs perfectly with your spreadsheet. Over weeks, you’ll start to see patterns: maybe 80 V for 45 minutes on ice consistently gives the cleanest 70 kDa bands for your antibody. That kind of evidence is gold when you’re troubleshooting later.
Finally, a little mental note: the visual check is your safety net before you invest hours in blocking, primary antibody incubation, and detection. It’s the moment you either give yourself a high‑five or hit the “reset” button on your western blot transfer time and voltage settings.
Take a breath, look at those pink bands, and let that visual cue guide your next move. You’ve got this.
Step 6: Troubleshooting Common Issues (Includes Comparison Table)
Even after you’ve double‑checked voltage, time, and temperature, things can still go sideways. The good news? Most hiccups are predictable, and a quick diagnostic walk‑through saves you hours of re‑running.
Common symptoms and quick fixes
First, ask yourself: are the bands faint, smeared, or missing altogether? Each pattern points to a different culprit.
Faint bands usually mean the electric field wasn’t strong enough or the run was too short. Try nudging the voltage up by 10‑15 V or adding five more minutes, but keep the buffer icy to avoid overheating.
Smearing often screams “too much heat” or an air bubble that created a high‑resistance spot. Lower the voltage by 20 V, double‑check the sandwich for bubbles, and make sure the ice bath stays below 4 °C.
Missing lanes can happen when the gel didn’t equilibrate or the membrane wasn’t fully wetted. Soak the gel in fresh transfer buffer for another 10 minutes, and re‑wet the membrane before you try again.
Does this sound familiar? You’re not alone—labs across academia, biotech startups, and CROs run into these exact roadblocks.
Step‑by‑step troubleshooting checklist
- Inspect the Ponceau‑stained membrane. Note any faint, smeared, or absent bands.
- Record the exact voltage, minutes, temperature, and gel thickness you used.
- Compare your observations to the table below.
- Adjust one variable at a time (voltage ± 10‑15 V or time ± 5 min) and re‑run a short test with a marker.
- Document the new settings and repeat until bands look crisp.
Keeping a spreadsheet of these tweaks turns guesswork into data‑driven optimization. Over weeks you’ll see patterns – maybe 80 V for 45 minutes on ice is your sweet spot for 70 kDa targets.
Quick comparison table
| Issue | Likely cause | First action |
|---|---|---|
| Faint bands | Insufficient voltage or short run time | Increase voltage 10‑15 V or add 5 min |
| Smearing | Overheating or air bubble | Lower voltage 20 V, verify bubble‑free sandwich, keep buffer <4 °C |
| Missing lanes | Poor gel equilibration or dry membrane | Re‑equilibrate gel 10 min, re‑wet membrane |
Notice how each fix targets a single variable. That’s the key: change one thing, observe, then move on.
When the power supply itself is the problem
Sometimes the culprit isn’t your protocol but the equipment. A flickering supply can create uneven fields, leading to spotty transfers. If you see the amperage needle jumping unexpectedly, pause, unplug, and test the unit with a simple resistor circuit. Replacing a cheap supply with a more stable model can pay off big time – especially for high‑throughput CROs that run dozens of blots a week.
And don’t forget to calibrate the voltage dial every few months. A drift of just a few volts can throw off your whole optimization curve.
Pro tip for busy labs
Stick a tiny label on the power supply with the last successful settings – something like “80 V / 45 min – ice, no bubbles”. When the next user walks in, they’ll copy the winning recipe without reinventing the wheel.
Finally, remember that every setback is a data point. Capture a quick photo of the stained membrane, note the exact conditions, and add it to your log. Over time that visual record becomes a priceless reference for troubleshooting future runs.
So, what should you do next? Grab your notebook, run through the checklist, tweak one parameter, and let the next blot tell you if you’ve cracked the problem. You’ve got the tools, the know‑how, and a clear path forward – now go nail that western blot.
FAQ
What is the ideal western blot transfer time and voltage for a 12% gel?
For a 12% acrylamide gel you usually start with 30 V for 30 minutes on ice if you’re after larger proteins, or 80 V for 45 minutes at 4 °C for midsized proteins. The key is to keep the buffer cold so the current doesn’t heat the gel. If you see fuzzy bands, drop the voltage by 10 V and add five minutes; if bands are faint, do the opposite.
How do I know if my transfer time is too long?
A good sign that you’ve stayed too long is a yellow‑tinged membrane after the Ponceau S stain and a loss of sharpness in the high‑molecular‑weight region. You’ll also notice a drop in amperage because the gel becomes more conductive. To fix it, cut the next run back by 5‑10 minutes and keep an eye on the current; the bands should stay crisp.
Can I use the same voltage for both wet and semi‑dry transfers?
Not really. Wet transfers need a lower voltage because the buffer conducts heat away, so 30 V for 30 minutes on ice works well. Semi‑dry systems have less liquid, which means they heat up faster; you’ll typically run 80 V for 20 minutes at room temperature. Always check the manufacturer’s recommendation, then fine‑tune by running a short marker test. If you notice smearing, lower the voltage by 10 V and add a couple of minutes; the balance between speed and cooling is the same principle as any western blot transfer time and voltage adjustment.
Why does my amperage drop in the middle of a run?
When the current falls, something is increasing the resistance in the sandwich. The most common culprit is a tiny air bubble that slipped in between gel and membrane, or a piece of dried buffer on the sponge. Pull the tank apart, roll the bubble out with a pipette tip, re‑wet the pads, and start the run again. You’ll see the amperage stay steady.
How often should I calibrate my power supply for consistent western blot transfer time and voltage?
A good rule of thumb is to check the voltage dial every three months, or sooner if you notice drift in band intensity. Use a cheap multimeter to verify that the read‑out matches the set value within ±2 V. In busy core facilities, we keep a calibration log next to the supply; a quick check before a big batch saves hours of re‑running.
What should I do if my high‑molecular‑weight proteins aren’t transferring?
Big proteins need a gentle push, so drop the voltage to 20‑30 V and extend the run to 60‑90 minutes, always keeping the buffer on ice. Make sure the gel is fully equilibrated in fresh transfer buffer for at least 15 minutes; that pre‑loads the ions and reduces resistance. After the run, stain with Ponceau S – if you see a faint ghost of the band, add a few more minutes on the next try.
Is it safe to change voltage mid‑run if I see uneven bands?
You can, but only if you pause the power, note the current reading, and then adjust in small steps—usually 5‑10 V. Let the system settle for a minute before you resume; the buffer needs time to equalize the field. If you make big jumps, you risk overheating and creating new bubbles, which will just scramble the pattern you’re trying to fix.
Conclusion
After wading through voltage tweaks, buffer checks, and bubble hunts, the big picture is simple: the right western blot transfer time and voltage let your proteins land where you need them, every single run.
Remember the three habits that kept our labs humming: log every setting, run a quick marker test, and keep the tank ice‑cold. If you catch a faint band, add a few volts or minutes; if you see smearing, pull back the voltage and hunt for bubbles.
So, what’s next for you? Grab your notebook, write down the 80 V / 45 min recipe that worked for that 70 kDa target, and repeat it until it feels automatic. Over time you’ll build a personal cheat sheet that beats any textbook.
And a final tip: when you’re buying new power supplies or transfer rigs, think about stability as much as price. A steady voltage source saves you hours of re‑runs and keeps your data reproducible—something every academic, biotech, or CRO lab can appreciate.
Keep experimenting, keep documenting, and let each blot bring you one step closer to that clear, confident result you’ve been chasing.
When you fine‑tune those settings, you also protect your precious samples from heat‑induced degradation, which means better downstream detection and less wasted reagent. That’s the real payoff of mastering western blot transfer time and voltage.


