
Ever stared at a blank membrane after a western blot and thought, “Where did my proteins go?”
You’re not alone. The moment you realize the transfer worked but the bands are invisible is both frustrating and a little scary.
That’s where Ponceau S comes in – a quick, reversible stain that lets you see every protein spot in seconds.
Imagine you’re running a tight experiment in a university lab or a CRO, and you need that visual confirmation before you waste a precious antibody.
In our experience, a reliable ponceau s staining protocol saves hours of guesswork and protects costly reagents.
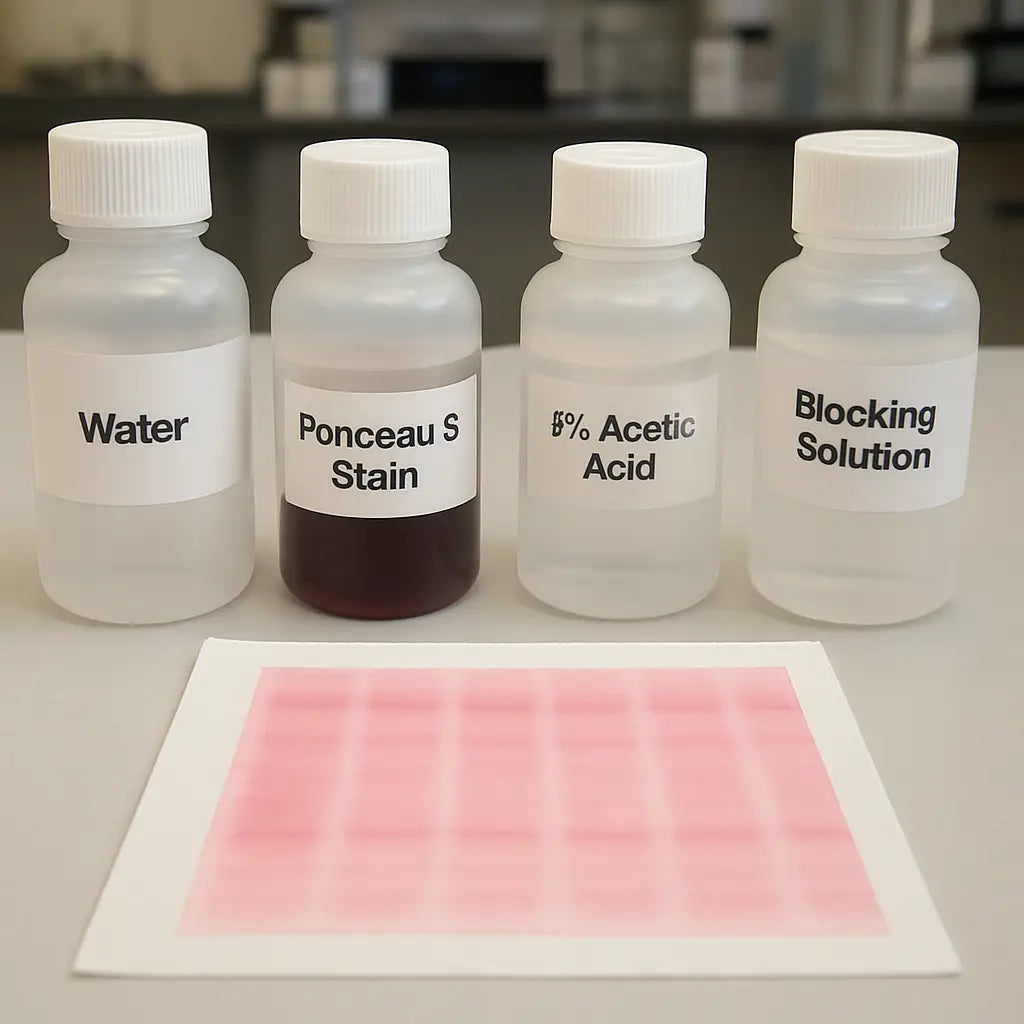
So, what does a solid protocol look? First, you need a fresh 0.1% Ponceau S solution in 5% acetic acid. Mix until the powder dissolves completely; a gentle stir helps avoid clumps.
Next, after the transfer, rinse the membrane briefly with water to remove excess buffer. Then submerge it in the stain for about one to five minutes, watching the pink bands appear.
Feeling the bands? Great. Quickly rinse with water until the background clears – you’ll see a crisp pink pattern that mirrors your protein distribution.
Now, here’s a tip most people miss: a brief soak in methanol (10% for 10 seconds) before staining can boost contrast, especially for low‑abundance proteins.
And because Ponceau S is reversible, you can wash it away with TBST or PBST before moving on to antibody incubation without damaging your target.
But what if the stain looks faint? Check the pH of your acetic acid; too low and the stain won’t bind well. Also, make sure your transfer buffer wasn’t overloaded – excess salts can mask the dye.
Bottom line: a simple, repeatable ponceau s staining protocol gives you confidence, saves time, and lets you troubleshoot transfers before you commit to the full blot.
Ready to try it? Grab a bottle of Ponceau S powder, mix up the solution, and let those pink bands guide your next experiment.
TL;DR
Our quick, reversible ponceau s staining protocol lets you see protein bands in seconds, saving costly antibodies and giving confidence before you move on to detection.
Follow the simple steps, mix 0.1% powder in 5% acetic acid, brief methanol soak, stain 1‑5 minutes, rinse, and you’ll troubleshoot transfers instantly with reliable results every time.
Step 1: Prepare Reagents and Solutions
Alright, you’ve just finished the transfer and you’re staring at that blank membrane, wondering if the proteins ever made it across. First thing’s first – you need a fresh, reliable ponceau s staining solution. If the mix isn’t spot‑on, the whole protocol can feel like trying to read a blurry postcard.
Here’s the quick chemistry: dissolve 0.1 g of Ponceau S powder in 100 mL of 5 % acetic acid. Stir gently; a magnetic stir bar does the trick without introducing bubbles. You’ll notice the powder disappearing into a pink‑ish solution – that’s the dye ready to cling to your proteins.
Why 5 % acetic acid?
Acetic acid gives the right pH (around 2.5) for the dye to bind positively charged protein residues. Too low and the stain won’t stick; too high and you’ll get a faint background. A quick pH strip is a cheap sanity check – we’ve seen whole labs save hours just by double‑checking this step.
Pro tip: if you’re working in a busy core facility, keep a small bottle of pre‑made 5 % acetic acid on the bench. It cuts down prep time and ensures consistency across runs.
Preparing the methanol soak (optional but golden)
Before you dunk the membrane, a 10 % methanol rinse for 10 seconds can really boost contrast, especially for low‑abundance targets. Just dip the membrane, give it a quick shake, and move straight to the Ponceau solution. If you forget, no worries – the stain will still work, but you might need a longer incubation.
And if you’re wondering whether you need a special buffer for the soak, the answer is no. Straight 10 % methanol in water does the job. Keep a small vial handy; you’ll thank yourself when those faint bands finally pop.
Mixing tips that save you from clumps
Clumps are the bane of any staining protocol. To avoid them, add the powder to the acid slowly while stirring, not the other way around. If you see specks, let the solution sit for a minute, then give it another gentle swirl. A quick visual check – the solution should be uniformly pink, not speckled.
Store any extra solution in a dark bottle at 4 °C. It stays good for a week or two, but label it clearly. Speaking of labeling, don’t forget to print durable, water‑resistant tags for your reagents. custom lab labels are cheap, stick well, and survive the occasional splash.
Now that your reagents are ready, you can move on to the actual staining. But before you do, here’s a visual aid that walks you through the whole mixing process.
Watching that video while you stir helps you spot the right color and texture. It’s like having a lab mate double‑checking your work, without the coffee breaks.
Once you’ve got the solution, you’re set to stain. If you ever need a refresher on how this fits into the larger western blot workflow, check out our Western blot troubleshooting guide. It ties the staining step into the whole picture, from transfer to detection.
Step 2: Run SDS‑PAGE and Fix Gel
Now that your Ponceau S solution is ready, it's time to actually separate the proteins on a gel. Running SDS‑PAGE might sound like a ritual you have to memorize, but think of it as a simple kitchen recipe – you just need the right ingredients, timing, and a little patience.
First, gather your pre‑cast polyacrylamide gel or pour a fresh 12% gel if you prefer custom thickness. Make sure the gel sits flat in the electrophoresis tank and that the buffer chambers are filled with freshly prepared 1× SDS‑PAGE running buffer. A quick visual check for bubbles can save you from a weird streak later.
Load your sample wells with 5‑10 µL of protein mix, using a low‑retention pipette tip to avoid wasting precious sample. If you're working in a CRO or a busy academic core, you might be loading dozens of lanes – label each tube on the side of the tank so you don’t mix up the order.
Set the power supply to 120 V constant voltage for a typical mini‑gel. You’ll see the dye front migrate steadily; once it reaches about two‑thirds of the gel length, reduce the voltage to 80 V to finish the run without overheating. This step keeps the bands sharp, especially for low‑abundance proteins.
While the run finishes, you can prep the gel‑fixing solution. A common fix is 10% methanol and 10% acetic acid in water. Mix equal parts methanol and acetic acid, then dilute to 100 mL with distilled water. The fix not only immobilizes the proteins but also removes SDS that could interfere with downstream staining.
When the electrophoresis is done, turn off the power and carefully remove the gel cassette. Place the gel in a shallow tray and pour enough fixing solution to fully cover it. Let it sit for 10 minutes – you’ll notice the gel becomes slightly opaque, a sign the proteins are locked in place.
Now, rinse the gel three times with deionized water for 5 minutes each. This washes out excess methanol and acetic acid, which otherwise would create background when you later apply Ponceau S. A quick shake between rinses helps the water reach every corner.
If you’re a visual learner, this short video walks through the entire electrophoresis and fixing workflow, highlighting the little tricks we’ve picked up from years of troubleshooting.
Notice how the video pauses just before the fix step – that’s the sweet spot to add your methanol‑acetic acid mix without disturbing the gel. Once the fix is complete, you’re ready to stain with Ponceau S and instantly see whether your transfer worked.
A quick sanity check before staining: dip a corner of the gel into the stain for 5 seconds. If the pink color appears evenly, your fixation was successful. If you see patchy staining, double‑check that you rinsed thoroughly and that the fixing solution was freshly prepared.
Tip: For labs that run multiple gels back‑to‑back, keep a spare fixing solution in a labeled bottle. We’ve seen CROs avoid cross‑contamination simply by using a dedicated 500 mL reservoir that never sits open for more than a day.
Finally, store the fixed gel in a sealed plastic bag at 4 °C if you can’t move on to staining right away. The gel remains stable for up to 24‑hours, giving you flexibility when the bench gets crowded.
With the gel fixed and ready, the next step – Ponceau S staining – becomes a breeze. You’ll appreciate the contrast boost, especially when you’re probing low‑expressed targets in a clinical sample or a plant extract.
Step 3: Apply Ponceau S Stain (Video Demonstration)
Alright, the gel's fixed, the membrane's ready – now it's time for the moment most of us live for: watching those pink bands pop into view. If you’ve ever felt that little surge of relief when the stain hits just right, you know why we call this step the “wow” part of the ponceau s staining protocol.
Gather your stain and tools
Grab the 0.1 % Ponceau S solution you prepared earlier, a shallow staining tray, and a pair of tweezers. For larger membranes, a shallow dish the size of a pizza box works surprisingly well – you’ll avoid having to fold the membrane.
Pro tip: If you’re running multiple blots in a row, keep a spare bottle of freshly made stain on hand. A quick dip test (10 seconds) will tell you if the dye has lost its punch.
Step‑by‑step staining
1. Submerge the membrane fully in the stain. You’ll see the pink hue creep over the surface within seconds.
2. Gently rock the tray back and forth. This keeps the solution moving and prevents uneven spots.
3. Watch the time. One minute is enough for strong bands; five minutes gives a deeper color if you’re hunting low‑abundance proteins. Set a timer – you don’t want to over‑stain and waste the next rinse.
4. When the bands look bright enough, lift the membrane with tweezers and give it a quick shake over the sink to remove excess dye.
Does the stain look faint? That’s a cue to extend the incubation by a minute or two. Too dark? A brief rinse in 5 % acetic acid will tone it down without erasing the pattern.
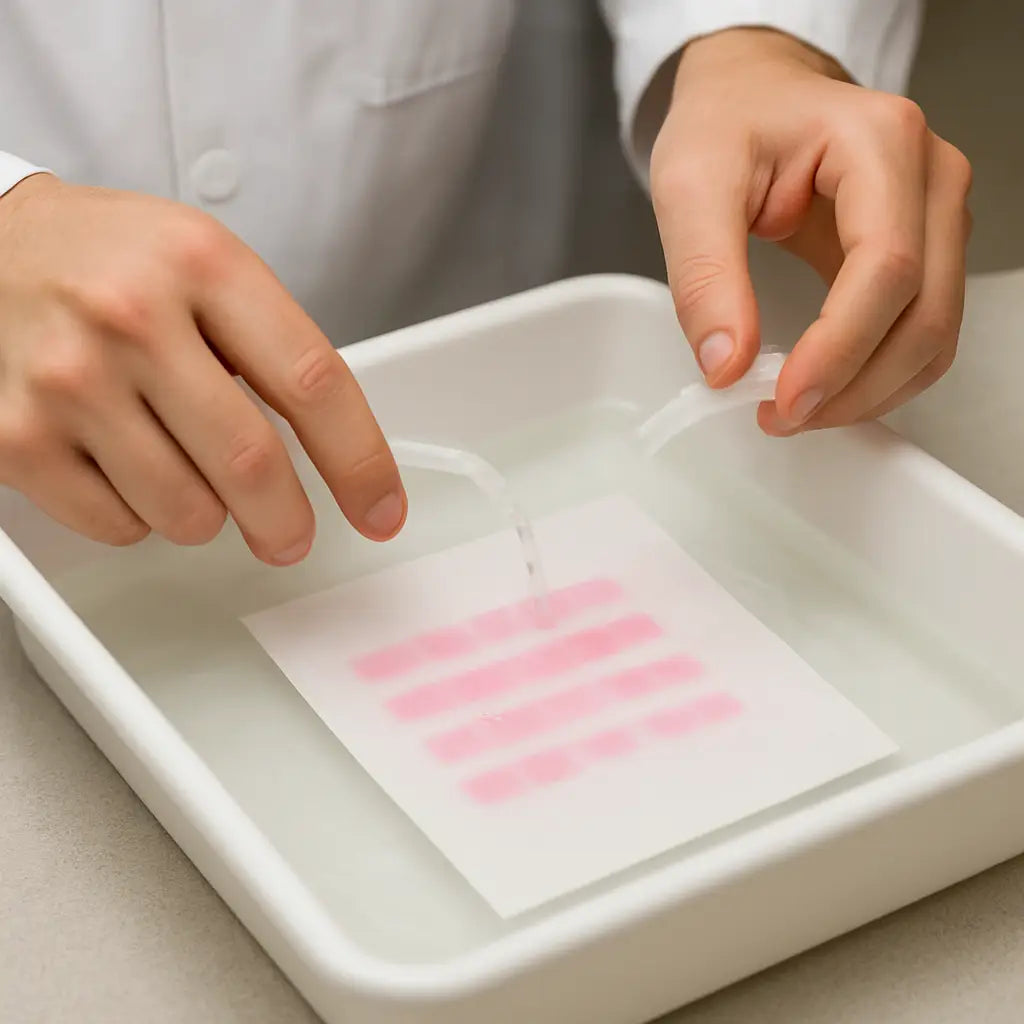
Rinse and inspect
Place the membrane in a fresh beaker of distilled water. Swirl gently for 30 seconds, then repeat with a second beaker. You should see the background fade to a clear canvas while the bands stay pink.
If any ghostly smears linger, a short dip (10 seconds) in 0.1 % Tween‑20 in PBS will clean them up. This extra step is especially useful for CROs that run high‑throughput blots where background can quickly become a nightmare.
Quick sanity check
Hold the membrane up to a light source. The bands should be crisp, with clean edges and uniform intensity across the lane. If a lane looks lighter, double‑check that the sample was loaded correctly or that the transfer buffer wasn’t overloaded.
For anyone buying a reliable reagent, we’ve found the high‑quality Ponceau S solution from Rockland to be a solid choice. It’s priced competitively and comes with a certificate of analysis, which can be reassuring for regulated labs.
What to do next?
Now that you’ve visualized the protein distribution, you can decide whether to proceed to antibody incubation or repeat the transfer. The beauty of the ponceau s staining protocol is its reversibility – a few washes with TBST will wipe the pink away, leaving the membrane ready for detection.
In practice, we often snap a quick photo of the stained membrane, label it with the gel name, and archive it alongside the raw data. This tiny habit saves a lot of “where did those bands go?” moments later on.
So, grab that tray, dip, rock, rinse, and let the pink guide your next experiment. You’ve earned a clear view of your proteins – now go ahead and blot with confidence.
Step 4: Destain and Visualize Bands
Now that the pink has shown you where every protein landed, it's time to wipe the dye away so the membrane is ready for antibody work.
The destaining step feels a bit like cleaning a window after a storm – you want the glass crystal‑clear without scrubbing away the view.
Rinse with TBST or PBST
Grab a clean beaker of 0.1 % Tween‑20 in TBS (TBST) or plain PBS with 0.1 % Tween‑20 if you prefer. Submerge the membrane and give it a gentle shake for 5 minutes. If the background is still pink after the first round, repeat the wash once more. The detergent pulls the Ponceau molecules off the nitrocellulose while leaving the proteins stuck.
Why not use plain water first? A quick dip in distilled water for 30 seconds can strip most of the dye, especially if you used a short stain time. Follow that with the TBST rinse to get rid of any stubborn pink residue. You’ll see the membrane turn almost transparent, but the protein spots stay faintly pink – a good sign they’re still there.
Now hold the membrane up to a bright transilluminator or a handheld LED. The bands should appear as crisp, pink silhouettes against a nearly white background. If a lane looks lighter than the others, think about loading errors or uneven transfer pressure – it’s a clue, not a catastrophe.
What should you look for?
- Uniform pink intensity across each lane.
- Sharp, defined edges with no smearing.
- No lingering pink haze in the background.
If everything checks out, snap a quick photo. Use a smartphone or a lab camera, place the membrane on a dark surface, and capture the image with the light source behind it. Label the file with the gel name, date, and any notes about the staining time. This tiny habit saves you from “where did those bands disappear?” moments later.
Pro tip for busy labs: keep a reusable staining tray with a built‑in drain. It lets you flip the membrane from stain to rinse without juggling multiple dishes, saving precious bench space.
Quick Destaining Checklist
- Prepare fresh TBST (0.1 % Tween‑20 in TBS).
- Rinse in distilled water for 30 seconds.
- Soak in TBST for 5 minutes, shake gently.
- Repeat TBST soak if background remains pink.
- Inspect under a light source; bands should be crisp.
- Photograph and label the membrane.
That’s it – you’ve destained and visualized the bands, and you’re ready to move on to primary antibody incubation. The membrane is clean, the protein pattern is locked in your mind, and you can proceed with confidence knowing the transfer worked.
Step 5: Document, Quantify, and Store Gel
Now that you’ve destained and checked the bands, the next thing most labs skip is actually recording what they just saw. Trust me, that tiny habit can save you days of head‑scratching later.
First, snap a quick photo. A smartphone works fine – just place the gel on a dark, non‑reflective surface, turn on the transilluminator, and capture the image. Make sure the whole lane fits in the frame; you’ll thank yourself when you need to compare intensity across runs.
Second, label that file immediately. Include the gel name, date, buffer composition, and any notes about stain time. A naming convention like GelA_20260103_Ponceau_5min.jpg keeps everything searchable.
But a picture alone isn’t enough if you want to quantify band intensity later. Open the image in a free analysis tool – ImageJ (FIJI) is a favorite because it’s open source and works on Windows, macOS, and Linux.
Here’s a quick run‑through:
Quantify with ImageJ
1. Load the JPEG, set the scale (if you captured a ruler), and convert to 8‑bit grayscale.
2. Use the “Rectangular” selection to draw a box around each lane, then run “Analyze → Measure”. The mean gray value gives you a proxy for band intensity.
3. Export the results as a CSV and paste them into your lab notebook or a spreadsheet.
Do you ever wonder why two blots that look similar on the membrane give different signal later? Those numbers can reveal subtle loading differences before you even start the antibody incubation.
Storing the Gel Safely
After you’ve captured the image and logged the numbers, you need to keep the physical gel in good shape. Most labs store gels in sealed plastic bags at 4 °C for up to 24 hours. If you need longer storage, a freezer at –20 °C works, but remember to wrap the gel in aluminum foil to block light.
For high‑throughput core facilities, we’ve seen people use dedicated gel racks that fit inside a standard 4 °C fridge drawer. The racks keep gels upright, preventing them from sticking together or absorbing moisture.
And don’t forget to write a brief note on the outside of the bag – something like “fixed, Ponceau‑stained, ready for blot” helps anyone who pulls the gel out later.
So, what’s the minimum checklist you should follow after each run?
Quick Checklist
- Capture a clear, well‑lit photo.
- Rename the file with gel ID, date, and stain time.
- Quantify band intensity in ImageJ and save the CSV.
- Store the gel in a sealed bag at 4 °C (or –20 °C for longer).
- Label the bag with a brief description.
Having that record in front of you makes troubleshooting a breeze. The next time you see a faint band, you can pull up the CSV, compare the numbers, and decide if you need to load more protein or adjust the transfer time.
Below is a quick reference table that sums up the three main documentation steps.
| Step | Tool/Method | Key Tips |
|---|---|---|
| Photo | Smartphone + dark surface | Use consistent lighting; include a ruler. |
| Quantify | ImageJ (FIJI) | Set scale, convert to 8‑bit, export CSV. |
| Store | Sealed bag + fridge/freezer | Label bag, keep gel upright, wrap in foil for –20 °C. |
That’s it – a simple routine that turns a fleeting pink gel into a permanent piece of data you can trust. Next up, you’ll move on to primary antibody incubation armed with confidence that you’ve captured every detail of the transfer.
Conclusion
We've walked through every step of a reliable ponceau s staining protocol, from fresh reagent prep to snapping a clean photo of your gel.
So, why does this matter? Because a quick pink check saves you hours of wasted antibodies and lets you spot transfer hiccups before they become costly experiments.
Remember to:
- Mix 0.1 % Ponceau S in 5 % acetic acid fresh or protect it from light.
- Stain for 1‑5 minutes, then rinse until the background disappears.
- Capture a well‑lit image, rename it with gel ID and date, and quantify with ImageJ.
- Seal the fixed gel in a labelled bag at 4 °C (or –20 °C for longer storage).
In our experience, labs that adopt this routine see a noticeable drop in repeat blots and a smoother move to antibody incubation.
Got a busy CRO or a tight academic schedule? Treat the checklist like a lab habit – a few seconds each run, and you’ll always have that reliable reference point when troubleshooting later.
Next time you stare at a blank membrane, you’ll know exactly how to turn that uncertainty into a confident, documented result. Happy blotting!
Finally, keep your inventory tidy – a labeled bottle of Ponceau S from Shop Genomics stays stable for weeks, and the free shipping on bulk orders means you never run out mid‑experiment. A small step like that keeps your workflow smooth and your data trustworthy.
FAQ
What is the purpose of a ponceau s staining protocol?
In short, it gives you a quick visual check that proteins actually made it onto the membrane before you waste antibodies. The pink dye binds to all proteins, so you can spot transfer gaps, overloaded lanes, or membrane tears in seconds. That early confidence lets you pause, fix the problem, and avoid costly repeat blots.
How do I prepare a 0.1% ponceau s solution?
Weigh out 100 mg of ponceau s powder, add 95 mL distilled water, then top with 5 mL glacial acetic acid. Stir gently until the colour is uniform – no clumps. Store the solution in an amber bottle at 4 °C, protected from light, and it stays usable for about a month. If the colour fades, just make a fresh batch.
How long should I stain the membrane and what signs tell me it’s ready?
Usually 1–5 minutes is enough. Start checking after the first minute; you should see a faint pink outline of each lane. If the bands look crisp and the background is still mostly clear, you’re good. Longer staining deepens the colour, which helps with low‑abundance proteins, but don’t go beyond 5 minutes or the background will get messy.
What are common reasons for a faint or uneven stain?
First, the stain solution might be too old or exposed to light – the dye loses potency. Second, insufficient rinsing after the gel fix step can leave salts that mask the dye. Third, uneven transfer pressure or overloaded wells can produce patchy protein distribution. A quick test strip before each blot helps you catch these issues early.
Can I reuse the ponceau s solution for multiple blots?
Yes, you can typically reuse the same batch for up to three blots if the colour stays strong. After each use, filter the solution through a 0.45 µm syringe filter to remove debris, then keep it sealed in the amber bottle. When you notice the pink fading or background getting cloudy, it’s time to prepare a fresh solution.
How should I document and store the stained membrane?
Snap a well‑lit photo right after rinsing, label the file with the gel ID, date, and stain time. Then place the membrane in a labeled zip‑lock bag and store it at 4 °C for up to 24 hours, or at –20 °C for longer storage (wrapped in foil to block light). This habit makes later troubleshooting a breeze.
Is the ponceau s stain reversible before antibody incubation?
Absolutely. A brief wash with TBST or PBST for 5 minutes removes the pink dye without disturbing the bound proteins. You can even do a quick water dip first to speed up removal. Once the background is clear, the membrane is ready for primary antibody incubation, and you’ve saved both time and reagents.


