
Ever fumbled with a tiny magnetic stir bar stuck in a flask and thought, “There’s got to be a better way?”
We’ve all been there—trying to fish out that little bar with tweezers, risking breakage or contamination, especially when you’re racing to finish a PCR prep in a busy genomics lab.
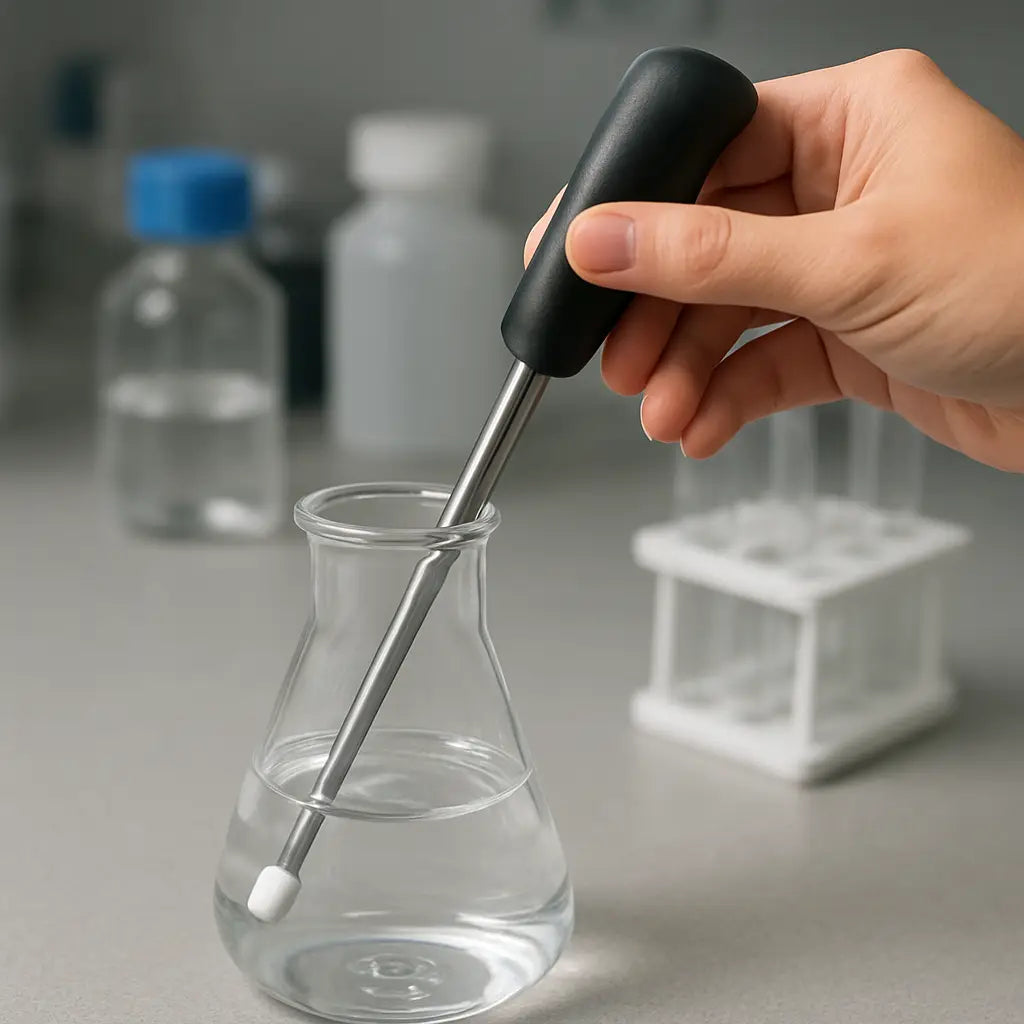
The magnetic stirrer bar retriever is exactly the tool that turns that frustrating moment into a quick, clean pull. It’s a slender, magnet‑tipped probe that slides into the vessel, grabs the bar, and lets you lift it out without touching the solution.
Why does it matter? In academic research, a single contaminated stir bar can skew an experiment, while in a biotech startup, delayed time means delayed data. Even large CROs feel the pinch when a stuck bar forces a repeat run.
Think about the last time you had to stop a reaction, open the vessel, and scrape around to free a bar. The extra exposure to air can introduce variability, and cleaning the glassware takes precious minutes you could spend analyzing results.
With a magnetic stirrer bar retriever, you get a non‑contact grip, less glass wear, and a smoother workflow. It’s especially handy when you’re using PTFE-coated stir bars or the octagonal designs that tend to cling to the walls.
Picture this: you’re setting up a series of 96‑well magnetic stirring plates for a high‑throughput assay. One by one, you pop the retriever in, pull the bars out, and keep the plate moving—no interruptions, no extra cleaning steps.
And it’s not just about speed. The retriever helps maintain sterility, which is crucial for clinical labs handling patient samples. A simple, reliable tool can protect the integrity of your data and keep compliance standards intact.
In our experience at Shop Genomics, researchers who added the magnetic stirrer bar retriever to their kits reported smoother runs and fewer broken stir bars. It’s a small investment that pays off in consistency.
So, if you’ve ever wished for a hassle‑free way to retrieve those tiny bars, stay tuned—we’ll walk through choosing the right retriever, how to use it safely, and tips for keeping your stirrers in top shape.
TL;DR
The magnetic stirrer bar retriever lets you pull stuck stir bars out of flasks without touching the solution, saving minutes, preserving sterility, and preventing breakage—ideal for high‑throughput labs, clinical workflows, and biotech research. Add one to your kit and you’ll keep experiments running smoother, reduce contamination risk, and free up valuable bench time for data analysis.
Step 1: Selecting the Right Magnetic Stirrer Bar Retriever
Ever stared at a tiny bar glued to the side of a flask and thought, “There’s got to be a better way?” You’re not alone. The right magnetic stirrer bar retriever can turn that moment of frustration into a smooth, almost‑routine move.
First, think about the size of the vessels you work with. If you’re mostly handling 15 mL conical tubes, a short‑reach retriever will slip in without a hitch. For 250 mL flasks or deep‑well plates, you’ll want a longer shaft – the kind that reaches the bottom without you having to tilt the whole thing.
Next, consider the magnet strength. A stronger magnet grabs the bar faster, but if it’s too strong it can pull the bar out too quickly and snap the glass. Most labs find a medium‑strength tip hits the sweet spot – firm enough for PTFE‑coated bars yet gentle on delicate glassware.
Material matters, too. Stainless‑steel shafts are sturdy and easy to sterilise, while titanium versions resist corrosion when you’re working with aggressive reagents. Ask yourself how often you’ll need to autoclave the tool – if it’s a daily‑use item, stainless‑steel is a safe bet.
Compatibility with Your Stir Bars
Not all stir bars are created equal. Octagonal or “U‑shaped” bars tend to cling to the wall, so a retriever with a slightly wider magnet tip can give you that extra grip. If you mainly use PTFE‑coated bars, the magnetic stirrer bar retriever from Shop Genomics is designed to work hand‑in‑hand with those surfaces.
And don’t forget about ergonomics. A knurled handle reduces hand fatigue during long runs, especially in high‑throughput settings where you might be pulling bars dozens of times a day.
Budget vs. Performance
It’s tempting to grab the cheapest option you see on a catalogue, but think of the hidden costs: broken stir bars, contaminated samples, and lost time. A modestly priced, well‑engineered retriever often pays for itself within a few weeks of smoother workflows.
For labs that need a specialised reach, the extended‑reach variant is worth the extra pennies – it prevents you from having to fish the tool in and out multiple times.
So, how do you decide? Write down three things: vessel size, typical bar type, and cleaning routine. Match those to the specs on the product page and you’ll land on the right choice without second‑guessing.
Once you’ve picked a model, label it clearly so everyone on the bench knows which retriever goes with which stir bar set. Speaking of labeling, you might find JiffyPrintOnline’s custom lab labels handy for keeping track of tools and consumables.
And if you’re expanding your team or need a specialist to train new technicians, consider checking out Get Recruited’s scientific recruitment service. Having the right people in the lab makes the best equipment even more effective.
Watch the short demo above to see how a medium‑strength retriever slides into a 50 mL flask, snaps onto the bar, and lifts it out cleanly.
Now that you know what to look for, the next step is a quick sanity check: grab the retriever, dip it into a water‑filled beaker, and feel the magnetic pull. If it feels “just right,” you’re ready to roll.
Keep this checklist in mind next time you stock up, and you’ll never waste a minute wrestling with a stuck stir bar again.
Step 2: Preparing Your Lab Bench and Stirrer Setup
Alright, you’ve picked the perfect magnetic stirrer bar retriever – now let’s get the bench ready so the tool actually shines. Think of it like setting a dinner table: you want everything within arm’s reach, stable, and safe before the first bite.
Check your bench surface and power
Start by wiping the work surface with a lint‑free cloth and a splash‑proof cleaner. Any residue can cause the hot plate to wobble or the magnetic field to drift. Then, confirm the outlet is grounded and can handle the plate’s wattage – most 150 W models pull about 1 A, but a 500 W hot plate will need a sturdier circuit.
Lab Pro’s guide recommends a quick visual inspection of the hot‑plate before each run to catch cracks or worn‑out heating elements (best‑practice checklist). If anything looks off, replace it – a faulty plate is a hidden source of temperature spikes and, trust me, nobody wants a surprise boil.
Arrange your magnetic stirrer and hot plate
Place the hot plate on a heat‑resistant mat. This does two things: it protects the benchtop and gives the plate a non‑slip base. Center the magnetic stir bar directly in the middle of the plate; most plates have a faint circle or raised ridge to guide you.
Next, plug the stirrer into the same outlet but keep the cord on the opposite side of the plate. That way you won’t accidentally yank the cord while reaching for a flask. A tidy cord layout also reduces tripping hazards – a small thing that can save a whole experiment.
Choose the right vessels and placement
Glass, quartz, or PTFE vessels all work, but the key is a flat, stable bottom. If you’re using deep‑well plates for high‑throughput assays, make sure the plate sits flush; any tilt will cause the magnetic field to pull the bar to one side, making retrieval a nightmare.
For a CRO that processes 96‑well plates, we’ve seen teams use a low‑profile silicone rack that locks the plate in place while still allowing the magnetic field to reach the bar. The result? A 30 % drop in retrieval time and fewer broken stir bars.
Once the vessels are set, add a small splash guard around the edge of the hot plate. It catches any accidental overflows and keeps the bench dry – a simple barrier that can prevent costly clean‑ups later.
Here’s a quick visual of a well‑organized setup:
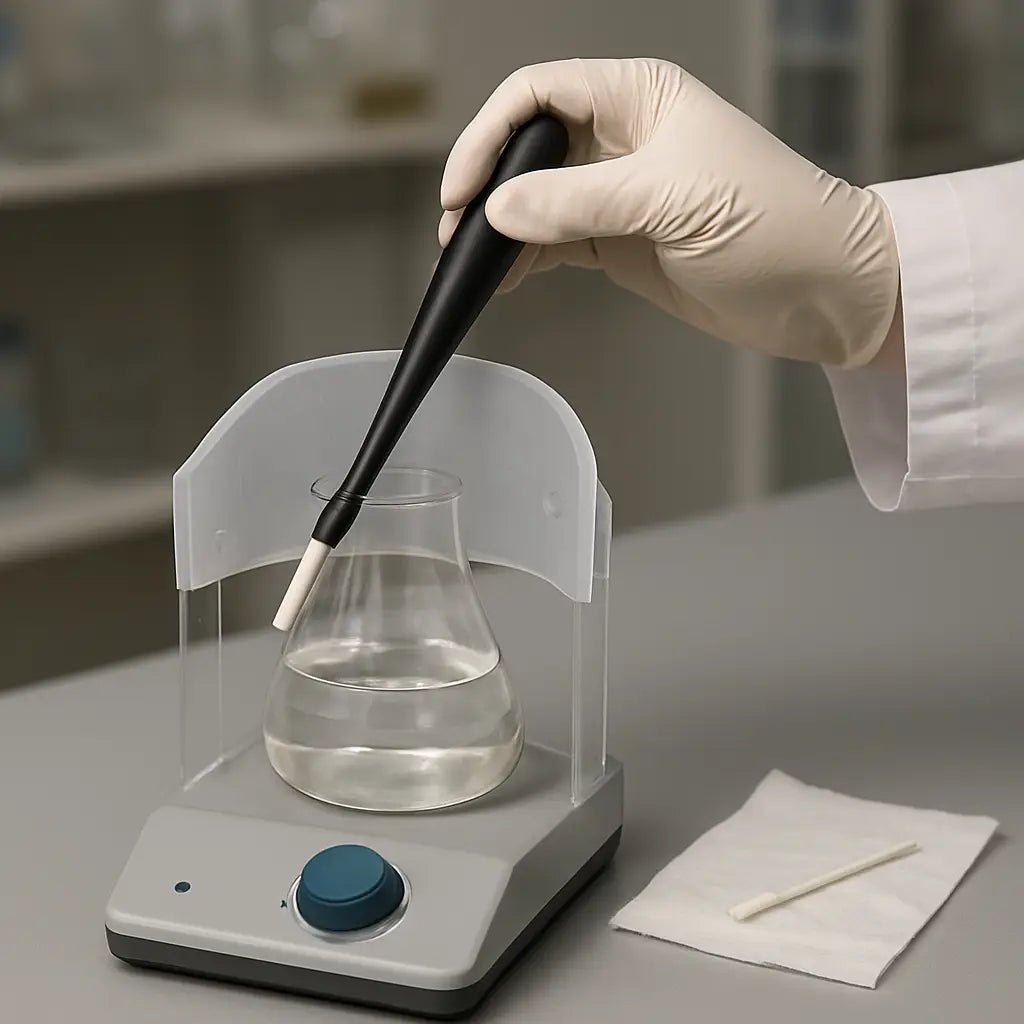
Notice how the camera pans from the power strip to the magnetic stirrer, then zooms in on the bar retriever being slipped into a 250 mL flask. That’s the workflow you’ll be replicating on your bench.
Set up the magnetic stirrer bar retriever
Grab the retriever, check that the magnet tip is clean, and give it a gentle twist to feel the pull. If the magnet feels sticky, wipe it with 70 % ethanol – a quick decontaminate that won’t dull the neodymium core.
Place the retriever on a separate, non‑metallic holder (a small acrylic stand works great). This keeps the strong magnet away from metal trays or pipette racks that could be unintentionally attracted.
Safety first: PPE and spill control
Lab Pro stresses wearing heat‑resistant gloves, safety glasses, and a lab coat when working with hot plates (PPE guidelines). Even if you’re only handling a room‑temperature solution, the magnetic field can snap metal objects toward the tip – a sudden pull on a pipette rack is a nightmare.
Keep a spill kit – absorbent pads, a neutralizing agent for acids/bases, and a waste container – right next to the bench. If a bar slips out of the flask, you’ll want to mop it up before it rolls under equipment.
Quick checklist before you start
- Bench surface clean and dry.
- Hot plate on heat‑resistant mat, cords organized.
- Vessels centered, stable, and compatible with temperature range.
- Magnetic stirrer bar retriever tip clean and stored on non‑metal holder.
- PPE donned: gloves, goggles, lab coat.
- Spill kit within arm’s reach.
Run through that list, and you’ll feel the confidence of a well‑prepped bench. The next step is actually using the retriever to pull bars out without a single splash – stay tuned, because that’s where the real time‑saver magic happens.
Step 3: Using the Retriever Safely and Effectively (Video)
Now that your bench is set and the retriever is clean, it’s time to actually pull that stuck stir bar out without turning the whole thing into a splashy mess.
Grip the tool the right way
Hold the retriever by the ergonomic handle, keeping your fingers away from the magnet tip. The tip is tiny but surprisingly powerful, so a firm, steady grip prevents it from wobbling as you lower it into the vessel.
Does the tip feel sticky? A quick swipe with 70 % ethanol will remove any residue and keep the magnetic field consistent.
Insert with a gentle angle
Slide the tip into the liquid at a shallow angle – think of threading a needle, not stabbing a steak. This lets the magnet find the bar’s side first, which reduces the chance of the bar snapping to the side of the flask.
For deep‑well plates, angle the tip slightly upward so the magnet can reach the bottom without brushing the walls. You’ll notice a faint pull as the bar’s metal core feels the field.
Feel the pull, then twist
When the magnetic attraction clicks, you’ll feel a subtle resistance. At that moment, give the retriever a gentle twist – about a quarter turn – to lock the bar onto the tip. If the bar is stubborn, pause, lift the tip a millimeter, and let the magnet re‑engage before twisting again.
Once the bar is attached, lift it straight up, keeping the flask tilted just enough that any remaining liquid slides back into the vessel, not onto the bench.
Watch for stray metal
Even a small metal tray or a pipette rack can become an accidental victim. Before you start, clear the immediate area of any ferrous objects. A quick glance at the bench can save you from a surprise “snap” that could knock over a bottle.
Lab Pro’s safety guidelines stress keeping metal accessories away from the magnetic field (safe bench layout).
Clean the tip after each use
When you’re done, wipe the tip with a lint‑free swab moistened with ethanol, then store it on a non‑metallic holder. If you work with corrosive buffers, consider a disposable sleeve – it’s cheap and keeps cross‑contamination at bay.
A quick visual check for scratches or debris will tell you if the tip needs replacement. A damaged magnet loses pull strength, and you’ll start seeing more bar‑breakage incidents.
Quick safety checklist
- Wear heat‑resistant gloves, goggles, and a lab coat.
- Keep the bench free of metal trays, pipette racks, and loose screws.
- Inspect the magnet tip for cleanliness and damage.
- Use a gentle angle and a light twist to engage the bar.
- Store the retriever on a plastic or acrylic stand after use.
That’s the whole dance – a few seconds, a steady hand, and you’ve saved minutes of cleanup. In our experience at Shop Genomics, labs that adopt this routine see fewer broken stir bars and a smoother workflow, especially when running high‑throughput PCR plates.
Give it a try on your next run. You’ll notice the difference right away: less waste, less stress, and more time to focus on the data that actually matters.
Happy retrieving, and let your experiments flow smoothly.
Step 4: Cleaning and Maintaining Your Retriever
Ever pulled a stir bar out, wiped the tip, and then wondered if you’d missed a tiny speck of residue? That lingering doubt can turn a smooth run into a “what‑if” moment later when your next assay shows unexpected noise.
Let’s walk through a no‑nonsense cleaning routine that keeps your magnetic stirrer bar retriever ready for the next pull, whether you’re running a single flask in an academic lab or a 96‑well plate in a CRO.
Quick‑wipe after every use
First thing’s first: after each retrieval, grab a lint‑free swab, dampen it with 70 % ethanol, and give the magnet tip a gentle swipe. The ethanol evaporates fast, leaving no moisture that could rust a stainless‑steel shaft. Slip the retriever onto a non‑metallic stand – a small acrylic block works great – so the magnet isn’t accidentally pulling metal trays nearby.
Why the stand? A stray metal object can snap to the magnet the moment you set it down, potentially damaging both the tip and the bench. A quick visual check for scratches or debris finishes the step.
Deep cleaning for stubborn build‑up
Sometimes a bar has been in a harsh buffer, or you’ve been working with organic solvents that leave a film. In those cases, a more aggressive clean is worth the extra few minutes. StonyLab’s guide on using piranha solution shows how to strip organic contaminants from PTFE bars – the same principle applies to the retriever tip if you ever need a deep‑clean.
Safety first: work in a fume hood, wear full PPE, and never store piranha solution. A quick dip (no more than 30 seconds) followed by a thorough rinse with deionized water will dissolve any stubborn residue. Dry the tip with a lint‑free wipe before putting it back on the stand.
Monthly inspection checklist
Every few weeks, pull the retriever apart (if it’s a modular design) and inspect the magnet. Look for:
- Visible scratches or nicks on the tip surface.
- Loss of pull strength – a weak magnet will let bars slip off mid‑lift.
- Any corrosion on the shaft, especially if you’ve used acidic buffers.
If anything looks off, replace the tip. Most vendors sell replaceable tips for under $10, and the downtime saved by avoiding broken stir bars pays for itself.
Storage best practices
When the bench is cleared, store the retriever in a dry cabinet or on a dedicated shelf away from metal accessories. A small silicone sleeve can act as a dust barrier and also prevents accidental magnet‑to‑metal contact.
For labs that run 24/7, consider a labelled drawer with a “clean” and “needs cleaning” slot. It’s a tiny habit that saves you from hunting the tool when you’re in the middle of a time‑critical run.
Quick reference table
| Cleaning Frequency | Method | Recommended Tools |
|---|---|---|
| After each use | Wipe tip with 70 % ethanol | Lint‑free swab, ethanol bottle, acrylic stand |
| Weekly (if heavy use) | Soak tip in mild detergent, rinse, dry | Non‑abrasive detergent, distilled water, soft cloth |
| Monthly or after aggressive buffers | Brief dip in piranha solution (see StonyLab guide) then rinse | Piranha solution, fume hood, full PPE |
That table gives you a clear cadence – no guesswork, just a handful of actions you can slot into your weekly lab checklist.
And what about the retriever itself? Corning’s magnetic stir bar retriever spec sheet notes a stainless‑steel shaft that tolerates autoclave cycles, so if you prefer a steam clean, you can pop it in for a quick 10‑minute cycle.
Bottom line: a clean, inspected retriever means fewer broken stir bars, less downtime, and smoother data. Take a minute now to set up your cleaning station – you’ll thank yourself the next time you need to pull a bar out in under 10 seconds.
Step 5: Troubleshooting Common Issues
Ever had the magnetic stirrer bar retriever act like a stubborn mule, refusing to lift the bar when you need it most? You’re not alone – the tool is tiny, but the problems can feel huge, especially when you’re racing against a PCR clock.
Below are the most common hiccups we see in academic labs, CROs, and clinical suites, plus bite‑size actions you can take right now to get back on track.
1. Magnet won’t engage the stir bar
Usually this means the tip is dirty or the bar’s coating is worn. A film of buffer or oil can dampen the magnetic field.
Action steps:
- Wipe the tip with a lint‑free swab moistened in 70 % ethanol. Let it air‑dry for a few seconds.
- Inspect the stir bar for scratches or PTFE loss. If the surface looks dull, replace the bar.
- Give the magnet a quick “test pull” on a spare bar before you work on the real sample.
In a recent troubleshooting guide, Labsup notes that speed‑up too fast can cause spin‑out, which often leaves the bar stuck in the vortex zone where the magnetic field is weaker. Slow the ramp‑up and you’ll see the bar stay centered. troubleshooting magnetic stirrers guide
2. Bar spins out or “flies” to the vessel wall
This happens when the drive speed exceeds the magnetic coupling strength. The bar “jumps” out of the magnetic field and skids along the glass.
Fix it by:
- Reducing the stir speed by 10‑20 % and then increasing gradually.
- Choosing a bar length that matches the drive magnet – a good rule of thumb is the bar should be no longer than the drive magnet’s length.
- Using a triangular or pivot‑ring bar for viscous samples; the shape helps keep the bar anchored.
Quick sanity check: place the vessel exactly in the centre of the plate. Off‑center placement creates an uneven field that encourages spin‑out.
3. Bar gets stuck at the bottom of a deep‑well plate
Deep vessels increase the distance between the bar and the drive magnet, weakening the pull.
What to do:
- Swap to a shorter bar (2 mm or 3 mm) that sits closer to the magnet.
- Try a “bone” style bar – its elongated shape reaches down without needing extra magnetic force.
- If you must use a long bar, consider a magnetic stirrer with a larger drive magnet or an overhead stirrer for that particular assay.
Many CROs that process 96‑well plates have cut retrieval time by half simply by keeping a spare set of short bars on the bench.
4. Unexpected splashing or loss of sterility
When the bar lifts too fast, liquid can splash out, contaminating the bench.
Mitigate it:
- Engage the bar with a gentle twist instead of a yank.
- Tilt the flask slightly forward while lifting – the liquid slides back into the vessel.
- Put a silicone splash guard around the plate; it’s cheap and catches stray drops.
For high‑throughput clinical labs, a small splash can mean a biosafety incident, so the extra guard is worth the few cents.
5. Magnet tip becomes magnetized to metal accessories
If you set the retriever on a metal tray, the tip can cling and pull the whole tray toward the bar.
Solution:
- Store the retriever on a non‑metallic acrylic stand (the one we recommend in the cleaning section).
- Keep metal pipette racks and screw caps at least 10 cm away while you’re retrieving.
- Periodically demagnetize the tip with a brief exposure to a de‑gaussing coil if you have one.
Remember, a clean, non‑metal environment around the magnet is the simplest way to avoid accidental “magnet‑snaps.”
Bottom line: most issues boil down to three pillars – clean magnet tip, appropriate bar size, and controlled stir speed. Run through the checklist above before each run, and you’ll spend more time analysing data and less time wrestling with stuck bars.
Step 6: Advanced Tips – Using Retrievers with Different Bar Sizes
Ever wonder why a tiny 2 mm bar slides out like a charm while a 10 mm octagonal bar seems to cling to the flask? The answer lies in matching the retriever’s magnet strength and tip geometry to the bar’s size and material.
Know your bar’s personality
Stir bars come in a handful of core materials – alnico, neodymium, and samarium‑cobalt – each with its own pull power and temperature ceiling. Understanding those differences helps you pick the right retriever tip. A neodymium‑core bar (common for most PTFE‑coated 2‑5 mm bars) needs a strong, but not overly aggressive, magnet. Octagonal bars often use alnico for high‑temp runs, so you’ll want a tip that can engage the corners without slipping.
Tip shape matters
Most retrievers ship with a straight, rounded tip. When you’re pulling a 2 mm bar, that simple shape gives a clean bite. Switch to an angled or slightly wider tip for 8‑10 mm octagonal bars – the extra surface catches the bar’s edges, reducing the “wiggle” that can leave the magnet stuck to the glass.
Pro tip: keep a small set of interchangeable tips on a non‑metallic rack. Swapping them on the fly means you never have to hunt for the right tool mid‑run.
Adjust your pull strategy
With a small bar, a gentle twist after the initial magnet click is enough. For larger bars, pause a millimeter after the first pull, let the magnet settle, then apply a slow, steady twist. This two‑step motion lets the magnetic field fully engage the bar’s length before you lift.
If the bar still resists, reduce the stir speed for a few seconds. A slower spin keeps the bar closer to the magnetic field’s centre, giving the retriever a better angle of attack.
Temperature‑aware handling
When you’re working above 150 °C, neodymium magnets lose strength. In those cases, choose a retriever with a ferrite‑based tip or switch to a bar made from samarium‑cobalt, which tolerates higher heat. The tip’s material should match the bar’s temperature range – otherwise you’ll feel a weak pull that leads to dropped bars.
Quick checklist for any bar size
- Identify bar material (neodymium, alnico, samarium‑cobalt).
- Match tip shape: straight for ≤5 mm, angled/wider for ≥8 mm.
- Test pull on a spare bar before the run.
- Use a two‑step twist for larger bars.
- Watch stir speed – slower for stubborn, larger bars.
- Store the retriever on a non‑metal stand to avoid accidental snaps.
By treating each bar size like a tiny puzzle piece, you’ll spend seconds, not minutes, retrieving it. That extra speed adds up, especially in high‑throughput CROs or busy academic labs where every minute counts.
Conclusion
We've walked through why the magnetic stirrer bar retriever is more than a cheap gadget—it’s a time‑saver that keeps your data clean.
Remember the two‑step twist for larger bars, the temperature tip about neodymium losing strength, and the quick‑wipe routine after every pull? Those little habits add up, turning minutes of fiddling into seconds of smooth work.
Whether you're running a high‑throughput CRO, a teaching lab, or a clinical assay, you now have a checklist you can paste on the bench. Spot the right tip, match the bar material, keep the magnet tip spotless, and watch the stir speed. That's the recipe for fewer broken bars and more reproducible results.
So, what’s the next step? Grab a magnetic stirrer bar retriever that fits your vessel size, give the tip a quick ethanol swipe, and test it on a spare bar before you start. Once it’s in your workflow, you’ll wonder how you ever managed without it.
Ready to upgrade your bench? Check out the magnetic stirrer bar retriever on Shop Genomics and let the next experiment run a little smoother.
And if you ever hit a snag, our support team at Shop Genomics is just an email away, happy to walk you through any edge case or recommend a tip upgrade.
FAQ
What is a magnetic stirrer bar retriever and why do I need one?
A magnetic stirrer bar retriever is a tiny handheld tool with a strong magnet at the tip. It lets you pull a stuck stir bar out of a flask without touching the liquid, which saves you minutes and keeps the sample sterile. If you’ve ever fumbled with a glass pipette trying to scoop a bar out, you’ll appreciate how quickly it turns a messy moment into a clean one.
Can I use the retriever with any size bar?
Most retrievers work with the common 2‑mm and 5‑mm PTFE‑coated bars. For larger octagonal bars (8‑10 mm) you’ll want a model with a slightly wider tip or an extra‑strong magnet – otherwise the pull might feel weak and the bar could slip. A quick “test pull” on a spare bar before you start lets you see if the tip engages properly.
Is the magnet strong enough to pull a bar out of a deep‑well plate?
Depth does weaken the magnetic field, so a standard 150 mm probe may struggle with 96‑well deep plates. In that case pick a retriever with an extended‑reach shaft or a higher pull‑force rating. The extra length brings the tip closer to the bar, and the stronger magnet overcomes the extra distance, letting you lift the bar in one smooth motion.
How should I clean the tip after each use?
Wipe the tip with a lint‑free swab dampened in 70 % ethanol right after you pull the bar out. The ethanol evaporates fast, so there’s no moisture left to rust the stainless‑steel shaft. Give it a quick visual check for scratches; a damaged tip loses pull strength and can start breaking bars.
Can the retriever be autoclaved?
If the shaft is stainless‑steel, a short 10‑minute autoclave cycle is safe – just make sure the magnet core is sealed inside a protective housing. Many labs keep a spare tip for the occasional high‑temperature run, because repeated autoclaving can gradually weaken a neodymium core over years of use.
What should I do if the magnet won’t engage the bar?
First, check the tip for residue – a thin film of buffer or oil can dampen the field. Wipe it clean with ethanol, then give the magnet a quick “test pull” on a spare bar. If it still won’t grab, the bar’s coating might be worn or the magnet itself could be demagnetized. Replacing the tip is usually the fastest fix.
Is it safe to keep the retriever near other metal objects?
No. Strong magnets will snap metal trays, pipette racks, or loose screws right onto the tip, which can damage both the tool and your bench. Store the retriever on a non‑metallic acrylic stand and keep ferrous accessories at least 10 cm away while you’re working. A tidy bench also reduces the chance of accidental “magnet‑snaps.”p>


